Get Started with ThingWorx Digital Performance Management
Destination or Printer: select Save as PDF
More Settings: In the Options, be sure the boxes Headers and footers and Background graphics are selected.
Determine Implementation and Testing Plan
Determine your DPM implementation, configuration, and testing approach, and document the plans.
01. Establish Source Control
If you anticipate a need to enhance or extend DPM functionality, a best practice is to establish DevOps (development operations) before you start development. DevOps improve communication, speed up deployment, and help minimize mistakes.
The developers working on your IoT initiative should establish the DevOps they follow. ThingWorx development is best suited for an Agile process. As a result, developers can create and iterate quickly. If your developers already have DevOps and follow a different methodology, consider how your IoT initiative fits your current processes.
Include the following in your considerations for DevOps:
- Development environments (we recommend at least four: dev, QA, test, prod Servers)
- Source control plan using standard ThingWorx import/export, Git, or SVN tools
- Naming standards
- Acceptance criteria documents and testing plans
- Connected products in the field
- End-user hardware and devices (including branding, look, and feel)
- Security requirements, organization structure, and user access
- Personnel (developers, QA, etc.)
In terms of source control, decide how you manage code and track work. Naming standards are crucial when developing with ThingWorx. It’s difficult to go back and change naming conventions once you deploy the solution.
- Git Integration with ThingWorx using Git Backup Extension PTC Communities
- ThingWorx DevOps with Jenkins PTC Communities
02. Understand How to Move DPM to Production
Enterprise deployment can be accomplished by downloading the DPM software. To move the solution between environments from QA/development to production, we recommend exporting and importing the extensions. Additionally, more direction on how to configure the infrastructure and install ThingWorx can be found in Install DPM
- Deploying DPM Help Center
- Importing and Exporting ThingWorx Help Center
03. Determine Your Testing Approach
Decide how you’ll test the solution before you deploy. First, refer to the designs for your applications, review your acceptance criteria, and confirm your development environments. Then, developers and device engineers work together to create a testing plan.
In general, we recommend the following testing:
- Unit testing: when developing, consider building in a unit testing concept to allow code to be tested separately from UI testing
- System testing: test the features and functionality of a collection of components defined by an acceptance criteria document
- Security and penetration testing: test for vulnerabilities, risks, and threats (always test with different scenarios that represent actual usage)
- Integration testing: test the edge, products, devices, and platform integrations
- Stress or load testing: test the stability of the solution and how it handles errors and load
- User acceptance testing (UAT): test with select end-users to make sure the UI meets their needs
- Deployment testing: verify the package works as expected on a staging server that represents a production configuration
Identify what testing you need to do in each of your environments. You might need additional testing that was not mentioned based on your specific solution or industry. Remember to consider security and compliance requirements at every stage.
Create a testing plan for each application. Align testing with your DevOps processes. Plan to test in a QA environment that replicates your production environment as closely as possible. Ensure that your tests replicate what it’s like in the real world; otherwise, the tests are invalid. Make it clear to your developers early that they should only write code in your dev environment (not test, QA, staging, or prod). Ensure that all developers are aligned on this. This prevents confusion and inaccurate test results later.
04. Document Testing Plan
Next, create and document the plan for how you test the solution. Be as thorough as possible. In your plan, include the following:
- Value statement
- Data sources and data flow
- Design specification
- Acceptance criteria
- Test procedure
- Environments and who has access to what
- Security requirements
- Naming conventions
- ThingWorx version or release numbers
- Results of quality assurance (QA) test
- Performance figures
- Revisions
- Software
You may not have some of this information until you start testing. As you test, add in what new information you receive and document code as you write it. If you keep your documentation concise, you find a rhythm as you move forward. Your documentation gives you evidence to solve issues and make decisions faster.
Did you find this helpful?
Design Integrations and Connectivity
Set Up Account
Table of Contents
Overview: Get Started with ThingWorx Digital Performance Management
Use this guide as you plan and implement your DPM solution. Follow step-by-step instructions and find resources to help you capture and share expert knowledge and meet your business goals.
The information is useful for:
- ThingWorx Admins
- Project Managers
- Stakeholders
- Technical Staff
- Developers
What is a Success Path?
A Success Path is an online guide to help you implement a specific PTC product at your organization. Each path provides step-by-step instructions from the early planning stages all the way through to deployment. Use a Success Path to help your organization get the most out of a product and achieve your business goals.
Did you find this helpful?
Get Familiar with Digital Performance Management
Review the top features and functionalities available in DPM.
Before you begin, complete these steps:
01. What is Digital Performance Management
Digital Performance Management (DPM) is a suite of tools to engage everyone from frontline workers to manufacturing leadership teams in focused problem-solving to unlock production efficiencies. DPM replaces outdated reporting tools and provides an operational solution to address performance issues.
DPM can be deployed quickly and help you from the start to the end of a product lifecycle.
Real-time data analysis allows teams to make fact-based investment decisions, helping to engage frontline operators.
This solution should be deployed on a pilot line at the beginning of the diagnostic of a transformation. Providing data to teams as early as possible is the keystone of a management infrastructure system that sends data throughout the operation.
02. Key Features and Functionality
DPM has many features and functionality that can help solve your business problems. The solution can:
- Perform comparisons for a machine for speed and quality issues across assets, lines, sites, etc.
- Providing outcome-based validation of transformation investments tied to actual production data confirms the value delivered
- Give thousands of operators performance understanding, not just engineers
- Help your organization leverage existing assets and performance data sources
- Identify potential performance impacts, take corrective action, and prove the value delivered
- Offer time to value in as little as 90 days with rapid implementation-focused approaches
- Accelerate time to value and provides the ability to expand
With your solution, you can take advantage of these tools:
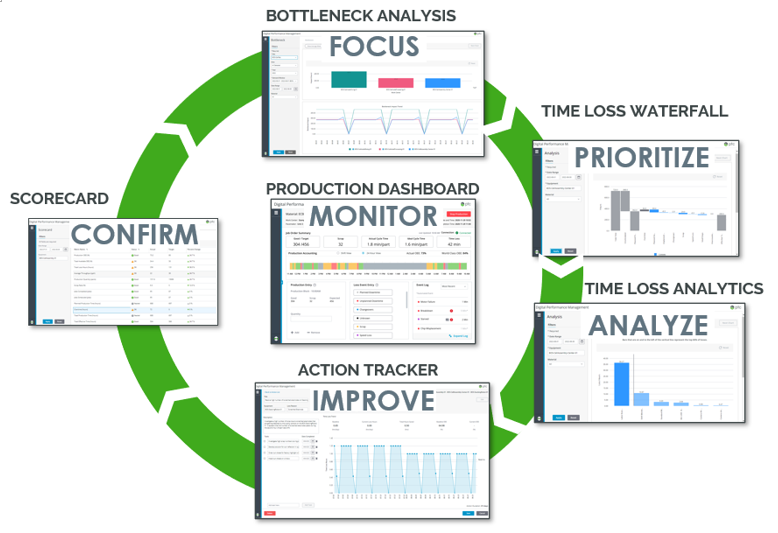
Production Dashboard
- A frontline tool that tracks production performance and collects data to inform reporting and analysis tools
- Engages operators and drives organizational accountability
Waterfall & Pareto
- An analysis tool that identifies top losses for each bottleneck and pinpoints root causes that can be solved with improvement projects
Time Loss Waterfall
- Determine where to focus the Loss Reason Pareto
Loss Reason Pareto
- Pareto identifies the top loss reason within each category and the most promising improvement initiative to increase overall equipment effectiveness (OEE)
- Actions can then be created to support the improvement of top loss reasons
Action Tracker
- A continuous improvement tool that helps provide transparency into improvement initiatives and confirm value delivered
Bottleneck
- An analysis tool that identifies and tracks the most significant bottlenecks in a factory
Scorecard
- A customized scorecard for rolling up enterprise-wide factory KPIs, such as OEE, tailored to individual role needs
- Enterprise-level roll-up and filtering for KPIs tailored to individual role needs (executive, plant management, frontline)
- Standard reports and charting
03. How Does DPM Leverage Your Factory Data?
Automated or Manual Data Entry
- Accelerate initial deployment and frontline engagement with manual data entry
- Integrate with existing automation systems to capture data in real-time
Leverages Real Data to Measure Improvements
- Link continuous improvement actions to reason codes to track improvement and OEE impact
- Use data to remove the guesswork and see how your actions have made an impact
- Translate operational impact to financial savings
Flexible Data Structure
- Import your hierarchy of regions, plants, lines, and equipment
- Handles multiple shift patterns and exceptions (such as rotating shifts and holidays)
Wrap and Extend Existing Systems
- Leverage existing IT/OT data to provide additional context
- Customizable and reusable building blocks for extensions
Additional Features
- Intuitive OOTB (out-of-the-box) user interfaces (UI)
- Support for desktops & tablets
04. How to Operationalize with PTC
Having a team with expertise in driving success with DPM at your organization is the best way to get started. This talented team should include a dedicated sales representative, customer success manager, and technical engineer. The PTC team can have a line implemented for you in 90 days. There is no additional cost for this.
What we need from you:
- Executive support to maintain momentum and adoption throughout the process
- Rapid team commitment and engagement from you:
- Executive Sponsor
- Plant Leadership
- Process SME
- Line Supervisors and Operators
Our goal is to help you realize the value of DPM at an enterprise level. We provide structured governance aligned with the core team, project management, and executive committed throughout the PoV (Proof of Value).
Together with a pre-scoped statement of work (SOW) and a PTC team moving quickly, you will realize how your organization obtains value from the solution.
There are also skilled advisors who can recommend you to the value you can receive by implementing DPM.
Recommended Resources
Mobilize Executive Team
Gather key champions to help garner support for the execution of ThingWorx Digital Performance Management.
Before you begin, complete these steps:
01. Gather Key Stakeholders
Whether your team opted for a Proof of Value or has pursued DPM on your own, gathering the critical members is key to your successful deployment of DPM. Review this list and list the people who fit these roles:
- Executive Sponsor: stakeholder(s) who can discuss broader organizational challenges, revenue, and strategic goals
- Project Champion: stakeholder(s) who can review and discuss success criteria and prioritize use cases based on importance and ease of execution
- Subject Matter Expert (SME): frontline employees who can discuss pains and challenges from an operational perspective and access metrics and KPIs used today to measure performance such as overall efficiency, throughput, FTFR (First Time Fix Rate), MTTR (Mean Time to Repair)
- Financial Representative: supporting stakeholder(s) who can provide financial data to understand how each use case impacts the business from an economic perspective (cost to train a new employee, costs associated with on-time delivery, warranty costs, returns, etc.)
02. Establish a Governance Plan
With DPM, your organization will see value in as soon as 90 days. By installing and setting up the OOTB (out-of-the-box) functionality, you can begin to see the changes in your organization. Creating a clear governance plan and structure is key to completing your first line quickly.
A governance plan refers to roles and processes within an enterprise that serve as a guideline for fulfilling, sustaining, and extending IT planning. A governance plan crosses all organizational layers, including stakeholders, administration, maintenance, strategy, policy, and support.
There are three levels of governance:
- Execution
- Responsible for doing and executing project requirements
- Program
- Responsible for how the project is executed
- Steering
- Responsible for what the project covers and why it is included
|
PROJECT TEAM |
PROJECT MANAGEMENT |
STEERING |
|
Participants |
|
|
|
|
Objectives |
|
|
|
|
Decision Rights |
|
|
|
|
Decision Maker |
|
|
|
|
Escalations |
|
|
|
|
Operating Rhythm |
|
|
|
03. Create a Communication Plan
Determine how, when, and with whom you will communicate throughout your DPM project. Your stakeholders will have different needs, depending on their role. Consider this in your communication plan.
As you plan how to communicate with your stakeholders, answer these questions:
- How frequently do you share information?
- For example, some stakeholders provide daily feedback and direction on the project. In contrast, others may get involved on a passive, less frequent basis
- What is the best channel for that information?
- For instance, emails, calls, or meetings may work for some stakeholders and not for others
- What information is most important to which stakeholders?
- Be careful to avoid communication overload
- What do you need from your stakeholders at various points along the timeline?
- Establishing key milestones or successes in these communications helps maintain momentum and excitement
Keep in mind that your stakeholders' involvement and communication needs may change over the project. Modify your approach as you go, if necessary.
Here is a sample communication schedule:
|
DAILY STAND-UP |
SHIFT REVIEW |
TWICE WEEKLY |
BI-WEEKLY |
|
Owner |
|
|
|
|
|
Attendees |
|
|
|
|
|
Duration |
|
|
|
|
|
Agenda |
|
|
|
|
|
Format |
|
|
|
|
04. Plan Feedback Mechanism
While it is critical to communicate, it is also imperative to listen. If stakeholder communication only comes from one direction, you risk overlooking valuable feedback or missing opportunities to address concerns. Instead, establish channels for soliciting and responding to feedback across your organization, and ensure stakeholders know how to get answers.
To help facilitate and elicit feedback, try one or more of the following methods:
- An open forum or team website: Provide a platform where stakeholders can ask questions and comments. Project leaders can help answer common questions across the organization
- Group email: Some employees may be hesitant to post on a public forum. To engage them, consider creating a dedicated project email inbox
- Anonymous survey: Send anonymous surveys throughout the process to gather honest feedback without the fear of repercussions
Select a feedback mechanism that easily translates for frontline workers, managers, new trainees, and project participants.
Assess Existing Enterprise Infrastructure and Processes
You can plan where you are headed by documenting your current infrastructure and processes.
Before you begin, complete these steps:
01. Review Current Technological Landscape
Start by documenting your current enterprise architecture. Think about how different parts of your organization flow together. Next, document the architecture that supports your organization’s manufacturing operations, including hardware, software, and network materials. With the assistance of a controls engineer and manufacturing IT, gather at a minimum the following information:
- Wi-Fi
- Network connectivity
- Directional data flow
- Existing KPI’s
- Networking status
- Data storage
Your equipment list defines the pieces of your operations in a hierarchical organization, from the enterprise level down to individual machines on the factory floor. The primary purpose of the equipment list is to define how data rolls up throughout your organization.
DPM supports the following hierarchy of equipment, from top to bottom:
|
EQUIPMENT TYPE |
DESCRIPTION |
|
Enterprise |
The entire company, including all factories across the globe |
|
Region |
A geographic collection of factories |
|
Site |
The entire operation is at a single site. Also known as a factory. |
|
Area |
A functional grouping of work centers within the site across all materials. Also known as a department. |
|
Work Center |
A collection of work units performing different tasks to output a common material. Also known as a line or work cell. |
|
Work Unit |
A single workstation against which loss events and production are being tracked. Also known as a machine, asset, or piece of equipment. |
While you are documenting what exists, start inquiring about what is not working today and what you would like to change in the future to support your use case.
02. Evaluate Manufacturing Processes and Map to DPM
Spend time evaluating your existing processes. First, find what causes bottlenecks and significant revenue losses. Then, consider the different parts of your manufacturing operations.
Next, evaluate how you currently analyze data. For example, are there inconsistencies in how you measure and report performance? Is the data kept separate across multiple different systems and dashboards? Can your team identify and compare losses to each other? The DPM Waterfall or Pareto Loss analysis tool helps identify the top losses for each bottleneck and pinpoint their root causes. Utilizing this information, your team can start well-informed improvement projects.
Does your current process lack visibility of shift performance? Are your standard KPIs not helping you analyze root causes? Think about your frontline workers. Are there multiple systems they must interact with that require extensive training and time for onboarding? With DPM’s Production Dashboard, your organization can improve operator engagement and drive accountability within your organization.
Once the team identifies areas of improvement, track your project’s actions thoroughly. First, evaluate your current process for action tracking. Then, determine if you can easily confirm the value. Are your essential resources appropriately allocated? Are your team’s current Industrie 4.0 investments not based on P&L impact? DPM’s Action Tracker confirms the delivered value and facilitates team huddles with continuous initiatives tracking.
Continue to review your current processes and needs. A customer success manager can help with mapping these needs.
03. Review Strategic Priorities, Goals, and Operational Challenges
Now, consider your company’s goals and priorities. Identify which factors create the most value for shareholders. Consult executives about these high-level business drivers. Important business drivers may include revenue growth, asset utilization, or margin optimization.
Discuss the following questions with your team:
- What level of performance visibility do you have today?
- How is your company’s management using performance visibility to inform decisions and prioritize improvements today?
- How would you characterize the ideal state of performance management might look like across your network?
- How does your company’s factory use performance visibility to identify and resolve problems on the shop floor today?
- What are the biggest roadblocks preventing you from achieving the level of performance management you seek for your company?
- What performance management improvement opportunities could be unlocked with a single source of truth across the enterprise?
- Does your company have a standardized way of viewing performance across lines, departments, and factories?
- Are you able to easily track returns on your initiative improvements?
- Are your operators engaged and empowered to support performance improvements?
Document your answers and prepare to map them to how they bring value to your organization.
Assemble a Team
To achieve a successful deployment, you will need an experienced team. First, determine the skill sets and experience your project team needs. Next, determine if your organization employs the right talent to meet the project's needs internally. Finally, hire external resources to bridge any gaps.
Before you begin, complete these steps:
01. Roles and Responsibilities
You will need a variety of contributors to implement DPM. The number of team members will depend on the scope of your use case. Having people on your team with experience implementing ThingWorx is a significant advantage. PTC, experienced partners, or systems integrators can often fill skill set and expertise gaps.
Although their titles may differ, typically, you will need the following team members to deploy DPM OOTB (out-of-the-box):
- Site leadership: This could be one person or multiple people, such as the site's Plant/Operations Manager and General Manager where DPM will be deployed. They will be critical to application adoption within a plant. Ideally, they are actively engaged in the project and are well-aligned with the goals.
- Line manager: This is the individual manager of the line where DPM is being deployed. This is a critical role to fill because they are a key contributor to the project's timeline.
- Continuous Improvement Lead: This person is focused on improving the efficiency of factory operations in the plant. Generally, they are focused on projects and activities that will enhance efficiency, typically measured as operational equipment effectiveness (OEE), or try to understand why overall efficiency has decreased. They are the perfect audience for DPM’s value proposition and will be critical to translating DPM data into action and tangible results.
- Operators: The operators on the line DPM is deployed on are critical subject matter experts for gathering specific metrics and ensuring the application's adoption.
- Subject matter expert(s): These are key operators and employees who can share experiences and be key users to test and validate the application. These SMEs also support go-live by training other users on the application. An example of an SME is "Automation Engineer" or "Controls Engineer". They specialize in designing, configuring, and maintaining the control systems that ensure connectivity to factory equipment (aka work units or assets), which is critical for DPM. Their responsibilities often include programming PLCs, configuring communication protocols, setting up data acquisition, and troubleshooting issues related to automation and control systems.
- IT administrator: Your IT administrator maintains your organization's IT network, servers, and security systems. They will also play a role in building and operating your ThingWorx application. Therefore, they need experience working with effective systems focused on challenges associated with high-scale connectivity.
- Business process consultant: Although not required, a business process consultant helps determine how to best connect new technology with your business processes to improve efficiency.
02. Assemble Your Project Team
Find out if your organization employs people who have the above skill sets. If so, ask the employees if they can contribute to the project. If you need to get their manager's approval, make sure to do so. While you can do most of the work remotely, team members must be on-site to gather requirements for going live.
03. Determine Outside Resources Needed
Typically, organizations hire contractors or consultants to bridge skills gaps and achieve their use cases. If internal employees are non-existent or unavailable, employ outside resources. Verify that the individuals you hire have the ThingWorx (including DPM) and Kepware experience to meet your project goals.
Customer Success Management can help you plan, implement, and measure your IoT initiative. Your PTC Customer Success Manager ensures you have the right mix of resources on your team. In addition, they will help make sure each contributor has extensive experience with the ThingWorx platform and is well suited for the role.
Recommended Resources
04. Understand Training Needs
Determine training needs based on the roles of your team. PTC has many options to help you start using DPM out of the box. First, navigate and explore DPM from the perspective of a Plant Leadership role. From this role, examine why and how you can use DPM to analyze plant production performance. Next, identify problem areas that are lowering your plant's performance. After identifying these issues, apply improvement initiatives to resolve the ones affecting your plant's performance. Finally, monitor those initiatives to bring value to your improvement plans.
While exploring these DPM tools and features, relate the plant leadership role to other plant personnel roles. Discover the effects of inter-communication between the roles for accurate plant production data recording. This training is accessible through the PTC University Learning Connector, which requires a PTC account.
Training Delivery Methods and Cost
PTC University training classes are available through a LEARN Subscription or individually. All courses are delivered online via a video conferencing application by a live instructor and attended by learners from various organizations worldwide. Upon registration, you can access the student guide for the class, and during the course you will be provided a virtual lab environment where you can practice what you learn.
To find out your purchasing options, talk to a training advisor.
Recommended Resources
- Talk to a Training Advisor PTC University
- LEARN Online Subscription PTC University
- PTC University PTC University
- Learning Connector PTC University
Plan First Line
Identify the best line to start with DPM. Then, review the steps below to help with the selection process.
Before you begin, complete these steps:
01. Review Plant Lines
To select your first line, consider picking a line where you have the most technical capabilities. Start by looking for a line with time loss, downtime, and speed loss that is unknown or unaccounted for. This line should have an identifiable pacemaker asset to focus on. The key data that is accessible is also critical to selection. For example, you should have access to the following data points:
- Job order schedule
- Job start/stop
- Material start/stop
- Production counts (including scrap)
- Downtime events (fault code mapped to reasons)
Ideally, you can access this data through Kepware automation. However, operators should also be available to enter any of those data points that are not automated. In addition, the operators should enter time hourly for data points, such as:
- Speed loss time
- Additional downtime
- Production
- Scrap
- Events
Consider when operators are available and the time necessary to participate in the first line’s deployment. The deployment should take 90 days. The selected site must understand:
- Key processes
- Loss drivers
- Theoretical capacity
- Targets
Ask your team the following questions:
- Are there well-documented process flows?
- Do we understand capacity and bottlenecks?
- Do we have clear targets set by product and line?
Recommended Resources
- Manual Data Entry and Automated Data Entry Help Center
- Setting Up Data Automation Help Center
02. Understand Existing Processes and Infrastructure
Now that you know which plant would be a good fit, it is time to move to the next steps. First, if you have not already done so, document an architecture flow diagram of the selected plant. You must understand your IT infrastructure to determine if automated data is possible and to ensure that the end-user has access to the application on the line.
Document the following details about the selected plant:
- What manufacturing category does the plant fall under, such as discrete or process?
- What are the existing enterprise software systems? First, consider all the following:
- Manufacturing execution system (MES)
- Other manufacturing/production system
- Enterprise resource planning (ERP)
- Quality
- Human-Machine Interface (HMI)/Supervisory control and data acquisition (SCADA)>
- Historian
- Existing data connectivity/maturity
- Document the following details about the selected line:
- Current automated and manual operations
- All asset/line centric details
- If there are any line specific systems
- The line-specific connectivity
- The line's layout and flow
- The line's schedule
03. Data Requirements
DPM requires a standard set of master data to configure the solution.
For process (runtime) data, DPM can source data in three ways:
- Automation integration directly to equipment
- Wrap and extend existing systems (such as MES and OEE)
- Manual data entry operator (for customers with no automation or who have paper-based solutions)
|
PLANT MODEL (Master Config) |
OPERATIONAL (Master Config) |
JOB/MATERIAL (Master Config) |
PROCESS (Runtime) |
|
Fault/Reason Codes
|
|
Asset
|
|
Labor/Shift
|
BOM
|
If your line is manual, conduct this review to plan how to account for specific data points:
- If the Automation or a third-party system does not have a job order or material start/stops
- An operator must start and stop production from the operator dashboard
- If the Automation or a third-party system does not have production counters
- An operator must manually enter production for the production block
- If the Automation/third-party system does not have scrap counters
- An operator must manually enter scrap for the production block
- If the Automation/third-party system does not have downtime data
- An operator must manually enter downtimes for the production block
Every hour (or configured production block duration), an operator must account for the remaining time by entering:
- Speed loss time
- Any additional downtimes, productions, scraps, and events
04. Gain Buy-In from Plant Personnel
Stakeholder support is a vital asset throughout your DPM project. From high-level business leaders to frontline workers, get buy-in at various levels of your organization. Your most crucial stakeholder is at the executive level. This person is a well-respected, well-connected executive champion who advocates for your initiative on an ongoing basis. Leadership and management support are essential. Your team will require full access to data and the personnel required to execute this implementation.
In addition to the people who champion DPM, you will also need end-users to test them in the real world. Identify a manageable group of workers who will test and provide feedback in the early stages of the project. These workers should represent your ideal end-users. They help you identify urgent fixes and improvement opportunities before implementing DPM on a larger scale.
Stakeholders may include:
- Corporate Executives
- IT Leaders
- Plant Managers
- Machine Operators
- End Users
You can also reference the DPM Playlists to determine stakeholders for your organization.
You can access training and tutorials for management and frontline personnel through PTC University Learning Connector. Note that a PTC login is required and can be established the first time you access the training course or tutorial.
05. Determine Costs for First Line
Before you kick off this project, gather all the costs of deploying to this initial line. This estimation provides you with an estimate of how much it will cost for multiple lines.
Calculate the final costs of:
- Equipment, such as hardware, software, and networking
- Internal and external resources required
- Any potential financial impact this project could have on your operations due to unfortunate events, such as outages and shortages
PTC recommends including a 10-15% contingency on your final budget to support unplanned costs that arise during the project.
06. Define Initial Project Scope
Defining the scope of your DPM project gives stakeholders a shared understanding of their role and the project objectives and goals. Ensure the scope is manageable for your timeline and budget and fulfills the success criteria for your use case. Plan your project in a phased approach: work toward short-term goals within your long-term plan. This phased approach generates quick wins and keeps the momentum moving forward.
07. Establish Dates and Deadlines
Establish a timeline that includes short-term and long-term goals to stay on track with your project. It should also include completion dates, milestones, key deliverables, and a rollout date. You will create a rollout plan later.
Create a Measurement Plan
Plan your problem statements aligned to strategic business goals, identify and capture operational metrics related to each, and complete the PTC Impact Canvas for these specific areas and use cases.
Before you begin, complete these steps:
01. Determine Goals and Metrics
Today, factories measure Overall Equipment Efficiency (OEE) traditionally with all the noted challenges. For example, the conventional OEE metric aggregates losses during production to a single percent to measure overall performance. However, there are inconsistencies in how lines, areas, and factories collect and calculate data. This leads to unreliable and backward-looking KPIs. Backward-looking metrics are based on how things have gone, such as profitability in the last quarter or year.

When DPM is introduced to replace old processes, the same data is leveraged, and inefficiencies become actionable improvement opportunities. In this case, you can increase efficiency through actionable lost time corrections. This lets you flexibly convert the found time into revenue, reduced costs, or increased service levels that work for your situation. Measure performance with a granular metric applicable to all levels of the organization that is easily translated to value.

02. Establish Baseline Metrics
Establishing baseline metrics helps prove that DPM had the intended effect on your organization. For example, suppose your goal is to increase operational efficiency at a specific plant. In this case, you should record the current state metrics for that plant before you deploy ThingWorx DPM.
In many cases, it is not possible to capture accurate baseline metrics. For example, your organization may not be capable of measuring the right things—but you will have deeper insight after ThingWorx DPM is in place. Other initiatives may be happening in parallel that could affect those metrics later. A high-level approximation is acceptable if the exact metric is not available or accurate. Having a reliable, clear picture of your first line is recommended, and everyone agrees that the information/data to provide this clear picture of the first line is relatively accurate.
Here are some questions you can ask about common baseline metrics you may want to consider. Choose baseline metrics that relate to your business goals:
Throughput and on-time-delivery:
- How many total parts are received per year?
- How many of these go through the incoming inspection? How many would you like to go through the incoming inspection?
- What is the bottleneck to get to the ideal state?
- How many parts are rejected on the floor?
- What is the cost per rejected part?
- How many units per line or work center are produced daily?
- What is your average cost per unit?
- What percentage of missed on-time delivery is due to inaccurate inspections, creating manufacturing delays?
- How many hours of delay occur yearly due to poor pre-production or in-line inspection?
- What is the lost revenue per hour of delay/what are the lost revenue costs associated with this percentage of missed on-time delivery?
Waste, rework, and scrap:
- What is your annual scrap rate percentage?
- What are your yearly scrap costs?
- What percentage of scrap is due to quality defects?
- How do you measure rework?
- What is the impact/cost of rework per year (total hours or dollars)?
- What percentage of these costs are associated with human error or low productivity (e.g., poor inspections)?
Downtime:
- What is the current unaccounted time (if you can identify it today)?
- How many downtime events occur every week?
- What is the gap between actual cycle time and ideal cycle time?
- What are your downtime by loss categories (for example: planned downtime, unplanned downtime, small stops, etc.)?
03. Document Measurement Plan
After you identify your goals and metrics, it is essential to document a detailed measurement plan. The measurement plan should outline the following:
- Short-term goals
- Long-term goals
- Key performance indicators and metrics
- Roles and responsibilities: who tracks and reports performance, and who needs to be informed
- Key milestones
- Baseline metrics/current state
- Other items, as needed
Share the measurement plan with stakeholders and refer to it throughout the project to ensure you are on track.
Manage Organizational Expectations
Ensure your organization is ready, willing, and able to function in a new business environment. Create a change management plan to enhance your DPM implementation and help stakeholders succeed after the change.
Before you begin, complete these steps:
01. Plan Stakeholder Involvement
The world is changing for your frontline workers, managers, and other employees using ThingWorx DPM. As a result, your workforce must adopt a new mindset, develop new skills, and learn new technologies and processes to prepare for changes. Change can be difficult, but it is necessary.
To help employees embrace change:
- Communicate changes consistently
- Listen to concerns and questions
- Encourage participation in the project
- Share the benefits that Industrial IoT brings to employees and the organization
- Obtain active and visible executive sponsorship for the project
- Dedicate resources to planning and enacting change management
- Respond positively to mistakes that occur during the learning process
- Create a plan to help your organization adapt to change
02. Create a Communication Plan
Create a communication plan to connect with internal and external stakeholders as part of your change management plan. Consider internal stakeholders such as technicians, service management, marketing, sales, and customer service employees. External stakeholders may be vendors, your customer’s customers, or contractors.
Use these questions to guide your communication plan:
- Who are your audiences?
- What does each audience care about most?
- What do they need to know to be successful?
- When do they need to know it?
- What are the existing communication channels?
- Are these communication channels effective?
- Do you need to add, remove, or change any communication channels?
- Who should deliver the message(s) for it to be effective?
- How often should each audience be communicated with?
- What do you need from your audiences at different points in time?
- How can your audiences communicate with you?
How you communicate is just as important as what you communicate. Review the following examples, and include any methodology in your communication plan that meets your needs.
- Newsletters: A newsletter is a method of communication in the form of an email or a page dedicated to your internal employee website. The newsletter often acts as an information sheet specific to the client, such as program news, new employees, upcoming events, etc., and specific programs impacted.
- Posters, Banners, Flyers: Posters, Banners, and Flyers act as a method typically posted around the client site in approved areas such as bulletin boards and wall cubicles. Usually, these methods of communication contain more visual aspects of communicating an event or a specific program update that is used to entice and capture the employees’ attention. Working closely with your marketing department for approval before posting around the site and release may be necessary.
- All Access Website: An all-access website acts as a method of communication, also known as a “One Stop Shop” that provides the end-user the ability to access various information, postings, calendar information, active links to the tools, training, documentation, etc. all from the same web page. Having an all-access website allows the end-user to access all forms of information without navigating to multiple areas, or emailing various team members to access the information they need. Be sure to include all available training from PTC and how to access it.
- Email Communications: Emails often are a form of communication that can be in the style of information bulletins and program status updates alerting the end-user community of upcoming events, changes within the program, and other program-specific information that would impact the user. It is a way to inform and engage the end-users. This is usually done on a monthly and “as-needed” basis. The program users must understand the purpose, progress, and functional changes impacting them.
- Surveys: It is recommended that surveys only be conducted quarterly or less. If you send too many surveys, the end-users may become less inclined to complete them.
- Demonstrations: Demonstrations can be executed in a few different venues. Typically, a demonstration allows the end-user to understand the changes occurring and the possible process changes. They can see the implementation of the tool in a live session. These demonstrations can be done in a formal meeting room with invited attendees or on a “walk-up” basis. Demonstrations leveraging the “walk-up” method allow users passing by to stop and see what is new and coming to the program. It is a great way to grab users who otherwise may not have time to sit in a formal meeting room demonstration. We recommend both methods. This method is vital during Hypercare and initial deployments to increase user engagement.
- Question and Answer (Q & A) Sessions: These Q&A sessions usually occur before releasing the application to the end-users and continue for a few weeks after implementation. Often, these are scheduled to occur weekly to accommodate all regions if there is a global impact on end-users. Typically, these sessions would be held for an hour and address end-user's questions. We recommend that the client be involved in this process to ensure that the presenters address all topics. As you conduct Q&A sessions, the questions and answers should be compiled and updated in the Frequently Asked Questions (FAQs) document. Refer to your change management plan to answer some of these questions. In addition, you may mention the training or materials end-users will need to use your ThingWorx application. More detailed information is available to help you plan end-user training.
In addition to informing others, you should listen. Establish a way for your internal and external audiences to respond to you. They should provide feedback, voice concerns, and share opportunities you may not know about.
03. Plan Feedback Mechanism
While it is essential to communicate, listening is also imperative. If stakeholder communication only comes from one direction, you risk overlooking valuable feedback or missing opportunities to address concerns. Instead, establish channels for soliciting and responding to feedback across your organization and ensure stakeholders know how to get answers.
To help facilitate and elicit feedback, try one or more of the following methods:
- An open forum or team website: Provide a forum where stakeholders can ask questions and make comments. Project leaders can help answer common questions across the organization.
- Group email: Some employees may hesitate to post on a public forum. To engage them, consider creating a dedicated project email inbox.
- Anonymous survey: Send anonymous surveys throughout the process to gather honest feedback without the fear of negative consequences
- One-on-one interviews: These can be conducted informally on the shop floor, or they can be set up in a more formal setting
Whichever method you choose, be sure frontline workers, managers, new trainees, project participants, and other stakeholders know how to express concerns, share ideas, and ask questions.
04. Create a Change Management Plan
You should create and execute a change management plan that specifies how your organization will transform from today to where it intends to be in the future. A successful change management process should be continuous: start by defining a vision and continue to measure progress after the change occurs.
Your change management process should:
- Define a compelling vision and clear objectives
- Ensure strong leadership and effective sponsorship
- Build and maintain ownership and accountability
- Align processes, organization, and culture
- Involve employees
- Provide adequate enablement and support
- Ensure stakeholder-specific communication
- Measure and monitor benefits realization continuously
- Identify how the change is valuable to everyone involved
Document your change management plan and distribute it throughout your organization accordingly.
Develop Long-Term Solution Management Strategy
Before you begin, complete these steps:
01. Create a Roadmap
Create a plan for when and how you will build and deploy additional lines and plants. For each additional use case, include:
- A high-level production schedule
- The resources required
- Any training activities needed
Before you make design decisions for DPM, make sure you have answers to the following questions:
- How are individual regions and plants defined?
- What does the standard OEE (Overall Equipment Effectiveness waterfall look like?)
- How will max and target rates be set?
- Is tracking “run” production necessary (for example, production vs. plan)?
- Who will enter production, changeover, downtime, and quality data?
- Who will be the tool owner on the ground?
- How will it be built into daily performance management?
- How will we be able to access the tool?
When deciding which plant line to pursue next, consider the cost at each stage and the similarities to the previous line. The ability to reuse the work helps your organization see value quickly and consistently.
02. Determine How to Manage the IT System
Assign a team to manage the health of the IT systems that support your IoT applications. This system management team is typically made up of IT professionals. Their purpose is to:
- Make sure the system is operating correctly
- Respond to outages
- Monitor the existing system performance and quality
- Implement system upgrades
03. Determine How to Provide Application Support
Develop processes for providing post-deployment technical support for DPM and consider the following:
- Availability
- Decide whether your ThingWorx applications are critical to your operations and define your support model accordingly. For example, if you run a 24x7 operation, your support must also be available 24x7. If not, you can adjust the support availability accordingly.
- Align the support organization's responsiveness with the system’s importance.
- Roles and Responsibilities
- Who should deliver support? The responsibilities may span different areas. For example, one team may oversee issues at the edge connection, and another may oversee application maintenance. In addition, your IT team will likely have a help desk as the first point of contact for support. Determine how teams prioritize issues among the various experts at different tiers.
- Escalation
- How will technical support escalate issues outside their domain of expertise?
- How will they handle complex issues that require additional expertise?
- In a tiered support model, the first level of support increases expertise in the triage process to determine the root cause and a solution. This expertise may span across varying roles and responsibilities.
- PTC support may be contacted for any product-related issues or questions.
- PTC Technical Support may not support custom components, extensions, and customizations. Ensure you clearly understand what is and is not supported by Tech Support. We recommend you have a Support Plan in place for any non-supported components (for example, there is a System Integrator (SI) partner providing support, or have the SI partner that developed the extensions provide documentation and information so that your team’s ThingWorx admins/architect(s) can solve the issue.)
The team supporting the end-to-end solution is typically not the same team that built it. Therefore, the solution should be well documented and handed off to the support team via training that includes the support aspects and how best to monitor and maintain the solution. To access PTC technical support, log a case with PTC eSupport. Once received, a member of the technical support team will assist you.
Recommended Resources
- Create eSupport Account eSupport
- Log a Support Case eSupport PTC login required
04. Plan Handoff Details
After deploying DPM, the project team transfers ownership to the appropriate application, system, or support management teams. The handoff may take place immediately after the go-live deployment or weeks later. Choose the milestone or date for when the handoff will occur.
Create a Rollout Plan
Plan how your organization deploys Digital Performance Management.
Before you begin, complete these steps:
01. Define Your Rollout Plan
Plan how to support employees as they learn to use this new technology. Depending on your organization’s use case, the specifics of your rollout plan will vary. A rollout plan outlines:
- Who will be using DPM?
- Why are they using DPM?
- What type of assigned role does the user need?
- You will assign a role (administrator, manager, author, or viewer) to everyone who needs to use DPM
- How do you communicate with them as they get started and beyond?
- When and how should they receive training? Who conducts the training?
- When should they start using DPM?
- How do they access the devices they need?
- Who manages user seats and role assignments?
- This could be someone in your IT department, or the execution lead on your team
- If they need assistance, how can they get it?
- How do new employees get started on an ongoing basis?
- Conversely, how do you revoke access for users who change jobs or leave the organization?
Plan how you’ll roll out new functionality on an ongoing basis. As you release new DPM features, consider these questions:
- Who needs data access to do their jobs?
- When do they get access to new functionality?
When new functionality is available, how will you notify them? Your rollout plan communicates many of the decisions you made through project planning. Document your rollout plan and share it accordingly.
02. Establish Internal Technical Support
People at your organization sometimes need technical support to use DPM successfully. PTC recommends establishing a help desk within your IT department to support these users. In addition, IT personnel should complete DPM training to answer basic questions and troubleshoot issues. Another option is scheduling time for the project team to train the IT personnel.
When the help desk cannot resolve the user’s issue, PTC offers technical support. Your organization’s help desk personnel or ThingWorx administrator may log a case with PTC eSupport. Once received, a member of the technical support team will assist you.
Recommended Resources
- Create Your eSupport Account eSupport
Plan Infrastructure
Ensure you have the proper infrastructure to support ThingWorx DPM.
Before you begin, complete these steps:
01. Design Site Specific Architecture
Depending on your business and the structure of your plant, you must design specific architecture for each plant.
02. Choose Hardware for End Users
Determine what kind of hardware end-users need to interact with your ThingWorx applications. This ensures you design the proper infrastructure to support them.
When choosing hardware for end-users, you should consider:
- Whether end-users need to move around with a device or simply view the application from a stationary terminal
- Environmental factors such as temperature or exposure to water, dust, or other elements
- How end-users need to interact with the application(s). You should consider whether:
- Your end-users wear gloves
- In this case, a touchscreen device may not be the best option
- The application requires your end-users to need one hand or both hands-free
- Your end-users wear safety gear, such as helmets, eye protection, or ear protection that could hinder their ability to see or hear
03. Document an Architecture Plan
Your architecture plan should specify what systems you need, how they should be configured, and what size those systems need to be to run your IoT applications.
Determine if your organization will expand this use case into other factories, create more applications to support additional use cases, or connect additional data sources in the future. Then, from the beginning, design your infrastructure to meet those needs. Designing an architecture that can support these things takes more time initially but makes it easier to expand capabilities later.
When defining your architecture plan, you should consider the following:
- Deployment: Whether you are deploying ThingWorx on-premises, in a PTC Cloud, or in your cloud environment
- Availability: If ThingWorx and any applications you deploy need to be available at all times or if some downtime is acceptable
- Environments: How many environments will you need, and the expected number of users each environment needs to support? We recommend having three environments:
- Development: Also referred to as "dev," this is the space your developers can use to create new applications, features, or work on patches
- Production: This environment hosts the live, tested applications your end users interact with. It is often referred to as "prod."
- Quality Assurance/Test: This environment lives between development and production. Here, you will validate and test new versions, patches, and configurations. Your quality assurance/test environment should be as close to a replica of your production environment as possible.
- Networking to support end-users: Ensure you have the proper network to support the end-users of your ThingWorx applications. The research you did to determine which devices your end-users need should help guide your network design.
- Usage: To understand what hardware—and how much processing and memory—you need for ThingWorx, consider the following:
- The number of end-users who will be accessing data during peak usage
- The number of data points that are called during peak usage
- The number of services called during peak usage
- The total number of Things (such as devices, sensors, connections, and modules) that ThingWorx will manage
- The frequency at which data is sent from each Thing to ThingWorx
Document your final decisions and share them across the project team for execution. This document should outline the components you need, how they relate to each other, and where they need to be located.
Recommended Resources
- DPM System Requirements Help Center
- ThingWorx Platform Sizing Guide Help Center
- ThingWorx Deployment Architecture Guide Help Center
- ThingWorx High Availability Overview Help Center
- Deploying DPM in the PTC Cloud Help Center
- DPM Customer Deployments Help Center
04. Identify Infrastructure Changes
Once you have completed your infrastructure architecture plan, compare it to what exists today—first, document what you will need to purchase. Then, consider how to adjust your design to work within the constraints of existing architecture until you can upgrade.
05. Source Hardware
If your infrastructure architecture plan requires additional hardware, start sourcing that hardware as soon as possible. This is especially important if the procurement process at your organization requires multiple approvals.
Plan User Access and Permissions
Review your list of potential users. Then determine which types of users should have permission to access which information within ThingWorx.
Before you begin, complete these steps:
01. Out-of-the-Box User Groups
ThingWorx offers built-in user groups for administrators, developers, and users you could use to start. Work with PTC or a partner to establish the necessary user groups and permissions for the roles you want to use in DPM.
Different user roles determine the permissions you need to give to a user group. A user role is a person or group who can take specific actions in the app using specific data. An example might be a support engineer (user role) who pulls reports (permission) for a site in Europe (visibility). Anticipate that your user groups and organization units may expand over time.
There are two forms of permissions you can adjust:
- Run-time permissions dictate what services a user can execute and properties they can access. Run-time permissions are assigned at the user group level.
- Design-time permissions dictate what a user can modify or access in Composer. Design-time permissions are assigned at the user group level.
Adapt as needed. It would be best if you made changes to your user groups and permissions over time.
Recommended Resources
- Creating an Organization and Assigning Users or Groups Help Center
- Configure Permissions PTC Communities
- DPM Training Tutorials and Classes PTC University
02. Identify Who Will Be Users
To maximize the usefulness of your application, explore what your end users (employees working in the plant) need from it. Ask the following questions:
- Who uses the application?
- What are their goals? What tasks must they accomplish?
- What are their pain points and challenges in their daily jobs?
- Who do they work with to accomplish essential tasks?
- How does their physical environment affect how they do their jobs?
- What hardware will they be using for the app (desktop, mobile, or tablet)?
03. Map Users to User Groups
Now that you know how users interact with the application, outline your user groups. User groups restrict what workers can see and do in the application.
Review your list of potential users. Then determine which types of users should have permission to access which information within ThingWorx.
Keep in mind:
- Balance permissions carefully. If you grant users too many permissions, they could see confidential data or mistakenly delete pieces of the application. On the other hand, granting users too few permissions may not access a vital screen.
- In ThingWorx Composer, you create groupings at three levels:
- Organization
- Organizational unit
- User group
ThingWorx offers user groups for administrators, developers, and users: Depending on your needs, these user groups may be sufficient to start with. Later in the process you will set up the appropriate groups and invite users to ThingWorx.
Design Integrations and Connectivity
The real power of ThingWorx comes from its ability to pull data from different sources into a single application to gain new insights and drive further actions. Plan how to integrate with the systems and connect to the machines necessary to achieve your use case.
Before you begin, complete these steps:
01. Determine Integration Connectors
Now that you have a clear picture of what data you will need to access for your application, you need to determine how to connect that data. ThingWorx collects data in two ways:
- Integrations: You integrate into systems that house data.
- Connectivity: You connect to machines or physical assets.
To create custom integrations in DPM, you must start with building blocks. To decide on the best approach for your organization, have a detailed conversation with your solution architect (someone highly skilled in ThingWorx), controls engineer, IT and OT experts, and any others who have a deep understanding of the specific data and systems to which you are trying to connect.
Recommended Resources
- Integration Connectors Help Center
- Learn about Building Blocks Help Center
- Common Building Blocks Help Center
02. Gather Data Requirements
First, collect a list of data requirements. These items are the must-haves in your integration and connectivity strategy. They should be specific to helping you support your identified Industrial IoT use case.
Depending on your system’s setup, data may be entered manually, automatically, or a hybrid of both. By default, data is manually entered by operators into the Production Dashboard. DPM also allows data entry to be automated and entered directly into DPM from sensors on a machine or other integrated data sources.
Determine your source of truth if there is a difference in the DPM data and connecting systems data, the system of record.
DPM customers may connect to a variety of tools that might include:
- Enterprise Resource Planning (ERP)
- Manufacturing Execution System (MES)
- Data historian
- Programmable Logic Controllers (PLCs)
- Custom SQL databases
- Enterprise data lake
03. Determine Edge Connectivity Requirements
Your use case may require you to connect to machines or physical assets. The devices and things that connect to the cloud in the IoT industry are often called “the edge.” This is because the things connect from outside the ThingWorx platform and send data into the platform. There are various edge devices, like programmable logic controllers (PLCs), Raspberry Pis, routers, and more.
If you must connect to edge devices, determine your requirements. The data requirements you established are a great place to start. In addition, your edge device requirements should address:
How to communicate with the device:
- What kind of data transfer or application protocol does the device use?
- Does it have a physical user interface?
- Do you need to convert from analog to digital?
- Is it wireless or hardwired to a network?
How to retrieve the data:
- Where does the data live on the device?
- How does the data travel from the edge device to ThingWorx?
- Are there any security barriers you need to address?
Depending on the device, there are numerous ways to connect. For manufacturing use cases, we recommend using Kepware to communicate with edge devices. Choose the technology that meets your requirements.
A systems integrator helps answer these questions. If possible, determine who programmed the device you are connecting. It may be a control engineer or programmer within your organization, a third-party vendor, or a machine builder. This person can provide invaluable expertise as you connect to edge devices.
Near Real-Time Events
Connection to Kepware or other Edge devices allows data collection in near real-time by the DPM Solution. Property updates from Kepware and other sources are not guaranteed to arrive chronologically. The Value Stream is used as a queue/buffer to allow the sorting of new events. Any standard Kepware installation can be used to pass tag data into DPM. Other ThingWorx edge data sources can be used to map tags.
There is a limit on what is considered "near real-time" data. The data placed into the property values must be less than 15 minutes old (property update time). Values beyond that limit will be ignored. Since data is ingested into a Value Stream first to sort events before being recorded to DPM, a timer delay of up to five minutes may be seen.
Recommended Resources
04. Modify Programmable Logic Controllers
In less common cases, your machine’s programmable logic controller (PLC) may require modifications to connect to ThingWorx. For example, you may need to modify a PLC to create serial or ethernet connections.
A control engineer or programmer within your organization should work with the automation engineer or controls engineer to modify the PLC.
05. Create Integration Technical Design
Now that you know which data sources you need to connect to and how you will connect to them, compile this information into a documented integration and connectivity strategy. This document helps inform other decisions that need to be made. These include changes to your infrastructure and timeline details for your ThingWorx project.
Your documented integration strategy should include:
- Requirements of each integration connector that is used
- A list of all transactions that need to occur, including the frequency
- All the data fields you are collecting
- Decisions on what acts as the central system(s) of record (the source of truth for your data)
- Any security considerations that need to be addressed
Determine Implementation and Testing Plan
Determine your DPM implementation, configuration, and testing approach, and document the plans.
Before you begin, complete these steps:
01. Establish Source Control
If you anticipate a need to enhance or extend DPM functionality, a best practice is to establish DevOps (development operations) before you start development. DevOps improve communication, speed up deployment, and help minimize mistakes.
The developers working on your IoT initiative should establish the DevOps they follow. ThingWorx development is best suited for an Agile process. As a result, developers can create and iterate quickly. If your developers already have DevOps and follow a different methodology, consider how your IoT initiative fits your current processes.
Include the following in your considerations for DevOps:
- Development environments (we recommend at least four: dev, QA, test, prod Servers)
- Source control plan using standard ThingWorx import/export, Git, or SVN tools
- Naming standards
- Acceptance criteria documents and testing plans
- Connected products in the field
- End-user hardware and devices (including branding, look, and feel)
- Security requirements, organization structure, and user access
- Personnel (developers, QA, etc.)
In terms of source control, decide how you manage code and track work. Naming standards are crucial when developing with ThingWorx. It’s difficult to go back and change naming conventions once you deploy the solution.
Recommended Resources
- Git Integration with ThingWorx using Git Backup Extension PTC Communities
- ThingWorx DevOps with Jenkins PTC Communities
02. Understand How to Move DPM to Production
Enterprise deployment can be accomplished by downloading the DPM software. To move the solution between environments from QA/development to production, we recommend exporting and importing the extensions. Additionally, more direction on how to configure the infrastructure and install ThingWorx can be found in Install DPM
Recommended Resources
- Deploying DPM Help Center
- Importing and Exporting ThingWorx Help Center
03. Determine Your Testing Approach
Decide how you’ll test the solution before you deploy. First, refer to the designs for your applications, review your acceptance criteria, and confirm your development environments. Then, developers and device engineers work together to create a testing plan.
In general, we recommend the following testing:
- Unit testing: when developing, consider building in a unit testing concept to allow code to be tested separately from UI testing
- System testing: test the features and functionality of a collection of components defined by an acceptance criteria document
- Security and penetration testing: test for vulnerabilities, risks, and threats (always test with different scenarios that represent actual usage)
- Integration testing: test the edge, products, devices, and platform integrations
- Stress or load testing: test the stability of the solution and how it handles errors and load
- User acceptance testing (UAT): test with select end-users to make sure the UI meets their needs
- Deployment testing: verify the package works as expected on a staging server that represents a production configuration
Identify what testing you need to do in each of your environments. You might need additional testing that was not mentioned based on your specific solution or industry. Remember to consider security and compliance requirements at every stage.
Create a testing plan for each application. Align testing with your DevOps processes. Plan to test in a QA environment that replicates your production environment as closely as possible. Ensure that your tests replicate what it’s like in the real world; otherwise, the tests are invalid. Make it clear to your developers early that they should only write code in your dev environment (not test, QA, staging, or prod). Ensure that all developers are aligned on this. This prevents confusion and inaccurate test results later.
04. Document Testing Plan
Next, create and document the plan for how you test the solution. Be as thorough as possible. In your plan, include the following:
- Value statement
- Data sources and data flow
- Design specification
- Acceptance criteria
- Test procedure
- Environments and who has access to what
- Security requirements
- Naming conventions
- ThingWorx version or release numbers
- Results of quality assurance (QA) test
- Performance figures
- Revisions
- Software
You may not have some of this information until you start testing. As you test, add in what new information you receive and document code as you write it. If you keep your documentation concise, you find a rhythm as you move forward. Your documentation gives you evidence to solve issues and make decisions faster.
Set Up Account
Set up your account to access software downloads and technical support.
Before you begin, complete these steps:
01. Create a PTC eSupport Account
You need a PTC Support Account to download ThingWorx software and access technical support.
To create your account, you must supply one of the following numbers:
- Your Service Contract Number (SCN)
- Your Sales Order Number (SON)
- Your Site Number
PTC will send a software order confirmation email when your purchase is complete. This email will contain your SCN, SON, and your site number. If you cannot find this information, contact PTC technical support.
Recommended Resources
- Create your PTC Account eSupport
- Get Help Logging In eSupport
Configure Infrastructure and Install ThingWorx
Configure the infrastructure and install the ThingWorx platform and any other software necessary for your use case.
Before you begin, complete these steps:
01. Configure the Infrastructure
Set up your infrastructure according to your documented architecture plan. This includes servers, networking, hardware, and devices you need to support ThingWorx across your organization. Then, prioritize the hardware. You can mark this objective as complete if you are a PTC Cloud customer.
Recommended Resources
- ThingWorx Secure Deployment Guide eSupport
02. Install ThingWorx Platform
Before you begin, review the “ThingWorx System Requirements” document to ensure you are ready for installation.
To access ThingWorx software, you must log in to PTC eSupport. If you do not already have a PTC account, create one now.
To install the ThingWorx platform, log in to the PTC eSupport Portal and select “Download Software.” For detailed steps on installing the ThingWorx Platform, see the “Installing ThingWorx” guide in the ThingWorx help center.
Recommended Resources
- ThingWorx System Requirements Help Center
- Installing ThingWorx Help Center
- PTC Software Download: ThingWorx Platform eSupport PTC login required
03. Confirm Infrastructure Security
Ensure your organization’s security measures allow ThingWorx to communicate with your systems. Work with your IT or network infrastructure team to plan how data passes from your network to ThingWorx. In some cases, the network firewall(s) may block connections, which prevents your integrations from passing data to DPM.
Install DPM
Configure the infrastructure and install the ThingWorx platform, DPM, and any other software necessary for your use case.
Before you begin, complete these steps:
01. DPM Deployment Models
Depending on your infrastructure, how you deploy DPM will differ. For instance:
- If you are a PTC Cloud customer, DPM will already be running on the environment you receive from PTC Cloud once it has been provisioned for you.
- If you have your own cloud or internal infrastructure: After you install ThingWorx, install your preferred SQL server, license your instance, and obtain access to DPM.
Recommended Resources
- DPM Customer Deployments Help Center
02. Gather Data
You will import master data into the DPM solution through a defined Excel spreadsheet format. Multiple tabs are used for each data structure. There is a tab map to a database table in the DPM schema. Data may have dependencies between tabs tables. Currently, the importer does not include order data or events, as many will be created or gathered in real-time. Finally, the file is uploaded, and processing is started via Mashup. Work with PTC Implementation Services or your system integrator to import your data into DPM.
Data can come from any source and can be exported to Excel. Be sure the structure and columns are populated correctly. The data will then be imported.
Your team can automate imports into DPM. All imports from the Excel sheet use regular ThingWorx services (API) to utilize the data. These can be leveraged for an integration effort. This is outside the standard DPM Solution function but is allowed as part of the extensibility of the platform and solution.
03. Add Initial DPM Users
Provide ThingWorx accounts for the team members developing your IoT application. You add these initial users in ThingWorx Composer. ThingWorx includes a default “Administrators” group. Users in this group have complete access to everything. We recommend assigning developers to the “Administrator” group, which provides the permissions to develop and validate the application.
For now, focus on creating user accounts for developers and other team members building the application. You will create user accounts for the end-users of the application later.
Recommended Resources
- How to Add Users Help Center
- Making DPM Available to Users Help Center
Configure Your Integrations
Connect to the systems that supply the data you need for your application. ThingWorx offers a variety of pre-built connectors, but some third-party systems require custom integration connectors.
Before you begin, complete these steps:
01. Understanding the DPM Data Model
The power of ThingWorx comes from its ability to aggregate different data into a single place. You must structure that data so your ThingWorx applications can use it. Building Blocks will allow you to create a digital representation of everything that provides data in ThingWorx using data models. It also shows the relationships between ThingWorx and all those things.
Your ThingWorx data model is comprised of these entities:
- Things are digital representations of all your assets, devices, systems, people, or processes that provide data.
- ThingTemplates store core functionality (such as properties, services, events, and subscriptions) - all Things need to be associated with a ThingTemplate, inheriting its identified functionality.
- ThingShapes also store functionality but can be applied to single or multiple ThingTemplates or Things. Use ThingShapes when there are properties, services, events, or subscriptions spanning multiple ThingTemplates or Things across several ThingTemplates.
While ThingWorx allows your data model to evolve, you need to invest early in the project to determine how to structure your data. Start by compiling a list of Things required for your use case. From there, figure out the relationships between those Things.
This is a brief introduction to the ThingWorx Data Model. Use the following recommended resources to learn more and prepare to design your data model. Work with a system integrator, programmer, or developer with object-oriented programming experience to design your data model.
Recommended Resources
- ThingWorx Training PTC University
- Data Model Introduction PTC Communities
- Design Your Data Model PTC Communities
- Best Practices for Developing Solutions Help Center
02. Create Custom Integration Connectors
Build custom integrations to the systems, assets, and tools your use case requires. In most cases, use REST APIs to create these integrations. The configuration is necessary within the system you are connecting to. PTC’s recommended best practice for creating custom integrations is to use building blocks. Use the data models in the base and/or domain building blocks when creating your connectors. A solutions architect can help determine how to build these connectors. If possible, work with an expert who understands the system you are connecting to.
Recommended Resources
- Common Building Blocks Help Center
- Creating a Custom Integration Connector Help Center
- Choose a Connectivity Method PTC Communities
- Getting Started Using Integration Connectors Help Center
- Adding Custom Properties to Data Models Help Center
03. Validate Connectors
After your connectors are in place, verify that the data flows from the source to ThingWorx. Then, deploy the integrations so they can be tested in the DPM application.
Make sure:
- The data is appearing in the correct format/structure
- The right amount of data is flowing through
- Data from ThingWorx is flowing back into the connected system (if your connection is bidirectional)
- The speed is acceptable (your system should not time out before data is fully transferred)
If necessary, troubleshoot any issues before you continue with deployment.
Recommended Resources
Customize With Building Blocks
Review the list of existing building blocks and determine what is beneficial in your organization’s deployment of DPM.
Before you begin, complete these steps:
01. What are Building Blocks?
A “building block,” or “component,” is an implementation pattern in ThingWorx. It is designed to produce smaller, independent, self-contained modules that you can use to build solutions. Each building block serves a specific purpose, including:
- External data integration
- Solution capabilities
- User interface additions
- Platform functionality
- Equipment manipulation and management.
- Building blocks are stacked together in an ordered fashion to make up a solution, starting from the base building block up to the solution building block.
Key benefits of building blocks include:
- Reusable across solutions
- Upgradable options
- Their development in ThingWorx with JavaScript
- Their design that supports visibility/multi-tenancy
- Their adherence to a standard set of design patterns
- Their support for wrap and extend
- Discoverability for global configuration management
- Their use of a standard naming convention
- Its use of the simple solution deployment
One building block consists of a set of ThingWorx entities combined into a ThingWorx project. This is packaged as a ThingWorx extension. Each building block is based on the base building block (PTC.Base) and enables the whole building block architecture.
- Building blocks are required to have:
- A separate ThingWorx Project
- A group of ThingWorx entities contained in a single project
- Project Types are Solution or Component
- Project dependencies to other blocks
- Blocks are dependent on Base Building Block
- Provides a common service layer
- Provides a common Master Mashup
- An Entry Point thing that enables the following:
- Definition of block information (i.e., name, version, etc.)
- Discovery for block configuration
- Deployment of services
- For DPM, executes schema scripts and loads default data
- A separate ThingWorx Project
Recommended Resources
- Learn about Building Blocks Help Center
- Common Building Blocks Help Center
02. How to Customize DPM
To fit additional use cases, your organization can customize DPM further.
Replacing Modular Mashups
Mashups are Web page visualizations you use to deliver information from the ThingWorx model. Certain mashups in the DPM user interface can be modular. When you have modular mashups, you can easily replace them with your customized mashups by changing the mashup defined in a configuration table. Services that call these modular mashups do not explicitly request the mashup. Instead, they request a service that retrieves the mashup defined for that modular mashup in the configuration table. As long as your custom mashup has the same inputs and outputs as the original, it and the surrounding functionality will work as expected.
Modular mashups are available in Action Tracker, Performance Analysis, and Production Dashboard.
For more information on working with mashups, see Mashup Builder in the ThingWorx Help Center.
Customizing the DPM Menu
Strings in the user interface can be changed by updating the localization tokens used in the mashups. Localization allows you to display run time labels in different languages or terminologies. In ThingWorx, you can configure localization tables with tokens assigned to text in the Mashup Builder. This can be useful to replace terms in user interface strings with terms more commonly used in your business. In addition, the menu in the navigation bar on the left side of the screen provides the means to navigate between DPM modules. You can customize this menu by changing the mashups opened by existing menu items and adding new ones. You can also change the labels that show in the menu by editing the localization token used for the menu item. For more information, see Changing User Interface Strings.
Customizing Services
You can customize the services provided in the PTC building blocks to implement your logic. This involves creating a new building block that extends from the PTC building block and overriding the service on the manager Thing for your new building block. Thing entities are one of the fundamental entity types in ThingWorx. They are used to represent an instance of an object that is actionable (services), declarative (properties), reactive (events), and observable (subscriptions). You can view the services in a building block on the Services page of the manager Thing for the building block.
Keep in mind the following when customizing services:
- Understanding namespaces, access modifiers, and their customization impact on public services
- Changing service code can cause long-running services or require intense computing. This could lead to performance loss.
- You can locate all block services in the blocks manager
- The manager pattern enables overriding out-of-the-box (OOTB) implementations.
- Common manager in base defines standard configurations for navigation, mashups, and managers
- Services definitions on a management ThingShape
Recommended Resources
- Replacing Modular Mashups Help Center
- Changing User Interface Strings Help Center
- Customizing the DPM Menu Help Center
- Customizing Services Help Center
Validate Solution
Test and verify that DPM is ready to go live. Then, deploy it to production.
Before you begin, complete these steps:
01. Verify User Permissions
Make sure your users have access to the correct components within the application. We recommend several users log in to ThingWorx in a test/QA environment and verify they have access to everything they need. Test the user permissions for each designated user group (administrator, developer, user, etc.). If someone cannot access a Mashup or if they have too much access, alter their permissions.
02. Complete Unit and Functional Testing
Thoroughly vet the application in a test/QA environment following the testing plan you created during planning:
- Unit-level testing verifies that each piece of functionality works correctly
- Functional testing ensures the application performs the way that a user expects
If you find issues, consider rolling the application back to your development environment for fixing.
03. Conduct User Acceptance Testing
Test the application in a test or QA environment with a few potential users such as plant managers, frontline workers, or other available participants. This ensures that what you have built meets their needs.
User Acceptance Testing should address questions such as:
- Can the test participants navigate and use the application?
- Is it what they expected? Is anything confusing?
- Is it missing any functionality that their system of record has today?
- Did the application function correctly during the test?
You may learn vital insights during this phase and choose to act on them later. For example, if the application does not meet all of the user’s needs, decide whether to pause deployment or launch as-is.
04. Confirm System Performance
After connecting assets and data begins to flow, perform various load tests to check if system load, performance, and availability are acceptable. For example, if you expect data to travel from an asset through the application in 5 seconds, verify that the application delivers that level of performance. Be sure your server is large enough to handle the data. Be realistic about your expectations: the faster your system, the higher your server costs.
It is important to stress test the system. Test the user load and device input load. Simulate several scenarios—including less likely situations when the system is processing more data than expected. For example, if your application is expected to process ten megabytes per minute, simulate 100 megabytes per minute to ensure the system does not crash under extreme conditions. While these scenarios may be uncommon, we recommend you prepare the system to handle them.
05. Cut Over Integrations
Transition your integrations to start feeding data into ThingWorx. After turning on the integrations, verify that the data flows accurately from the asset, tool, or system as expected. Make sure you are not receiving unnecessary data. If you are switching from an existing legacy system, compare the data from the old system to what you see in ThingWorx to be sure they are identical. Monitor the data for several hours before you continue to deployment.
06. Migrate Historical Data (if required)
Although rare, you may decide to ingest historical data to replace another system. If you are migrating existing data from other systems, verify that it correctly imports to ThingWorx. A developer, IT expert, data scientist, or engineer can help. It may take several weeks to fully migrate months or years of historical data. We recommend that you import data on a rolling basis. Prioritize the data you need to understand trends or make sense of the information you are collecting going forward. If you are retiring existing systems, migrate that data sooner.
Keep in mind that the more data you migrate and store, the more it affects system performance.
Prepare for Deployment
Ensure the workers who support and use DPM are ready for go-live.
Before you begin, complete these steps:
01. Add End User to Groups
If you have not already done so, add your administrators, application support team, and end-users to ThingWorx. Follow the plan you created to assign each user to the appropriate user groups. Ensure these users have permission to access everything they need within the application.
02. Create a Launch Schedule
Technically, DPM implementation is straightforward, but it requires a focused effort to build a sustained performance management system. Here is a sample schedule of launch activities:
Sample Schedule for Tool Configuration and Launch Stages
|
|
Full Team |
|
Managers/Supervisors & CA |
|
IT |
|
Technical Lead |
|
Operational Lead |
|
Monday |
Tuesday |
Wednesday |
Thursday |
Friday |
|
|
|
Additional manager/tool owner training (if necessary) |
Operator coaching of the line |
Online coaching as necessary |
Review week 1 data and feedback |
9:00 |
|
Kickoff with local managers |
10:00 |
||||
|
Tailor training materials for specific lines |
Supervisor training |
Reporting and huddle training |
|
11:00 |
|
|
Add plant structure |
Online coaching as necessary |
Online coaching as necessary |
|
12:00 |
|
|
Add plant and bottleneck specific loss reasons |
Supervisor training |
Update tool as needed |
|
13:00 |
|
|
Afternoon operator training (classroom at the line) PM operator training |
Define huddle script for data review |
|
14:00 |
||
|
Ensure the website is accessible from the line(s), add shortcuts, and create users |
Reporting and huddle training |
|
15:00 |
||
|
Supervisor training |
|
|
16:00 |
||
|
|
|
|
|
|
17:00 |
03. Train End Users and Gather Acceptance
Train workers who use DPM. The depth and format of your training varies depending on its complexity.
Ensure your end-users know:
- How to use the application
- How does the application affect their job or role
- If applicable, how to navigate the application on different devices (such as desktop computers or tablets)
- How to get help from the support team
- Where to access documentation
- How to troubleshoot and report errors
Inform end users when the application goes live. Then, follow up with them a few weeks after deployment to get feedback.
Go Live
When you are ready to go live, deploy ThingWorx DPM to your production environment. Share progress with stakeholders and update documentation. Once the app is live, notify users and teach them how to access it.
Before you begin, complete these steps:
01. Deploy the Solution to Production
After you have performed all the necessary testing in the test/QA environment, you are ready to deploy the code to production through Solution Central. This step "publishes" your application—deploying it to your manufacturing plant. Before promoting to production, ensure you have a backup in place. If you have followed a thorough DevOps process, your work should already be backed up.
To go live in production, the developer or architect deploys data and entities to the production server. If an issue arises, do not make changes to the application in the production environment. First, make adjustments and test them in the development environment. Second, begin testing/QA in an environment and test thoroughly. Third, publish and deploy the code to production.
Once the technical team has successfully deployed the application, notify project team members and stakeholders. The application is now collecting actual data and communicating with your assets. Finally, it is available for use.
02. Perform Final Smoke Test
The final smoke test helps you determine whether the application is ready to deploy. If any issues arose during a unit, functional, or user acceptance test, retest to ensure they are fixed. Run through several test scenarios, like adding a new user or interacting with a Mashup. Double-check your integrations for data leakage.
03. Communicate with Users
The person or group responsible for communicating with end users should notify all users that the app is live and ready to use. Then, refer to your organizational change management plan and follow up on any remaining communication and training items.
Provide end users with the information they need to access the app, whether sharing the link or showing them how to access it online.
Once the app is live, communicate with all users:
- How to access the app
- What login credentials to use
- How to get support or training
- How to access documentation
- How to report issues
Deployment Support
Provide intensive hands-on support. Prevent downtime by anticipating and quickly resolving issues.
Before you begin, complete these steps:
01. Provide Hypercare Support
During and immediately after deployment, your application support team must be readily available to resolve issues. They should also know how to reach IT, if necessary. Ideally, the architect(s) and developer(s) who built the solution can help if needed.
If your application runs 24 hours per day, seven days per week, one to two employees should be reachable outside of regular business hours in case of emergencies. Emergencies are less likely to occur if you thoroughly test the system before deployment.
This Hypercare period typically lasts 7-14 days. Hypercare ends when the application is functioning as expected. There may be ongoing bugs or minor fixes that developers address later.
02. Transition to Long-Term Support
After deployment, the team who deployed DPM will transfer ownership of the live solution to your designated support organization. This team is responsible for providing technical support to ThingWorx users, among other duties. Ensure the application support team is trained and prepared to resolve potential issues.
After the handoff, your support organization should never make changes to the application in production. Instead, if there is a problem, make the necessary changes on the development server, test them, and then once approved, publish them to production. Finally, note the difference in the documentation.
Appropriately trained employees can access the Customer Support Engagement Guide or contact PTC Support Services if an issue cannot be resolved internally by experienced DPM front-line personnel.
Recommended Resources
- Customer Support Engagement Guide
- PTC Cloud Engagement Guide PTC login required
Use the Solution
Onboard your end-users and evaluate how the project went.
Before you begin, complete these steps:
01. Start using DPM
Beginning with this first production line, your operators and line workers should incorporate DPM into their day-to-day jobs. The key to success is appropriate training and open communication. Ensure each employee on this line has completed the minimum training identified in your training strategy. Also, revisit the feedback mechanism plan to ensure your end users have a clear way of communicating issues they encounter or want to provide feedback. This feedback is essential for moving forward with additional lines and plants. A great way to onboard new users is via demonstrations and communicating details of what was implemented and why.
Ensure that Line Operators and Supervisors possess a clear and comprehensive understanding of the essential procedures for utilizing the Production Dashboard. This includes the capability to effectively review and input production counts, scrap counts, and job orders (initiating and concluding), as well as record downtime or lost time attributed to various reasons. Strive to streamline these data entry tasks through automation, integrations, and asset connectivity, alleviating Operators and Supervisors from the burden of manual data entry. Refer to the Production Dashboard sub-topics for detailed instructions on event/data management.
02. Document Lessons Learned
As the project team gathers feedback from that first line, consider how the same processes may work for other lines or plants. Gather feedback from the project team, employees who helped create the procedures, employees using those procedures, and anyone else involved with DPM.
Explore questions like:
- Did you achieve the outcome you identified for your use case?
- What went well throughout the project?
- What was challenging?
- What did you learn?
- How could you have done things differently?
- What are the benefits of using DPM compared to using previous methods?
- How can you improve for the next project?
- Were there any skillsets missing from the project team?
- Was the timeline appropriate?
- Did you have enough user licenses?
The project retrospective helps identify opportunities to improve processes, reallocate resources, and change your approach. It also enables you to communicate positive outcomes as you encourage others to adopt Digital Performance Management.
03. Optimize the Solution
Consider the following ideas for improving/optimizing DPM to maximize value:
- Would increased data automation lead to more accurate DPM data regarding impactful reasons for the lost production time?
- Are there opportunities to reduce operator manual entry/engagement with solutions via increased data collection automation or integration with other systems (e.g., ERP, MES?)
- Are there opportunities to invest resources in additional DPM extensions, especially those that can be reused by other lines or plants (for example, shift handover reports built in ThingWorx)
- Are there opportunities to invest in other IoT applications that could add additional value beyond DPM, such as remote monitoring solutions that give a clear picture of machine performance and status
- Determine areas for continuous improvement, such as monitoring the amount of unaccounted time to see if improvements can be made to the production line to ensure all time is tracked
Evaluate Success and Value
Revisit the goals and metrics you established for your DPM project. Then, gather the data you need to measure success and consider your next steps.
Before you begin, complete these steps:
01. Gather and Review Metrics
Revisit the goals and metrics you set at the beginning of your project to measure progress and success. Revisit your baseline metrics.
Depending on your use case, we recommend you wait 30-90 days after going live to assess the first metrics for the app. There will be some immediate improvements. However, some metrics require several weeks of data to correctly create a measurement, especially if workers are slow to adopt the app.
Compare the baseline metrics to your current data to determine the value of the solution so far. Slow adoption is an indicator by itself. One of the indicators of low adoptions is significant ‘unaccounted’ time. It should be a success metric to drive this value to zero. If people are not using the solution, consider why they are having trouble accessing the solution. Is there a network or hardware issue? Is there a lack of automation? Do they need training? You can act on some of these issues.
Also, account for any unexpected benefits that ThingWorx Digital Performance Management has provided your organization. There may be a measurable or less tangible value worth highlighting. Or digital reporting may have eliminated the need for pen-and-paper reporting, saving time and waste. You may want to adjust your value propositions based on the numbers and results the group managers see. If so, clearly explain the reasons to your stakeholders.
02. Communicate Results
Share the results and adjustments to your value propositions with the project sponsor, project team, organizational leaders, group managers, users, and other stakeholders. It is important to share these results, so all stakeholders are informed about the solution’s value. Reviewing these results can also help you strategize the next steps.
You will provide a clearer picture of value if you continue to measure and report over time. Users may turn to the app more as they get comfortable. They may also discover new ways to use product data. Because of this, usage may change based on their information needs.
As new deployments begin (within or across sites), incorporate representatives from previous deployments to share expertise and learnings.
03. Confirm Performance Improvement
Refer to the measurement plan you created earlier and review your baseline metrics. Are you able to confirm the improvement of that singular line’s performance? At this time, you may continue to adjust the application for this line. Then, return to the design phase reference “Building Blocks” to learn how to customize your DPM application further.
Plan Enterprise Architecture
Plan your problem statements aligned to strategic business goals, identify and capture operational metrics related to each, and complete the PTC Impact Canvas for these specific areas and specific use cases.
Before you begin, complete these steps:
01. Document Existing Infrastructure
Enterprise Architecture defines, organizes, standardizes, and documents the whole architecture and all critical elements of the respective organization. This architecture covers relevant domains such as business, digital, physical, or organizational. The architecture also documents relations and interactions between elements that belong to those domains, such as processes, functions, applications, events, data, or technologies.
Your architecture plan should specify what systems you need, how they should be configured, and what size those systems need to be to run your IoT applications.
It is important to know if your organization plans to:
- Expand this use case into other factories
- Create more applications to support additional use cases
- Connect additional data sources in the future
Designing an architecture that can support these needs takes more time initially, but makes it easier to expand capabilities later.
When defining your architecture plan, you should consider:
- Deployment: Whether you are deploying ThingWorx on-premises, in a PTC-hosted cloud, or in your cloud environment
- Availability: If ThingWorx and any applications you deploy need to be available at all times or if some downtime is acceptable
- Environments: How many environments will you need, and what is the expected number of users each environment needs to support? We recommend having three environments:
- Development: Also referred to as “dev,” this is the space your developers can use to create new applications, features, or work on patches.
- Production: Often referred to as “prod.” This environment hosts the live, tested applications your end users interact with.
- Quality Assurance/Test: This environment lives between dev and prod. Here, you will validate and test new versions, patches, and configurations. Your QA/test environment should be as close to a replica of your production environment as possible.
- Networking to support end-users: Ensure you have the proper network to support the end-users of your ThingWorx applications. The research you did to determine which devices your end-users need should help guide your network design.
- Usage: To understand what hardware and how much processing and memory you need for ThingWorx, you must consider:
- How many end-users are accessing data during peak usage?
- The number of data points that are called during peak usage
- The number of services called during peak usage
- The total number of Things (devices, sensors, connections, modules, etc.) that ThingWorx manages
- The frequency at which data is sent from each Thing to ThingWorx
Document your final decisions and share them across the project team for execution. This document should outline the components you need, how they relate to each other, and where to locate them.
Recommended Resources
- ThingWorx Platform Sizing Guide Help Center
- ThingWorx Deployment Architecture Guide Help Center
- ThingWorx High Availability Overview Help Center
- DPM System Requirements Help Center
- Deploying DPM in the PTC Cloud Help Center
- DPM Customer Deployments Help Center
02. Document Existing Connectivity
Your use case may require you to connect to machines or physical assets. In the IoT industry, the devices and things that connect to the cloud are often called the edge: The things connect from outside the ThingWorx platform and send data into the platform. There are various edge devices, like programmable logic controllers (PLCs), Raspberry Pis, routers, and more.
If you must connect to edge devices, determine your requirements. The data requirements you established are a great place to start. In addition, your edge device requirements should address:
How to communicate with the device:
- What kind of data transfer or application protocol does the device use?
- Does it have a physical user interface?
- Do you need to convert from analog to digital?
- Is it wireless or hardwired to a network?
How to retrieve the data (Note: a Systems Integrator can help you answer these questions):
- Where does the data live on the device?
- How does the data travel from the edge device to ThingWorx?
- Are there any security barriers you need to address?
Depending on the device, there are numerous ways to connect. For manufacturing use cases, we recommend you use Kepware to communicate with edge devices. Choose the technology that meets your requirements.
If possible, determine who programmed the device you are connecting to. It may be a control engineer or programmer within your organization, a third-party vendor, or a machine builder. This person can provide invaluable expertise as you connect to edge devices.
Near Real-Time Events
Connection to Kepware or other edge devices allows data collection in near real-time to be collected by the DPM Solution. Property updates from Kepware and other sources are not guaranteed to arrive in chronological order. The Value Stream is used as a queue or buffer to allow the sorting of new events. Any standard Kepware installation can be used to pass tag data into DPM. Other Thingworx edge data sources can be used to map tags.
There is a limit on what is considered “near real-time” data. The data placed into the property values must be less than 15 minutes old (property update time). Values beyond that limit will be ignored. This type of data needs to be received through a separate interface. A published API and data formats will be available in the future. A timer delay of up to five minutes may be seen because data is first received into a Value Stream. This happens to sort events before recording to DPM.
Recommended Resources
03. Document Existing Processes
If not already created, document an architecture flow diagram of the selected plant. Understanding your IT infrastructure is critical to determine if automated data is possible and ensures that the end-user has access to the application on the plant.
Document the following details about the selected plant:
- The manufacturing category the plant falls under, such as discrete or process
- The existing enterprise software systems
- Consider all of the following:
- MES
- Other Manufacturing/Production Systems
- ERP
- Quality
- HMI/SCADA
- Historian
- Consider all of the following:
Document the following details about the selected line:
- Current automated and manual operations
- All asset-related or line-related details
- Plant-specific systems
- Plant-specific connectivity
- Plant's layout and flow
- Each plant's schedule
Recommended Resources
- DPM System Requirements Help Center
- Deploying DPM in the PTC Cloud Help Center
- DPM Customer Deployments Help Center
04. Document Current Business Logic
Evaluate and document all of your organization's current business logic. Then, determine whether or not that logic will need to change to accommodate ThingWorx DPM.
05. Determine Security Requirements
After reviewing the previously documented security requirements, determine what additional requirements your organization will need per line and plant. Consider the industry your organization currently manufactures for.
06. Understand the Hardware Requirements for the Program
Review the hardware you are using on the initial line. Then, determine how you would execute a similar deployment on a different line or at a plant. Do you have the appropriate hardware to support the deployment of DPM?
Plan Solution Expansion
Plan which sites to deploy DPM to next and determine what future applications will look like.
Before you begin, complete these steps:
01. Identify and Prioritize Deployment Locations
After reviewing the metrics from the first line deployed, determine which line should go next. Ideally, you should have an entire factory rollout plan as early as possible – or at least beyond the pilot line. Make these decisions after making updates and customizations to the application. Finally, select a line that is similar to the line your team just launched. A site with a similar infrastructure benefits your team tremendously.
02. Understand Benefits at Each Location
When you understand the benefits, you can determine the order of lines and plants to deploy DPM. First, start with the lines that’ll benefit significantly from DPM’s features. Next, focus on lines that need improvements to their overall efficiency and proceed.
03. Revisit Building Blocks
You began using DPM out of the box and revisited building blocks for potential customizations to improve DPM use. While considering customizations for your application, think about whether it should be line-specific customization or more universal across your sites. If it is line-specific or site-specific, continue rolling out DPM out-of-the-box functionality (OOTB) on new lines or sites. Then, the site-specific team can revisit customizing DPM as a separate project. On the other hand, if your customizations need to be a universal change within the application, regather your team and plan those customizations.
Recommended Resources
Create Program Plan
Document your strategy for Digital Performance Management by creating a program plan. Determine who should oversee the program, when key milestones occur, and how you will coordinate your efforts across teams. Most importantly, focus on supporting your organization's strategic business goals.
Before you begin, complete these steps:
01. Review PTC's Recommended Program Plan
The program plan outlines how you will achieve and measure the value you expect to gain for the business and reflects your vision for your DPM use cases. The program plan is high-level, long-term, and affects multiple areas of your organization.
A program plan should specify:
- Roles and responsibilities
- Program governance
- Program scope
- Roadmap
- Program risks
- Escalation plan
- Program operating model
Focus on quantifiable goals you expect DPM to help your organization achieve. Later, you will create a project plan that details how you will complete specific deliverables to support those goals:
- Document your program plan, share it with your team and ensure everyone is working toward a shared goal.
- Revisit the plan as your implementation progresses, changing it as needed.
- Designate someone to maintain the document: a project manager, program manager, or champion.
02. Navigate Changes in Process and People
As you develop your program plan, consider how you will facilitate changes that DPM brings. As a result, your workforce adopts a new mindset, develops new skills, and learns new technology and processes.
To help employees embrace change, plan to:
- Communicate consistently
- Listen openly to concerns and questions
- Encourage participation
- Share the benefits that DPM bring to the employees and the organization as a whole
- Obtain active and visible executive sponsorship
- Dedicate resources to planning and enacting change management
Later, you will plan how to build excitement and address concerns with others at your organization.
PTC can help your organization navigate change and achieve your goals faster. Contact your PTC sales representative to learn more about organizational change support.
03. Assign Roles and Responsibilities
Earlier, you outlined the roles you need to implement DPM successfully. If you have not already done so, document who at your organization will fill those roles. Some team members are responsible for achieving the program goals, while others are responsible for executing specific deliverables to support those goals.
04. Establish Program Governance
Organize the people on your team to facilitate success. First, decide who is invested in and accountable for achieving key goals. Typically, the champion is responsible for governing the program. However, suppose you are rolling out DPM to multiple lines or plants across the organization. In this case, you may need various leaders to govern the program. A program manager may also be involved in coordinating the multiple teams. This role ensures team alignment and is responsible for meeting deadlines, following the strategy, and achieving goals.
The champion also identifies how DPM affects various business units across the organization. They collaborate with leaders whose teams use DPM and who may have conflicting needs. This role considers how this new technology affects people, processes, and tools and makes decisions accordingly.
Meanwhile, the execution lead, technical lead, and other team members focus on the day-to-day work of implementing the technology: setting up DPM and empowering others to use it. They report progress to the program manager and champion, who ensure they are achieving the strategic vision. Decide how to organize the project contributors and to whom they report. Also, decide who has the authority to make crucial decisions and take action.
05. Document Program Scope
Document the previously established use cases and the program scope. Which aspects of your organization benefit most? Next, determine which people, processes, and tools are affected by DPM. For example, your scope may include employees working at particular locations and exclude other locations.
Later, you will create a Project Plan that specifies more details about the people who use DPM and the procedures you will document.
06. Create Your Value Roadmap
A value roadmap defines the timeline and scope for each use case and the expected value attainment. You should estimate how much time your organization requires to fully implement your use cases. Depending on the scale of your program, your timeline could be four months, one year, or more.
Given your timeline, decide when to pursue each use case (which comes first, second, third). We recommend dividing your project into phases and working toward one or two use cases in each phase. Consider aligning phases to business quarters. Document how many phases you need and which use cases are included in each. Build milestones into the plan and measure progress as you go.
07. Anticipate Risks to the Program
Identify any risks to achieving your program goals and imagine how to mitigate them.
Possible risks include:
- Subject matter experts are too busy with their day-to-day jobs to learn how to use DPM and document essential procedures
- Employees have difficulty embracing new technology and choose not to use DPM
- Rigid corporate policies slow down the project
- The organization changes priorities and reduces support or funding for new technology
Often, proactive communication, strong executive leadership, and thorough planning minimize risk.
08. Manage and Escalate Issues
Establish a process for communicating, escalating, and resolving problems that may arise. By designating key decision-makers early in the project, you will be better prepared to address issues quickly. In addition, make sure the team understands the chain of command.
Questions to consider:
- Who has the authority to do and decide what?
- Suppose a contributor lacks the authority to make a decision. How should they escalate the issue to someone who holds more power?
- Whom should individual contributors contact to resolve day-to-day issues?
- How can contributors get attention from leaders promptly, if needed?
- Who approves work?
- How does work get approved?
- If two teams disagree, who makes the final decision?
Establishing a clear structure for managing issues prevents delays to the project later.
09. Operate the Program
Decide how everyone contributing to the project will collaborate and communicate (program operating model). In some cases, the decisions made by one contributor affect other contributors later, and you will need to share updates accordingly. Also, consider whether different workstreams need to be standardized across the program.
Questions to consider:
- Which teams are working on what, and when?
- How do contributors keep one another informed?
- How often should various groups meet?
- Which groups need to meet more or less frequently?
- How does everyone report their progress?
- Are there preferred communication methods or project management tools you can share?
- What information do executive stakeholders need?
Planning how the project operates is crucial for achieving your program goals, especially if the contributors do not often work together.
Scale Your DPM Solution
Plan your problem statements aligned to strategic business goals, identify and capture operational metrics related to each, and complete the PTC Impact Canvas for these specific areas and specific use cases.
Before you begin, complete these steps:
01. Review Lessons Learned From Pilot Site
Review the lessons learned from your pilot site and incorporate them into the current plans for scaling the solution. Consider involving participants from the first site to serve as resources to support the new teams.
02. Assemble Team at Each Site
As you did for the first line, assemble a dedicated team to deploy DPM at another site. In addition, refer to the Assemble a Team objective earlier in the path. When building these new teams, consider why DPM fits these locations. Then, engage with the appropriate employees.
03. Document Measurement Plan at Each Site
Each of your plants or lines may require unique metrics tracking. Evaluate each one closely and refer to the initial measurement plan you created. Keep in mind the critical functionality of DPM and the types of metrics it is designed to capture. Then, elaborate on those metrics and plan them across your organization.
04. Plan Stakeholder Involvement
As you did for the first line, engage with all essential stakeholders at each plant. Refer to Mobilize Executive Team to review the list of key stakeholders and determine who will fit the roles listed. You will need to create this list for each plant.
05. Inform Project Team
Creating a clear governance plan is key to completing your first line quickly.
A governance plan refers to an enterprise's roles and processes that serve as a guideline for fulfilling, sustaining, and extending IT planning. A governance plan applies to all organizational layers, including stakeholders, administration, maintenance, strategy, policy, and support. Refer to the governance plan you previously established.
06. Plan Feedback Mechanism
It is vital to obtain feedback and capture opportunities to address concerns. Specifically, you will want to gather feedback from the first-line deployment. Refer to the Plan Feedback Mechanism section in Mobilize Executive Team for best practices. Then, make adjustments based on the plant's unique structure and needs.
07. Review Project Communication Plan
A communication plan will need to be created for each deployment of DPM. This will help you determine how, when, and with whom you will communicate throughout your DPM project. Of course, your stakeholders will have different needs based on their roles. Refer to Mobilize Executive Team to see how to create a communication plan.
08. Complete Training
Train the stakeholders for the line or plant you will be deploying DPM. Review the recommended training in Assemble a Team.
09. Communicate Project Kick-Off
You are now ready to begin to scale DPM. Communicate the kickoff of the following line's project, and share the results of the first deployment. At this point, you want to get your end users excited about future changes. This success path can be used as often as you need to scale your capacity goals.