Get Started with Windchill+
Everything you need to get started with Windchill+
Destination or Printer: select Save as PDF
More Settings: In the Options, be sure the boxes Headers and footers and Background graphics are selected.
Finalize Project Plan
Before development begins, project plan details should be completed and signed off on by al appropriate parties. This should include timelines, staffing needs, and any other details that are specific to the project.
01. Project Plan Details
Much of the project plan will have been defined or had the framework set by the SoW. These aspects would include the acceptance criteria as part of the definition of a minimum viable product and hypercare coverage that will take place. Review these details with the partner/PTC and ensure they are still appropriate and accurate to the desired result of the project.
Ensure there are proper training considerations for end users as well as a communication plan for end users in place. These two aspects of the project will allow for a much smoother and more productive launch for both end users and support. Training should begin well before Go-Live and continue throughout the lifetime of the product. PTC offers many options for training across users, but internal training is also encouraged, especially if customization is involved.
02. Reassess IT Needs
At this point in the project, ensure all entitlements and cloud needs are aligned among all parties: the business, the partner, and PTC. This is important because setting up Windchill+ environments takes time, a minimum of 7 business days, but up to 2 weeks; thus, it cannot be quickly set up and delivered.
As part of finalizing the project plan, a verification and validation plan should be developed. Having a plan like this before the solution is built ensures that the system works as the business expects and that any customizations work as designed. Ensure there is a method to check the system. The partner should be able to assist in this testing as well as confirming results, but it is up to the business to ensure all desired functionality is present and working as expected.
03. Data Migration
Data migration considerations should have been finalized at an earlier stage, but at this point, during the finalization of the project plan and design, all assumptions about data migration, including size, form, and timing, should be validated and reiterated to all appropriate parties. This is also the time to communicate these needs to the PTC cloud team, allowing ample lead preparation time to ensure the process goes as smoothly as possible.
04. Sign Off
Make any updates required to the project plan and design, ensuring all appropriate parties sign off on the plan.
Did you find this helpful?
Discovery and Requirement Gathering
Finalize Design
Table of Contents
Overview: Get Started with Windchill+
Use this guide to plan, design, setup, and deploy Windchill+ for your organization. Provided are step-by-step instructions, training, documentation, and services to assist.
There are multiple sections within this path, please click the link below that best describes your current relationship with Windchill+.
I am considering purchasing Windchill+
I am ready for the Implementation of Windchill+
What is a Success Path?
A Success Path is an online guide to help you implement a specific PTC product at your organization. Each path provides step-by-step instructions from the early planning stages all the way through to deployment. Use a Success Path to help your organization get the most out of a product and achieve your business goals.
Did you find this helpful?
Get Familiar with Windchill+
Windchill+ takes traditional enterprise PLM with its comprehensive capabilities and optimizes it with all the benefits of cloud computing and services. Users of Windchill+ enjoy the same configurable workflows, change management processes, and BOM capabilities, alongside zero downtime upgrades, frictionless adoption of new modules, and built-in security. Windchill+ is the first of its kind: a feature rich PLM solution delivered entirely as a service for improved multi-enterprise collaboration and a fully connected digital thread.
Before you begin, complete these steps:
01. What is Windchill+?
Windchill+ is a cloud-based PLM solution that manages your product lifecycle from concept to delivery, fostering collaboration among teams, streamlining workflows, and optimizing processes. Data can also be accessed anytime, anywhere, from any device resulting in tasks being completed quicker and easier.
02. What are the Benefits of Windchill+
Windchill+ retains all out-of-the-box functionality of on-premises Windchill with the added benefit of the seamlessness of a SaaS offering. The result of this combination is a powerful PLM solution that acts as a catalyst for your business to ensure product development goals are met.
Windchill+ helps achieve your product development goals by:
- Reducing costs and risks: Windchill+ reduces or eliminates hardware, software, and maintenance costs, along with providing backup and disaster recovery. It also complies with industry standards and regulations, and protects data with encryption and authentication.
- Increasing efficiency and productivity: Windchill+ automates tasks, integrates with tools, and provides real-time visibility and analytics.
- Improving quality and innovation: Windchill+ supports design, engineering, and manufacturing processes, facilitates testing, validation, and iterating products via change management. It also fosters creativity and collaboration with features such as comments and in system feedback loops.
03. Utilizing ThingWorx Navigate and PLM Foundation for Windchill+
PTC offers multiple ways for users to begin using Windchill+ quickly and effortlessly. This includes a user interface, ThingWorx Navigate, as well as a backend offering that includes a foundational setup for Windchill, resulting in quicker time-to-value and more seamless, vetted operation.
Windchill+ enjoys the same out-of-the-Box functionality of ThingWorx Navigate as on premise Windchill. All users can quickly begin to utilize Windchill+ in a simple and streamlined interface, allowing not just a quick implementation via PTC Cloud and SaaS, but also a quick learning curve for users to begin benefitting from the software.
There are set guidelines for ThingWorx Navigate to ensure all ThingWorx projects and environments integrate with Windchill+ securely and stably.
The PLM Foundation VRD acts, as the name suggests, as a foundation for a new Windchill+ instance. This VRD aims to give customers a starting point and guide the implementation team in configuring Windchill to meet specific business needs.
Recommended Resources
- PLM Foundation VRD (Ptc-partner.workrails.com)
PTC login required - Accelerate Innovation with Windchill+
- Contact Sales
- SaaS vs Self Hosted PLM Solutions
- Windchill+ Help Center Help Center
- Master SaaS Agreement (Ptc-p-001.sitecorecontenthub.cloud)
- PTC Trust Center
Set Goals and Metrics
Windchill+ is designed and built to facilitate your business goals. Goals vary wildly from industry to industry and business to business. The primary benefit of Windchill+ is allowing any business to achieve its goals quicker and with less friction. PLM can work to help you achieve the goals of your business instead of simply being something that must be done.
Before you begin, complete these steps:
01. Immediate Wins
As a SaaS solution, implementation is twice as fast when compared to typical on-premises solutions. This is achieved by all deployments being based on a single best practice configuration, enabling customers to adopt new capabilities seamlessly and ensuring a consistent user experience. This is also completed by shared vaults between production and non-production systems, allowing for faster rehosting turnaround time, which accelerates the implementation timeline significantly.
Increased security with decreased security costs is a foundational element of Windchill+. PTC is a continuous, active ally in ensuring the safety of data housed within all Windchill+ environments. With multiple security certifications, PTC is uniquely positioned to act as the single point of responsibility for your service and cloud, and is uniquely qualified to respond to any security incident.
Recommended Resources
02. Measurable Impact
Not all metrics can be easily measured, but Windchill+ will have a measurable impact on many aspects of the business in relation to PLM. One of the simplest, and most important, is the number of users with easy access to PLM data. Windchill+, with ThingWorx Navigate, gives a user-friendly way for non-experts to view data directly without the need for extensive PLM knowledge.
Here are some other examples of goals:
- Increase the number of users with easy access to PLM data by a designated amount
- Decrease the amount of time engineers dedicate to answering inquiries by a specific percentage
- Reduce product development costs by a specific amount
- Reduce time to market by a specific amount
Determine what metrics, or key performance indicators (KPIs), you can use to measure progress toward your goals.
Some examples of metrics to measure progress are:
- The number of users accessing PLM information
- The number of new users from specific groups or work areas
- The frequency with which users access data
- The number of calls and/or meetings between groups
Regardless of what your goals and metrics are, ensure they can be reliably tracked. Discuss with people within the organization who have access to data or collect data to set realistic expectations of what is possible. If the metrics are not being actively measured, begin now. If that is not possible, select different, applicable metrics.
Recommended Resources
03. Long Term Wins
By being a Software-as-a-Service (SaaS) solution, update cost and disruption are immediately negated upon deployment. A typical on-premises PLM solution upgrade occurs every 2-3 years, costs 1-2 million dollars, and can result in 2 days of downtime. Windchill+ guarantees the most up-to-date version available, with a predictable update schedule. Update costs are included in the service, and the downtime for upgrades is minimal.
Internal IT support costs decrease dramatically upon Windchill+ implementation. This is caused by several factors, including the ability to scale as needed and reacting to migrations or large data imports easily. PTC is responsible for the full stack and is accountable as the single partner. This support allows internal IT to focus efforts on other ways to improve environments and frees up time for improvement in other areas. The final aspect that frees up IT resources is the guarantee of vertical and horizontal integration compatibility. Infrastructure is assured up and down the stack, versions of OS, Java, Database, etc. are guaranteed compatible and a prescriptive upgrade schedule accounts for compatibility across all PTC SaaS offerings.
Recommended Resources
Defining Your Windchill+ Environment Strategy
Each Windchill+ environmental strategy will depend on industry requirements and should vary based on business needs. Windchill+ is flexible enough to function utilizing only two environments, one production and one nonproduction, or can facilitate as many environments as desired. Utilize the information below to decide on your business’s needs.
Before you begin, complete these steps:
01. Windchill+ Environments
There are several different environments that Windchill+ can utilize and the number of environments along with which type will vary from industry to industry and business to business. Included with all Windchill+ packages are one production environment, where the live version of your Windchill instance will be housed and one integration environment, a bridge environment between development and production.
More complicated projects, such as Windchill Bulk Migrator (WBM) being within scope after implementation, may require other environments, such as a migration environment or a secondary integration environment.
A development environment is required for all Windchill+ packages to function appropriately. This environment can be built by the customer in conjunction with the PTC-enabled partner.
NOTE: Contact your Sales Representative or CSM to access the Cloud Portal detailed below.
Alternatively, partners can take advantage of a virtual machine hosted by PTC on the PTC Cloud Portal. The cloud portal method is recommended by PTC as the PTC Cloud Portal will come pre-configured to align with the customer's Windchill+ target environment. Partners can build the development environment simply and efficiently utilizing templates and this saves customers from the expense and maintenance of a locally hosted development environment.
Costs associated with the virtual machine are minimal and can be further decreased with automatic shutoff times daily, which can be easily set within the portal. Once the virtual machine image is requested, the image will be available within an hour for development and usage. Partners and customers can stay up to date on new features as well as evolving technical notes via the Release Notes published along with each release.
Recommended Resources
- Reference Documents PTC login required
02. Windchill+ Maintenance Needs
The maintenance needs for a Windchill+ production environment is significantly less than any non-SaaS PLM solution. PTC takes on most of the responsibility and effort for scaling, updating, and troubleshooting, resulting in the ability for each business to focus on improvements and efficiencies as opposed to regular maintenance. Updates will be performed in conjunction with PTC, ensuring smooth transitions to new versions and when business grows, adding additional licenses is simple and quick with support from PTC cloud.
03. Windchill Navigate Considerations
Windchill Navigate licenses are included along with each Windchill+ license. This additional software allows nonexpert users to have easier access to PLM data. Windchill Navigate should be hosted in the cloud along with Windchill+, and the only requirement for environments and testing is that an identical Windchill+ environment be available for connections testing, ensuring data is flowing as expected. This environment can be the same environment used for any integration testing.
Recommended Resources
04. CAD Considerations
CAD data management in Windchill uses business objects called CAD documents to contain and manage CAD information within a Windchill database. In Windchill, a document is an object containing files in application format. A CAD document is a revision-controlled, lifecycle-managed object containing a CAD model or drawing file. The CAD model can be a file or a set of files containing information in a CAD application format. While CAD documents can have other information related as attachments, the model file is the primary content. For Windchill users, the CAD document becomes almost synonymous with the CAD file. For example, initiating the "Open" action (in a CAD application) on a selected CAD document in Windchill opens the model file into the authoring application.
In the simplest case, CAD data management in Windchill helps you store and retrieve CAD files as you work on them. When design files are modified and checked in to Windchill, the changes are then visible to other users, enabling group collaboration.
CAD documents typically represent elements of a CAD assembly structure and can be associated to Windchill part objects that comprise a parallel product structure. This allows the exchange of attributes between Windchill parts and CAD documents. When related Windchill part objects (see Parts in Windchill) and product structures are included and managed, then CAD data management becomes elevated to product data management (PDM).
Define System and integration Requirements
To define system and integration requirements, the business must understand the OOTB features and benefits of the Windchill+ solution. It has built-in functionality that can be immediately utilized without any modification but allows some customization within limits. Cloud security and migration are also important aspects of the requirement, and the details are below.
Before you begin, complete these steps:
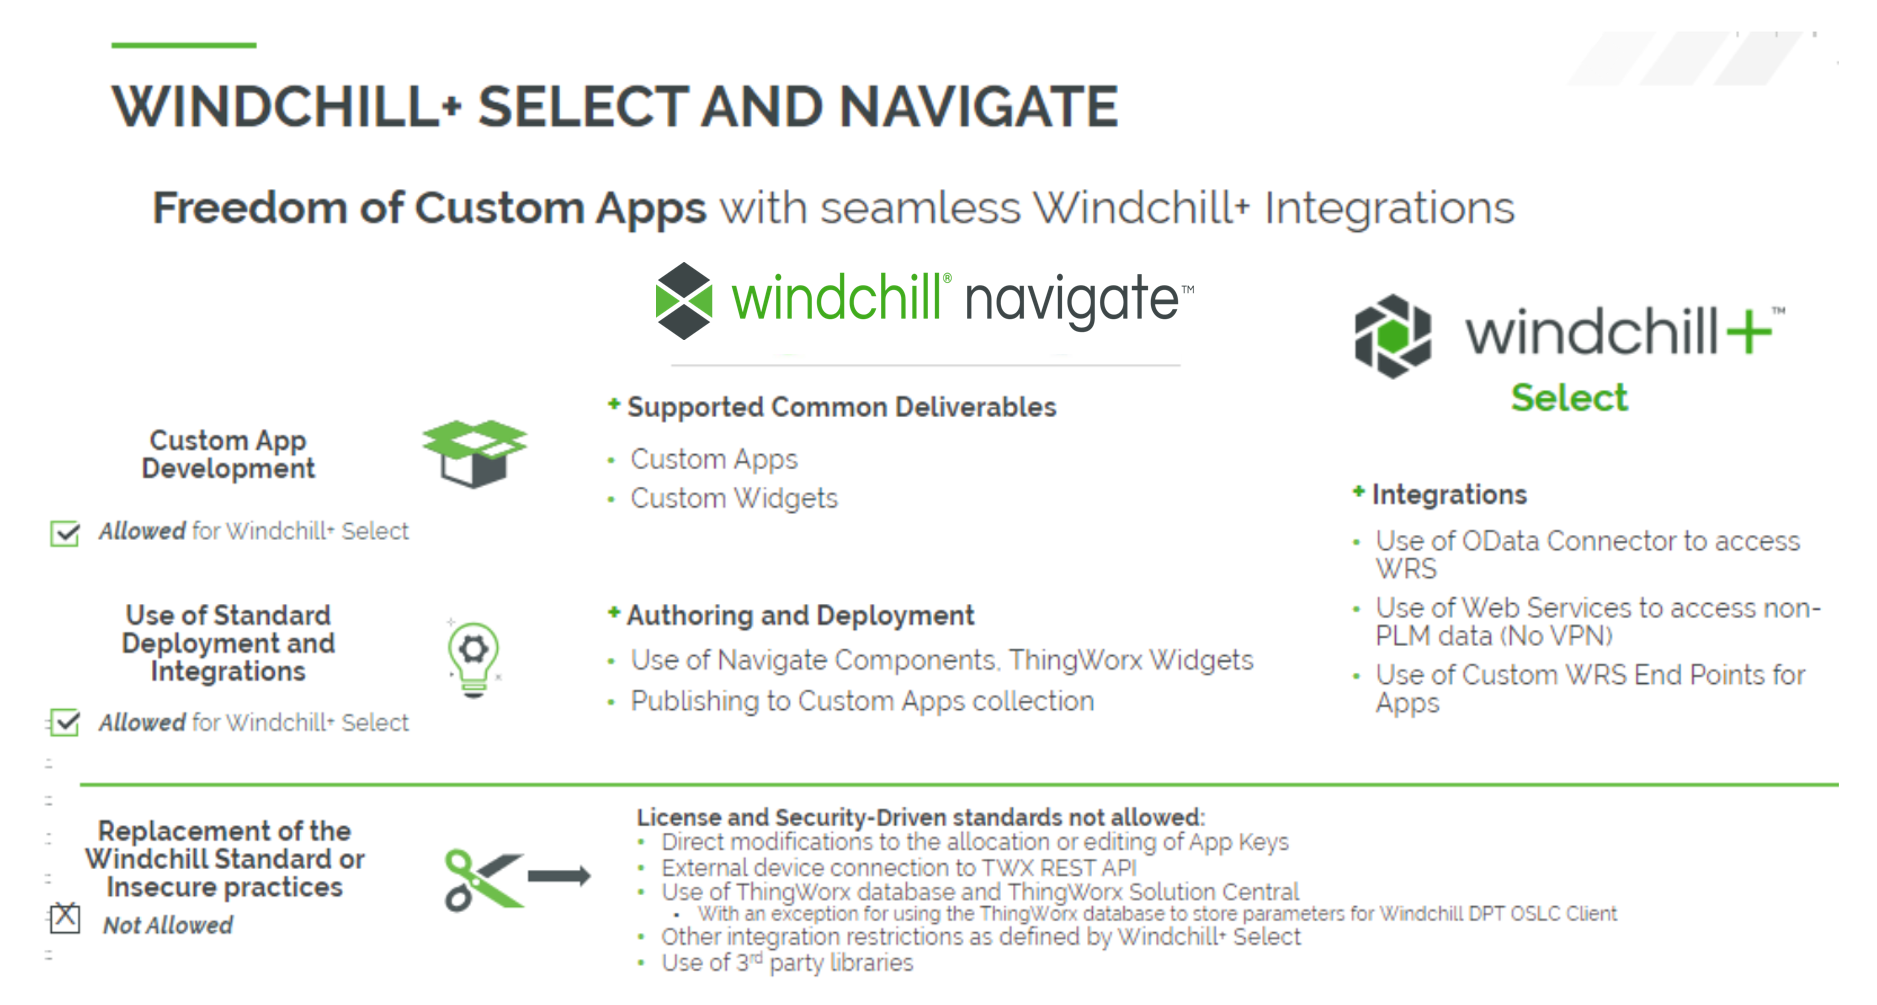
01. Windchill+ Guidelines and Guardrails
Windchill+ solution is designed to be fast and easy to use, offering several ways to meet business needs. It provides a strategic way to monitor, track, and manage people, information, and processes at every phase in the lifecycle of the product. The out-of-the-box (OOTB) functionality provides pre-defined options and is available immediately upon installation. With that in mind, customization can still be required for certain scenarios. PTC defines certain guidelines and guardrails for any customization.
There is a defined list of allowed customizations available as well as disallowed customizations.
Before proceeding with any customization:
- Evaluate the business value versus introducing additional system complexity.
- Ensure that the process you choose minimizes complexity and streamlines system upgrades.
Recommended Resources
- Windchill PLM - Client JavaDoc PTC login required
02. PTC Cloud Security Requirements
There are very few cloud security requirements for Windchill+. The main one regards deployment files utilizing the Code and Configuration Deployment (CCD) Utility. A CCD file must be provided to PTC for each deployment. This includes both initial deployment and any subsequent deployments with code changes. This does not apply to updates or standard modifications. A CCD is required for initial deployment along with any customer customization that may occur, resulting in a change in the code.
If a forbidden file type is submitted or if there is something wrong with the CCD, PTC will flag it and notify the customer that changes are necessary. The customer can then rework the file and resubmit. If unable to resolve the issues, the customer can always reach out to PTC via a support ticket for assistance.
03. Migration Considerations
Consider any existing PLM data that would need migration into Windchill+. This process can be extensive and should be considered early. If there is no migration effort required, this section can be skipped.
For an overview of how the Windchill Bulk Migrator functions, please click here. This page will give a high-level overview of what to expect in the process of migration. If the current PLM data is extensive and requires migration, a PTC implementation partner should be considered to ensure the process is done efficiently and completely. Not all partners can complete this task, contact your PTC presales representative for more information.
Environment required for data migration:
- A clone of the source system
- Intermediary system/database where data can be processed
- Local/Development target system
- Create a PTC support account
Recommended Resources
04. Scope Reduction Due to SaaS Offering
Windchill+ offered as a SaaS solution, results in a combination of automated tools, streamlined self-service capabilities, and subsumption of many administrative tasks. This simplifies or eliminates deployments and updates, vaulting, cloning/re-hosting, change management, security, and more. All of this means the business can spend more time innovating and getting things done, with a PLM solution acting as a facilitator instead of an obstacle.
Finding an Implementation Partner and Assembling a Team
Putting together right team is paramount to success on any implementation. A Windchill+ implementation will require a skilled internal team along with some external resources. Consider the most qualified and capable members and ensure they have the needed skills before continuing the project.
Before you begin, complete these steps:
01. Skills of Partners to Consider
When selecting an implementation partner, consider the segment the partner specializes in, along with which geographical area it serves. Different partners specialize in different services as well. Use this tool to filter partners based on these criteria. If your business has large data migration concerns that the implementation partner will need to handle, contact your pre-sales representative from PTC for advice on potential partners.
If your business already has a preferred partner, then there is no reason they cannot be used as long as they are capable of completing the task. If they are not part of the tool previously mentioned, please reach out to your pre-sales contact for more information.
Recommended Resources
02. Windchill PLM Implementation Assurance
For customers who would like a smoother implementation experience, PTC recommends customers reach out to their Customer Success Manager assigned to this assurance service. Please contact your PTC representative about the Windchill PLM Implementation Assurance Service. In this service, PTC will support customers and their partners through the various Windchill PLM implementation project stages. Challenges to meeting this goal include varying degrees of product maturity with varied and complex customer business use cases. As a result, these projects often require a great deal of expertise and experience to ensure our customers achieve lifetime value with our application. PTC offers this joint go-to-market approach with our Partners to share knowledge and advice with our customers throughout critical phases of Partner-led engagements.
A customer might be a good fit for this service if they are…
- Partner-lead Implementations
- Single Line of Business
- Single Language, Region and Currency
- Seeking a Standardized Approach to Implementation
- Assurance Service engagement established prior to Project Kick-off
A customer might NOT be a good fit for this service if they are…
- Inability to adhere to a governance structure
- Multiple Languages or Regions
- Looking only to solve a singular specific existing business need
- Are not concerned with the future impact of their design solution
- The project has already started
03. Internal Cross Functional Core Teams
Building a strong and committed internal core team is essential to the success of any large project and an implementation of Windchill+ is no different.
General Project Roles
- Project Sponsor
- Project Manager
Technical Project Roles
- IT Administrator: This role is responsible for installation, infrastructure, network security, and authentication. This individual will need the following skills:
- Familiarity with infrastructure costs and procurement
- Understanding of data architecture, including Windchill
- System Integration
- Understanding of security requirements, including certificates and current Windchill security
- SSO configuration
Other Roles to Consider
- Organizational Change Manager
- Business Process Consultant
Subject Matter Experts
- Technical Experts
- These individuals should have an understanding of PLM processes and need from a solution perspective. They could include power users on a current system or IT personnel who currently provide support to the existing solution. This group is not limited to these individuals and should include anyone within the organization it is believed will have technical knowledge that will be vital to the overall design of the solution.
- Business Experts
- These individuals should have a deep understanding of the overall PLM process from a business process perspective. They should know how the business wants the flow of information to function and how PLM is used throughout the business. These experts can come from any number of backgrounds but should include at least some who have a high-level view of the process and can provide details and insight on how departments interact and how processes touch.
04. External Teams
There may be a need for extra external teams, but most customers will utilize an implementation partner to assist throughout the deployment process and for initial tech support. Along with the partner, considering Windchill+ is a cloud-based solution, PTC’s cloud team will be involved for the lifetime of the solution.
Create Your Project Plan
A comprehensive Project plan is integral to the success of any project. Windchill+ is no different. See what that plan should entail below.
Before you begin, complete these steps:
01. Internal Project Manager
Determine and identify a project manager who can act as the main point of contact with PTC and/or the partner. This individual will facilitate communication with both external resources and internal teams to ensure the project proceeds efficiently with minimal delay resulting from confusion or miscommunication.
02. Governance Model
An agreed-upon governance model should be established by the customer and should include such things as a RACI matrix that defines and specifies responsibilities to specific departments and individuals. This RACI matrix should designate where duties lie, especially when referring to internal vs Partner (or PTC). An internal champion should be identified as well, someone who is or can become more familiar with Windchill+’s offerings and can present those capabilities to a wider audience.
An important part of governance and something that should be defined and agreed upon at this point is a system for risk management and an escalation path for any issues that may arise during development and go-live. Documentation on how to resolve risks identified or issues once they arise is vital for a successful project. A defined escalation path assists in this and leaves no ambiguity as to who has the final say if any issues arise.
03. Confirm Target Go-Live Date/Minimum Viable Product
A confirmed target go-live should be defined and agreed upon, and the project timeline will require a specific amount of time. The go-live can be anytime afterward, but whatever date is chosen should be known to all project team members. The minimum viable product should have been defined when the SoW was signed, and this product should be kept in mind as project timelines and expectations for go-live are set. Another aspect of timelines to note is the setup time for environments. Access to environments can take several days, and these timelines should be considered now.
To ensure the product functions as expected, from a business and technical perspective, the customer and partner should have a validation/verification plan established. This will act as a method for checking the system functions fully as initially set out by the Statement of Work (SoW). This plan should also include validating any customization functionalities.
04. Project Schedules and Communication
A project kick-off should be scheduled with all appropriate parties along with workshops where requirement gathering will occur. There should be two different types of workshops: a business process-focused one and a technical-focused one. Each should be scheduled, and the individuals identified as Subject Matter Experts should be informed of the schedule to ensure all appropriate parties are available to attend.
These workshops will act as a basis for solution development, and so each department and area of expertise should be represented to ensure no important details are missed during requirements gathering that could result in a delay in development or, worse, a missing functionality at go-live.
05. OCM (Organization Change Management) Strategy
The majority of the involvement with the partner and PTC for the OCM Strategy will have been defined by the initial Statement of Work, but the following things should be considered in a general sense:
- Understand changes and benefits for users
- Identify what will change for users with the new solution
- Gather insights from mid-level and frontline staff to anticipate any potential risks
- Create a communication plan
- Use the questions below to guide the communication plan:
- Who are the audiences outside of the project team?
- What does each audience care most about?
- What do they need to know to be successful?
- When do they need to know certain information?
- What are the existing, best channels to communicate through?
- Who can most effectively deliver the message?
- How often should each audience be communicated with?
- What do you need from your audiences at different points in time?
- Use the questions below to guide the communication plan:
- Evaluate documentation needs
- Create a list of the groups who need documentation to install, support, and use the solution. For example:
- System administrator
- Solutions architect
- Application support team
- Help desk
- End users
- Talk with the implementation team about what has been documented so far. Ask managers of teams that will need the documentation:
- What they need in the documentation?
- When they need it?
- How best to deliver it?
- Create a list of the groups who need documentation to install, support, and use the solution. For example:
- Plan end user training
- Evaluate what training end users will need to be successful and comfortable with the new solution
- Consider license requirements including count and type of licenses
- Determine long-term solution support
- Determine who will provide long-term support
Recommended Resources
- PTC University Windchill Training Catalog (Training-materials.ptcu.com)
- Windchill Licensing Central Resource eSupport PTC login required
Discovery and Requirement Gathering
Requirement gathering from the appropriate resources is paramount to Windchill+ having a successful implementation. This includes requirements from both a technical perspective as well as a business process perspective.
Before you begin, complete these steps:
01. Training Plan
At this stage, consider who should be trained and in what order. It is recommended to train individuals who will act as administrators along with core and power users first. The training can be performed by a partner, by PTC, or internally depending on skill level and resources available.
Users should have access to some version of Windchill+ during the training to begin experimenting and getting hands-on experience with the solution. This will allow them more than theoretical knowledge and better equip users to give informed and constructive information during workshops.
PTC also offers a wide array of online enablement to assist in training. This includes free courses along with extending training that can be purchased individually or via a subscription.
02. Business Workshop
Hosting business requirement workshops early with the intent of informing is foundational to understanding all customer stakeholders' known timelines, expectations, and goals of the implementation.
During these workshops, a complete and agreed-upon version of the current state of the business process within a current PLM system should be created, which is paramount to a successful implementation of Windchill+. This process will ensure all business needs are met within the system at deployment instead of having to backtrack later to add or modify functionality. Document any gaps from a business perspective at this time so a resolution can be reached with minimal or no impact on the business.
Each industry's regulation requirements vary and should be noted and recorded now to ensure compliance immediately upon implementation. Take the time now also to make all stakeholders aware of user requirements. What do users need to ensure success and a quick-to-value experience for the PLM solution?
03. Technical Workshops
A series of technical workshops at an early stage in the project can result in less need for changes later in the process. Identifying essential details such as security requirements, integration requirements, and architecture requirements now, in the design phase, will result in a more straightforward development and inevitably result in fewer changes as development occurs. PTC and/or the partner will work with the customer to identify technical gaps and potential resolutions to those gaps.
Other requirements to consider include customization requirements, which can significantly impact timelines and should be done sparingly to fit specific business needs. Single sign-on (SSO) requirements and security should be considered; this discussion will go hand in hand with license requirements.
CAD data management is integral to any PLM solution. Consider what system configuration requirements will be necessary and ensure there is knowledge regarding this effort within your organization or within your organization or partner.
Please note, if there are any data migration requirements, they should have been identified earlier, but if they were not, please ensure the appropriate resources are available internally or from a partner, as this can potentially be a large project. Migration can occur all at once during go live, partially at go live, or occur afterwards, and this will be a decision to be made by the business.
As part of the technical workshop, PTC or the partner will provide the customer with an understanding of licenses. This will include how licenses work along with what features and functionality each license type grants users.
04. Document Gaps from Current System to WC+
Windchill+ has a multitude of out-of-the-box features and functionalities, as well as the ability to customize to specific needs. However, legacy PLM systems can have an almost infinite number of potential modifications that have been done. At this step, documenting any technical gaps that may result from the transition to Windchill+ is essential because it will allow time and thought to go into a potential solution. The partner or PTC will assist in this process to ensure that all functionality of Windchill+ is understood and all parties agree upon all potential gaps.
The PLM Foundation VRD can be utilized to assist with gap analysis. This is a free tool offered by PTC to its partners and can act as a starting point for a customer's implementation journey and identifying gaps to achieve their future desired Windchill+ state.
Finalize Project Plan
Before development begins, project plan details should be completed and signed off on by al appropriate parties. This should include timelines, staffing needs, and any other details that are specific to the project.
Before you begin, complete these steps:
01. Project Plan Details
Much of the project plan will have been defined or had the framework set by the SoW. These aspects would include the acceptance criteria as part of the definition of a minimum viable product and hypercare coverage that will take place. Review these details with the partner/PTC and ensure they are still appropriate and accurate to the desired result of the project.
Ensure there are proper training considerations for end users as well as a communication plan for end users in place. These two aspects of the project will allow for a much smoother and more productive launch for both end users and support. Training should begin well before Go-Live and continue throughout the lifetime of the product. PTC offers many options for training across users, but internal training is also encouraged, especially if customization is involved.
02. Reassess IT Needs
At this point in the project, ensure all entitlements and cloud needs are aligned among all parties: the business, the partner, and PTC. This is important because setting up Windchill+ environments takes time, a minimum of 7 business days, but up to 2 weeks; thus, it cannot be quickly set up and delivered.
As part of finalizing the project plan, a verification and validation plan should be developed. Having a plan like this before the solution is built ensures that the system works as the business expects and that any customizations work as designed. Ensure there is a method to check the system. The partner should be able to assist in this testing as well as confirming results, but it is up to the business to ensure all desired functionality is present and working as expected.
03. Data Migration
Data migration considerations should have been finalized at an earlier stage, but at this point, during the finalization of the project plan and design, all assumptions about data migration, including size, form, and timing, should be validated and reiterated to all appropriate parties. This is also the time to communicate these needs to the PTC cloud team, allowing ample lead preparation time to ensure the process goes as smoothly as possible.
04. Sign Off
Make any updates required to the project plan and design, ensuring all appropriate parties sign off on the plan.
Finalize Design
Before beginning any development, an agreed-upon design, comprehensive documentation, and a system to handle any changes or issues that may occur are vital to success.
Before you begin, complete these steps:
01. Data Flow Planning
Migration and Integration needs should have been considered earlier in the process, but finalizing the details and ensuring all project team members are aware is just as important. Details such as how many migration rehearsals should take place and finalizing a list of all upstream and downstream systems should be worked out by this stage.
Ensure there is a set plan and design for how data will flow throughout the system. Once the plan and design is made, ensure there is a plan for testing the flow of data during the migration as well as how it will function once the system is fully set up and running in production.
02. Finalize the Design of the Solution
The design of the solution will entail anything that the implementation team should need to know going into development and deployment. This information can include, but is not limited to:
- Providing existing business documents to the project team
- Ensuring the project team has all existing documents that describe and lay out business processes that Windchill+ will handle and interact with.
- Auditing existing business Processes
- Auditing any existing business processes before implementation of the solution will ensure that the solution is fulfilling business needs as they currently exist.
- Identifying the gaps in the solution
- Windchill+ is a complete PLM system, but if there are needs that the business requires that the OOTB functionality does not meet, identifying gaps that can be filled via custom solutions or gaps that can be filled via a change in business processes early before development will make the implementation smoother and the solution more effective.
- Managing customizations
- Before finalizing any customization needs, ensure they are within the Guidelines and Guardrails set by PTC. More customizations are hard to manage in any system. Windchill+ has these guardrails to allow for seamless updates and simple usage; however, managing customizations can generally be tricky since there will be no documentation outside the organization. Ensure that proper and complete documentation of any customizations and that internal support exists to assist users and in future modifications.
- Confirming licenses and users
- Ensure that the development team, along with PTC, are aware of how many licenses are required.
Recommended Resources
- Windchill PLM - Client JavaDoc PTC login required
- Windchill Support eSupport PTC login required
03. Documentation
Please note that the PLM foundation VRD has templates available for some documentation that should be created. Examples include the Functional Description Document and Configuration Design Document. Partners have access to these documents and can provide them to customers as needed.
Create User Documentation
Create instructions that guide employees to successfully Windchill+. Create user documentation that helps users get comfortable and explains how to get help.
User documentation should cover:
- What Windchill+ is and how your organization is using it
- How Windchill+ will affect their job or role
- How to find and launch Windchill+
- How to use Windchill+
- How to get help from support teams
- How to troubleshoot and report errors
Ensure every user who will use Windchill+ knows how to access the user documentation. Update the documentation as changes are made to the application.
Create Technical Documentation
Record detailed information about how Windchill+ was designed and developed. Thorough technical documentation helps designers and developers make changes to existing experiences and create new solutions.
Technical documentation should cover:
- What each component of custom code does
- Any systems that integrate with Windchill+ and who owns them
- Procedures for maintaining and deploying code (DevOps)
Ensure any employee responsible for designing or developing Windchill+ knows how to access technical documentation. These details are especially important when employees leave or change roles, and when new employees join the team. If documentation doesn’t exist, you may lose knowledge. Update the documentation as changes are made to the application.
Create Administration Documentation
The administrator of Windchill+ will require instructions on how to manage users and maintain the application.
Administration documentation should cover:
- How to add, modify, and remove users
- Which user groups. Example: administrators, developers, and users
- How to ensure each user has the correct permissions
- Procedures for granting access to new employees
- Procedures for modifying access for employees who change jobs
- Procedures for revoking access from employees leaving the organization
Ensure all admins know how to access the documentation. When changes are made to the application, update the documentation accordingly.
04. Manage Issues and Changes
How an organization handles change and triages issues is fundamental to success. No solution can or should remain static with business needs changing in an ever-changing world. Refer to your Organizational Change Management plan created earlier.
Some things to consider for this management include an escalation policy and a more general governance policy. For hypercare, all issues would be brought to the implementor and then escalated to PTC if the problem is cloud-related or the partner is unable to resolve the issue. Post hypercare, internal IT support should handle triage and resolution of most issues with PTC Support available if necessary.
An internal governance should be developed and signed off on regarding change controls for future updates and modifications as well as design approvals. How these changes and approvals are managed and what individuals or roles have authority over the approvals is vital to ensuring the solution stays as robust as possible. The final governance to consider is how to handle blocking points. Who can make decisions as to what to do if there are delays or systemic issues, and how would they go about this task, ensuring there is a record of decisions?
Validating Access
Ensure proper access and training for appropriate parties is established or in the process of being established. Now is the time to ensure the requirements for deployment are fully understood.
Before you begin, complete these steps:
01. Understanding the PTC Cloud Deployment Requirements
Code is deployed to the PTC cloud via the Code and Configuration Deployment (CCD). The CCD utility, built on Ant script, is developed by PTC to apply customizations and configuration changes to a Windchill installation. CCD works on a standardized package structure and supports customizations for Windchill+. See the help center for information on the design goals of CCD.
Ensure it is understood by the appropriate parties how to provide the CCD file to PTC. Talk to your PTC sales representative, speak to your partner or reach out via a support ticket if this process is not fully understood by this point.
02. Validate Access
Ensure all early access users have access. These individuals could be Windchill Administrators, any partner users that require access, as well as any end users that may act as testers, trainers, or power users. At this point in the process, most users that will need access at go live should be identified and have access, or be in the process of receiving access to the system. Any users that will be involved in User acceptance training once development is complete should have access at this time. Users can gain access to Windchill+ in two ways: The Enterprise directory service or the Participant Administration Utility.
Administrators as well as anyone who would have input during the development should have access to the system as well as the correct permissions to allow for appropriate feedback during the development and configuration process.
03. Training
Training should be underway for Administrators of the system at this point. Familiarity with Windchill+ will most likely have already occurred around the workshops, but formal training for anyone who will act as an administrator or power user should be occurring. PTC University offers wide array of training courses for all levels and roles across. A partner will need to provide any training for customizations created by their team. This training cannot occur until later, but the foundation could be laid now to ensure user5s are prepared.
Solution Development
Windchill+ fully functions utilizing out of the box modules and can meet predetermined business needs with only these capabilities. To meet other needs, a custom or tailored solution may need to be developed. PTC, and partners, can help in this situation.
Before you begin, complete these steps:
01. Solution Development
Previously, when the solution design was completed, customization requirements should have been finalized. At this point in the process the solution will begin actual development. Development will typically occur in an iterative loop, deploying to various, tiered environments to allow for feedback and testing to occur as development continues.
A business participates in this process throughout in a way that will be discussed prior to development beginning. The amount of interaction between PTC or partners and customers can widely vary from daily or weekly sync ups to feedback and review only once development is completed. The customer should make known and discuss with the development team feedback and communication expectations.
The typical process would occur as follows on each of the environments defined: Build followed by Test, Evaluate, and Deploy. Environments include personal builds and team builds within PTC or the partner before reaching the customer test environments and eventually production.
Recommended Resources
- Windchill PLM - Client JavaDoc PTC login required
- Windchill Support eSupport PTC login required
02. Managing Data Migration
If there is no data to migrate, this section can be skipped.
A partner will be required for any large scale data migration. The scope of this should have been set in the Statement of Work (SoW). What to know ahead of time is that The partner and the customer are responsible for data extraction and data transformation into a usable form for Windchill+. Again, a partner will be integral to this process, as it can potentially be complex.
PTC's Cloud team is responsible for loading the data into Windchill+. Please contact your PTC representative to schedule the data load and to ensure everything is progressing as expected.
03. Managing Integration Design
If there are no integration requirements, this section can be skipped.
Windchill+ benefits from the same level of integration as standard Windchill with all the added benefits of being a SaaS solution. Keeping the most up to date version of the software running for your business means that any new integration capabilities added will be available quickly and seamlessly.
Integrations for Windchill+ include:
- Info*Engine
- Multiple CAD/ECAD solutions
- Arbortext
- Multiple ERP Systems
- Multiple ALM solutions
- Jira
- SDM
- Almost any system with bi-directional, synchronized data flow
Recommended Resources
Build and Configuration Management
Build and configuration management are vital to the success of any software, not just for go-live, but for the life of the software. Understanding restrictions, requirements and maintenance will define whether a business gets the full benefit of Windchill+.
Before you begin, complete these steps:
01. General Considerations
Build and configuration management are vital to the success of any software, not just for go-live, but for the life of the software. Understanding restrictions, requirements and maintenance will define whether a business gets the full benefit of Windchill+.
Recommended Resources
- Windchill Support eSupport PTC login required
02. Requirements for Build
The two main categories of requirements for any build are validating the build and addressing any failures that are identified via the validation process. Validation will occur on the customers QA/Test system and is done to ensure that all functionality deploys fully into production. If failures are identified, most likely the validation procedures will be repeated fully unless the failure is localized to a small area of the solution.
Addressing failures will begin with a ticket being created that identifies the failure and assigns the appropriate parties to handle the task of correcting it. The ticketing system will be decided by the customer and can be any number of systems.
The only considerations for ThingWorx Navigate at this point in the process would be authorization and ensuring any integration connections are functioning correctly using the OData connector with Windchill REST Services to communicate with Windchill.
Recommended Resources
03. Build Validation
Build validation for Windchill+ should be performed similarly to any software best practices. These best practices will vary somewhat from industry to industry however the following are types of validation that should be performed on any customizations performed.
- Integration Testing
- Coverage Testing
- User Interface Testing
- Compliance Checks
For ThingWorx Navigate, the only extra validation recommended is to ensure all connectors are functioning as expected and data is flowing and presenting as desired. Usability and functionality can be further tested during User Acceptance Testing.
04. What PTC Cloud Provides and Responsibilities
PTC cloud will always work with the business to ensure that any and all requests are handled and executed as simply and quickly as possible. When deploying a build, PTC Cloud will need a minimum of 7 business days' notice for the environment to be up and running, 2 days for evaluating the request and 5 days to execute. It is always a good idea to communicate with PTC Cloud to check availability as far in advance as is viable for your business's schedule.
Throughout the lifespan of your Windchill+ subscription, a usage report will be provided that details active users along with license usage for production environments. Another report will detail vault usage for all environments that are non-production, this includes Dev, QA and integration etc.
PTC Cloud will non-security updates on a regular basis. These updates vary on frequency and what an estimated downtime may be. Please see the chart below:
|
Update |
Frequency |
Estimated Downtime |
|
OS Patches |
3 months |
8-10 hours |
|
ThingWorx/Navigate Updates |
6 months |
6-7 hours |
|
Security Updates |
As needed |
2-3 hours |
|
Kubernetes Updates |
6 months |
4-6 hours |
All updates will be performed on a non-production environment first to allow for customer testing. Typically these updates will be 2-3 weeks ahead of production updates.
User Acceptance Testing
Thoroughly test the Windchill+ solution to ensure that all critical issues are resolved before go-live and begin final preparations.
Before you begin, complete these steps:
01. Prepare for UAT
To prepare for UAT, the most important part is to identify and reserve the individuals who will be performing the testing. These people should be able to perform the testing fully and report results to the appropriate parties to ensure that the testing and results are valid and complete.
Ensure the accounts of these individuals are set up and that proper access has been established to perform testing. Proper access/permissions for testers are essential to ensure that the system will work appropriately for all users after go-live.
Finally, ensure all upstream and downstream integrations are set up and data is flowing in each direction. Allow testers to move data into Windchill+ from any upstream systems, manipulate the data within the solution and then move the data to any downstream systems, testing the data flows and translates correctly across all possible paths.
02. UAT
Have all prepared users perform the user acceptance testing. This type of testing will vary from organization to organization but the goal of UAT is to ensure your Windchill+ solution can handle real-world tasks and perform up to development specifications. This means that the users performing their testing should utilize the software in a test system as if they were performing tasks in their everyday job.
It is important for users to know where and how to submit feedback, both positive and negative. UAT is only as useful as the feedback received from the testers, so ensure that before testing begins, everyone is aware of what to expect and how to have their voices heard.
03. Performance Testing
The most important part of performance testing during UAT is to perform a simulation that will mirror the maximum number of users and locations that are expected upon go-live. This is to say, if there are 1,500 users expected to access the system simultaneously from 4 locations in 2 countries, that scenario should be explicitly tested to ensure that everything works as expected and to the standards expected. A PTC partner should be able to perform this testing in conjunction with eh business to ensure both the
The second part of performance testing that will be critical is to ensure the ping that occurs between external systems, for example, an ERP is functioning as expected and has the type of speed and performance that will allow data to flow smoothly.
This performance testing completed before go-live will ensure that once the solution is running fully there will be minimal unexpected interruptions or slowdowns due to capacity or integration issues. Both of these factors are integral to the success of any PLM solution.
04. OCM Activities
It is vital to follow Organizational Change Management procedures during any type of user testing and feedback. This strategy should have been developed earlier, but ensuring all practices are followed will allow for UAT feedback, performance feedback, and any other related testing to have the desired effect of resulting in effective feedback and changes enacted to resolve issues.
Ensure during the test-feedback cycle that documentation is updated properly and training is modified accordingly. Keep the project team, administrators, testers and appropriate users informed, via your communication plan, to allow for maximum visibility into any modifications occurring before go-live.
05. Training Preparations
Nearing the close of UAT, it is important to have all training material defined and collected as well as beginning the train the trainer portion of user training. Assuming UAT does not result in any large, fundamental issues, while the testing is finishing up, training can begin.
Prepare to Go-Live
Make sure the people who will use and support the Windchill+ solution are ready for go live. Communicate downtime to end users and distribute updated documentation as well as how to access training material and report problems.
Before you begin, complete these steps:
01. Establish Go and No-go Criteria
Project stakeholders should prepare criteria to determine when to proceed ("go") or postpone ("no-go") going live with Windchill+.
Consider the following questions when creating go/no-go criteria:
- Have testers completed all test scripts?
- Have all milestones been met?
- Did testers get the results they expected?
- Have acceptance criteria been met?
- Have critical errors been resolved?
- Have non-critical bugs been reviewed?
- Have the project stakeholders approved going live?
- Is the implementation team prepared to go live?
Stakeholders will conduct a go/no-go meeting to review acceptance criteria and decide whether to proceed.
- If the decision is go, proceed with going live.
- If the decision is no-go, document the reasons why and what work must occur before reassessing the decision.
02. Communicate with End Users
When preparing to go live, inform all end users to when the solution will become available along with how to find training and support.
End users should discuss workload concerns with their managers if the implementation will affect deadlines. Implementation often occurs near to or over the weekend to reduce the impact.
Ensure end users know:
- When Windchill+ will be available
- How to report problems
- How to find training, resources, or support
03. Distribute Documentation
Distribute documentation to end users and technical support. Upload the documentation to a central training resources location, if your organization has one. This documentation is critical for supporting Windchill+ on an ongoing basis. End users having the ability to access documentation will allow for self-learning and self diagnosis of issues, freeing up resources as much as possible for issues that require more advanced technical knowledge.
Go-Live
When prepared to go live, work with PTC to promote Windchill+ to the production environment. Share progress with stakeholders and update documentation. Once the solution is live, notify users and inform them how to access the solution. Along with this notification, remind users where to find resources and how to report any issues.
Before you begin, complete these steps:
01. Promote Solution to Production
When ready to go live, the IT team promotes the solution to production. If using PTC SaaS, work with the PTC Cloud team.
During this process, we recommend the following:
- Communicate the timing and progress of the launch to the project team.
- Identify the systems that will experience outages (such as Windchill) and communicate with teams who manage or own them so that they can monitor issues.
Once the solution is live, notify the project team and stakeholders.
02. Communicate with Users
Notify all users that the solution is live and ready to use. Refer to your organizational change management plan and follow up on any remaining communication and training items.
Provide end users with the information needed for access, this can be a link or steps instructing how to access the site.
Once live, communicate with all users:
- What login credentials to use
- How to get support and/or training
- How to access documentation
- How to report issues
03. Hypercare Support
The partner that assisted in implementing the solution should continue to provide hypercare support for a predetermined amount of time after go-live. This will act as a sort of control center for the launch, making support readily available for all users immediately after go-live. How this will function will vary, but users should have a simple way to contact the care team, and this should be included in the communication mentioned above.
The hypercare team should be responsible for documenting any bugs that are discovered during this time and reporting them to the development team. If there are cloud-related issues, the care team should report those to PTC via a support ticket.
Provide Support
Support being provided during and after go-live is important for users to have a good initial introduction to the solution. Hypercare and long term support should both be provided to the user base.
Before you begin, complete these steps:
01. Go-live Support
The implementation team should provide go-live support for, at minimum, the first week after Windchill+ goes live. The goal of go-live support is to have the implementation team quickly address issues that arise when end users use the solution every day. Go-live support lasts for a limited time, so plan accordingly.
Enable Power Users
Power users have an important role in go-live support; they act as ambassadors to end users and will help determine whether to escalate discovered issues to the support team. Encourage end users to use Windchill+ as normal and report any issues to power users.
Ideally, all end users will be trained on Windchill+, but that may not always be the case. Power users help determine which issues should be escalated to the support team and which demonstrate a need for extra training or instruction for the end users.
Categorize Issues
As power users start to triage and escalate problems, conduct daily meetings with the implementation team to prioritize and track open issues. As issues are reported, use a tracking tool to organize and categorize errors (Example: non-critical, user error, business process error, technical error). Each type of issue will be solved in a different way, and categorizing the issues helps the implementation team prioritize issues more efficiently.
Emergencies are less likely if thorough testing of the system is performed before deployment. The go-live support period is a good time to investigate issues and put the solution through rigorous user testing because the implementation team is still heavily involved in offering support. Once outside the go-live support period, instant access to the same team will not be available.
02. Transition to Long Term Support
Internal support teams will be responsible for long-term support after go-live support ends. Typically, there is not a formal meeting to transition to long-term support, so being prepared is critical.
Ensure end users know how to contact power users, system administrators, and technical support when issues arise. PTC recommends having a Windchill+ expert in IT or establishing a “help desk” for Windchill+ within your IT department. Help desk personnel should complete Windchill+ training so they are prepared to answer basic questions, troubleshoot problems, and manage product issues.
In cases where the help desk cannot resolve the issue, PTC offers technical support. Your organization’s Windchill+ administrator can log a case with PTC eSupport.
When opening a case, include:
- Windchill PDMLink as the product
- Detailed description of the issue
- Steps to reproduce the issue
- Any related data files or screenshots
- Text of error messages or warnings received
Recommended Resources
- Create your eSupport account eSupport
- Customer Support Guide
- Managing Technical Support Cases
- Open a case with PTC Technical Support eSupport PTC login required
- PTC Community PTC Communities
- PTC University's Windchill PLM Training Catalog (Training-materials.ptcu.com)
Measure Business Impact
Now that Windchill+ is running within your business, it is time to assess the value it provides and learn how it will function in a steady state. Once this is complete, learn what comes next.
Before you begin, complete these steps:
01. Review Metrics and Assess Value
Goals and metrics will vary depending on how any particular organization defines value. After end users are using Windchill+ for a designated period of time, revisit the goals and metrics set at the beginning of the project. It is recommended to reassess metrics at least once per quarter. This allows the organization to have a productive conversation with PTC and/or CSMs about Windchill+’s value and potential expansion.
While it's likely the organization will see improvements almost immediately, some metrics may require several weeks of data to properly measure, especially if end users are slow to adopt the solution.
Compare the baseline metrics to current data to determine how much value Windchill+ has provided. Consider the following questions:
- Is your organization in a better position for upgrades?
- Have you reduced your total cost of ownership?
- What was the return on investment?
- Are your business processes better optimized by utilizing a SaaS product?
If the value is not readily apparent, consider if:
- Metrics may not be accurately measured, or the baseline may have been accurate
- Any other factors affect the current outcome (Example: End users are not consistently using Windchill+)
Investigate any issues and reassess.
At this point, confirm goals have not changed from initial measurement plans. Then, consider if they are still relevant and adjust accordingly. If goals need adjusting, give stakeholders a clear reason.
02. Share Results
Share the results and any adjustments to goals with stakeholders, including the project executive sponsor, organizational leaders, deployment lead, and end users. In addition, outline the financial impact and any improvements resulting from the implementation.
Continued tracking and sharing of results provides a clearer picture of value to both business leaders and end users.
03. What’s Next?
Once Windchill+ has been in steady use for the organization and the value is clear, consider reaching out to your CSM or a PTC sales representative to look into additional licenses to expand the user base or discuss additional use cases for which the software can be utilized.
If there are any questions regarding the software, PTC support and community is always available, but there is also a thriving online independent user-based community that provides extra resources.
Recommended Resources