Katelyn Stevens, Senior Content Marketing Specialist, has worked for PTC University since 2007. A graduate of Mary Washington College in Fredericksburg, VA, she has her bachelor’s degree in English Literature with a concentration in Linguistics. Katelyn worked as a professional editor and manager for more than 10 years before switching over to content marketing. She is a regular contributor to the PTC University blog spot and writes in depth interviews and articles on emerging technologies in the education space. In addition, she manages PTC University’s social media platforms and creates original content as a thought leader in the industry. Katelyn currently resides on the south shore of Massachusetts with her husband, two children, and golden retriever.
Do you need to create complex CAD geometry? Creo supports several advanced techniques for selection that you should know about. You can use these different capabilities and approaches to select more robust feature references, or to more efficiently create geometry.
Matt Huybrecht from PTC University presented a quick overview recently. We took notes and grabbed a few slides for you:
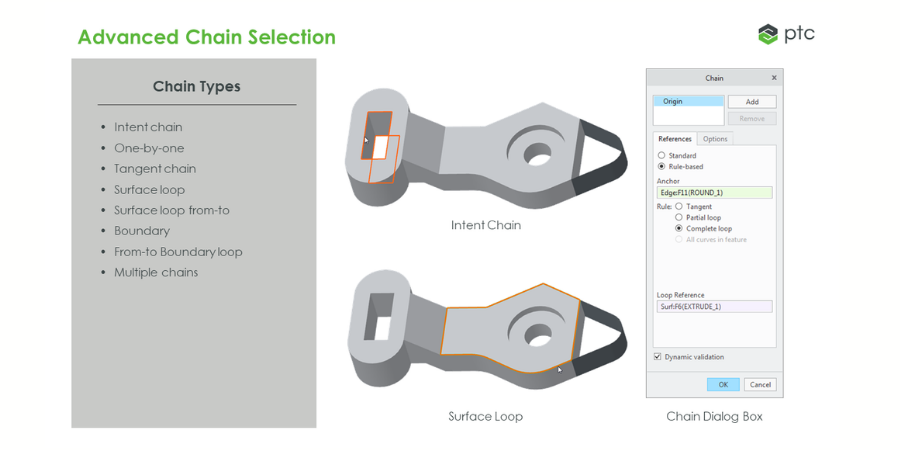
Understand Advanced Chain Selection
You can select multiple edges in Creo using different types of chains to increase efficiency and feature robustness.
A chain is a collection of adjacent edges and curves that share common endpoints. Chains can be open-ended or closed-looped, but they are always defined by two ends.

The following are the different types of chains that can be used to select edges:
- Intent chain – Enables you to select edges based on their intent. For example, you can use an intent chain to select the four edges of a square cut for purposes of rounding them. If the square cut is redefined into a hexagon cut, the intent chain automatically adds the two additional edges and rounds them because your intent was to round the edges of the cut. If you instead select the edges one at a time and round them, the round feature either fails or does not round the newly added edges.
- One-by-one – Enables you to select adjacent edges one at a time along a continuous path.
- Tangent chain – Enables you to select all the edges that are tangent to an anchor edge.
- Surface loop – Enables you to select a loop of edges on a surface.
- Surface loop from-to – Enables you to select a range of edges from the surface loop.
- Boundary – Enables you to select the outermost boundaries of a quilt.
- From-to Boundary loop – Enables you to select a range of edges from the boundary.
- Multiple chains – You can select multiple chains by selecting the first chain, pressing CTRL and selecting an edge for a new chain, then holding down SHIFT and completing the new chain from the selected edge.
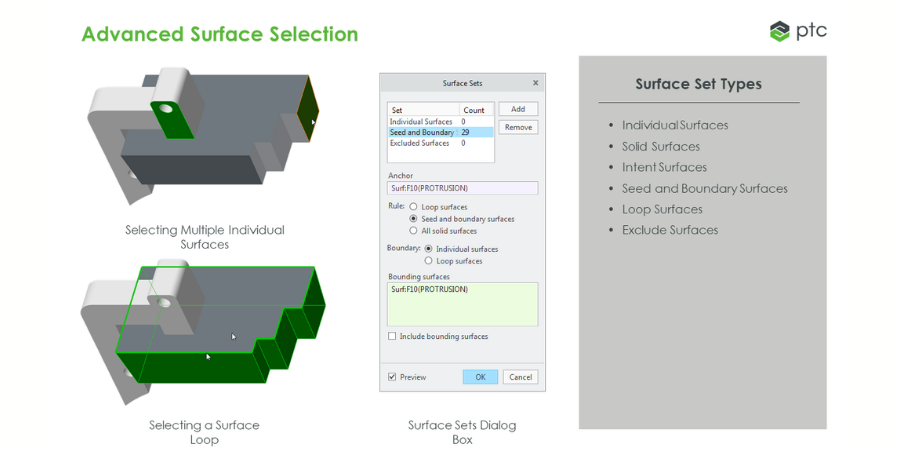
Use the Advanced Surface Selection
You can select multiple surfaces in Creo using different types of sets. A surface set is a collection of surface patches from solids or quilts.

Surface patches do not need to be adjacent. The following are the different types of surface sets that can be used to select surfaces:
- Individual Surfaces—Enables you to select surfaces from solids or quilts one at a time. To select multiple individual surfaces, press CTRL.
- Solid Surfaces – Enables you to select all surfaces of the solid geometry in a part model.
- Intent Surfaces – Enables you to select surfaces based on their intent. An intent surface set tends to be more robust because it can account for changes made to geometry.
- Seed and Boundary Surfaces – Enables you to select all surfaces from the selected seed surface up to the boundary or boundaries.
- Loop Surfaces – Enables you to select all the surfaces that are adjacent to the edges of a surface.
- Exclude Surfaces – Enables you to exclude surface patches during or after a surface set has been created.
Learn About the Advanced Shell Options
You can manipulate a shell feature to meet various requirements. There are several options available:
- Remove Surface – If you want your shell to be opened, you need to specify removed surfaces.
- Non-default Thickness – By default, the same thickness applies on all the surfaces, but it is possible to assign different wall thickness to selected surfaces.
- Thickness Direction – By default, the shell thickness is inside the original model. It is possible to invert the thickness to add it outside of the model.
- Exclude Surfaces – If you don’t want all the surfaces of the model to be shelled (for example, you may want to exclude rib surfaces), you have the option to exclude surfaces from the shell definition. This may be required when a constant wall thickness cannot be maintained in the solid model. In that case, you can exclude the surfaces causing the issue.
Analyze Draft Hinges and Pull Direction
To level set, a draft consists of the following parts:
- Draft surfaces — These are the surfaces that are to be drafted. You can select a single surface, multiple individual surfaces, or loop surfaces as the draft surfaces.
- Draft hinge — Determines the location on the model that remains the same size after the draft is created. The draft surfaces pivot about their intersection with this plane. There does not have to be a physical intersection. Rather, the intersection can be extrapolated. You can select a datum plane, solid model surface, curve chain, or surface quilt as the draft hinge.
- Pull direction — Direction that is used to measure the draft angle. The pull direction is also called the reference plane. By default, the pull direction is the same as the draft hinge. The direction reference is used to define the draft angle direction, and the draft angle is measured normal to this reference. You can select a datum plane, planar model surface, linear reference such as an edge or two points, or a coordinate system axis. The mold opening, or pull direction, is usually normal to this plane.
- Draft angle — Values range from -89.9 degrees to +89.9 degrees. When you specify the draft angle, you can reverse the direction from which material is added or removed by typing a negative value, clicking Reverse Angle in the dashboard, or by right-clicking the angle drag handle and selecting Flip Angle.
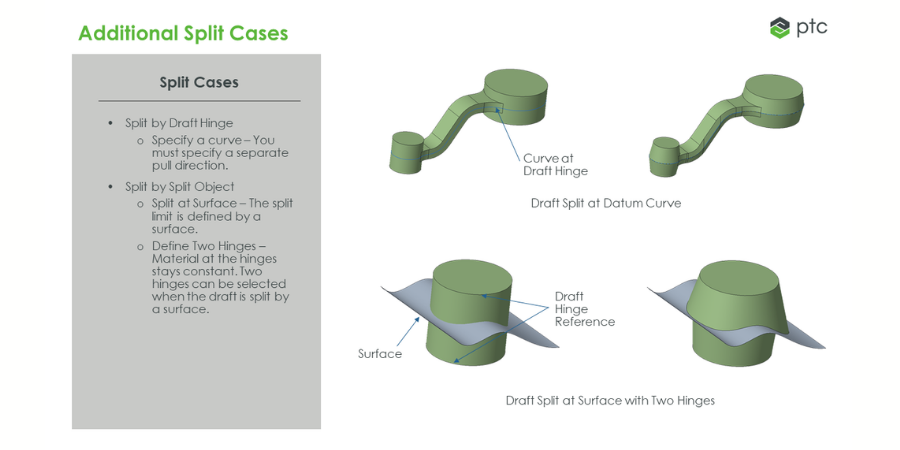
Review Additional Split Cases

You can create a draft that splits at a waistline curve. This causes the material at the curve to remain constant. If you specify a curve as the draft hinge, you must also specify a separate pull direction reference. You can create a draft that splits at a waistline surface, causing material at the surface to be added. This type of draft enables you to select additional draft hinges. To select a second hinge, you must first split the draft surfaces. The model remains the same size at both draft hinge locations. The selected surface is used as the split object. Once this split object was defined, a second draft hinge can be added.
For more ways to sharpen your Creo skills, join PTC University’s LEARN Online program.
Subscribe to Learn Online
Unlimited virtual Creo classes, on small cost.
Contact PTC University