Jon Jaehnig is a freelance journalist focusing on emerging technologies, particularly mixed reality and blockchain. He writes for MIXED and ARPost, among other publications.
This blog post was co-written with Matthias Bastian.
Key Takeaways:
- Vuforia’s Step Check makes Visual Inspection easy with AI-enhanced processes.
- Step Check helps inspection engineers with automated pass/fail guidance displayed on the real products and parts.
- If a part doesn't pass inspection, the inspection worker files it with additional comments explaining the problem.
- Automatically submitted documentation is easy for inspection engineers to process and easy for supervisors to analyze.
Human judgment is critical in visual inspection and cannot be automated away. The workers who perform this task deserve the tool necessary to make the job more manageable. Vuforia's Step Check is that tool.
Step Check combines augmented reality and artificial intelligence to create a revolutionary visual inspection tool. The process is as easy for team leaders to implement as it is for inspection engineers to use.
Using Step Check on the Line
Once a Step Check procedure has been set up for a part or product line, it walks inspection engineers through the process. This takes undue burden off experienced engineers, but also familiarizes someone to a product. Anyone can perform a multi-step inspection with Vuforia’s Step Check, even if they’d never seen the product before.
Training New Engineers or Training on New Products
Inspection engineers begin by either manually inputting an ID number for the part or piece to be inspected, or by scanning a bar code on the unit itself.
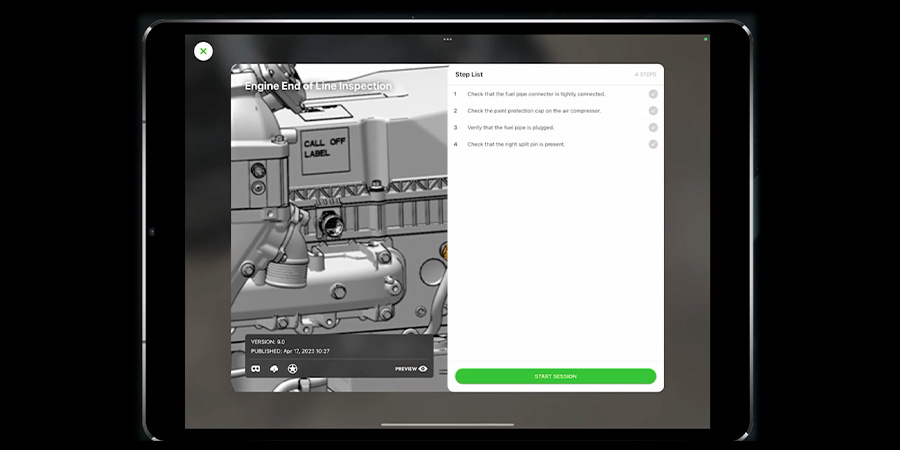
Beginning a session, inspection workers see a numbered list of all the inspection points to be completed.
Opening a new task shows an overview of all the steps to be completed. A grey check shows which inspection points haven’t been completed. A green check shows passed inspection points, and a red check shows failed inspection points. Tapping each item on the list brings up more information and additional options and assets.
Images or videos included in the procedure help inspection engineers identify inspection points, including what they should look like when assembled correctly.
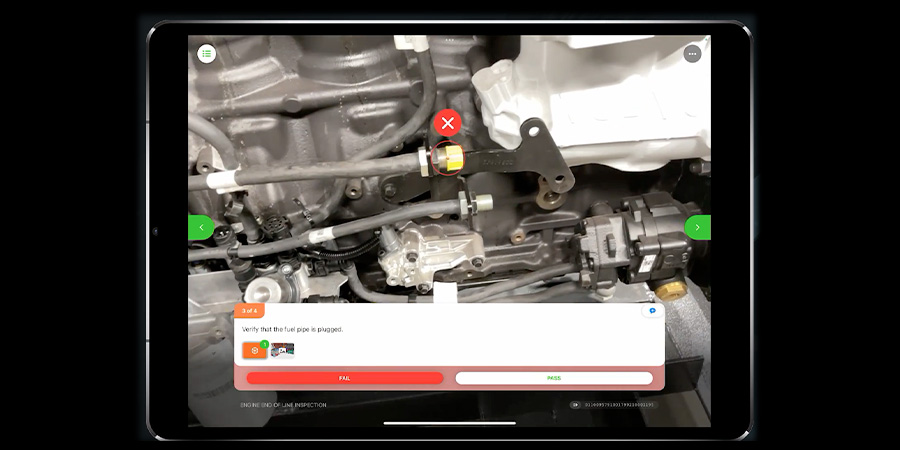
An easy-to-use visual system identifies when an inspection point doesn’t look right, and draws the inspection engineer’s attention to the problem area.
Step Check identifies and clearly marks inspection points depending on their state compared to reference material. If an inspection point doesn’t match the trained AI model and reference, the inspection engineer can get more information on the inspection point, get guidance for commonly encountered issues with that inspection point, or “Fail” the inspection point.
Step Check’s ability to recognize elements of an inspection point extends to a highly specific point of accuracy. For example, if a nut is threaded onto a piece but hasn’t been sufficiently tightened, Step Check will recognize that the piece isn’t properly in place.
The same visual system confirms when an inspection point does look right and inspection workers can move on to the next step.
If the problem is one that can be addressed by the inspection engineer onsite, Step Check helps them to resolve the issue and pass the inspection point. In this example, a fuel pipe was attached to the product, but was not properly connected.
This is an easy fix when the solution is clear. Instead of failing the inspection point and sending the product back, which would have turned a two-second fix into multi-step headache, Step Check helps the inspection engineer resolve the problem on the spot.
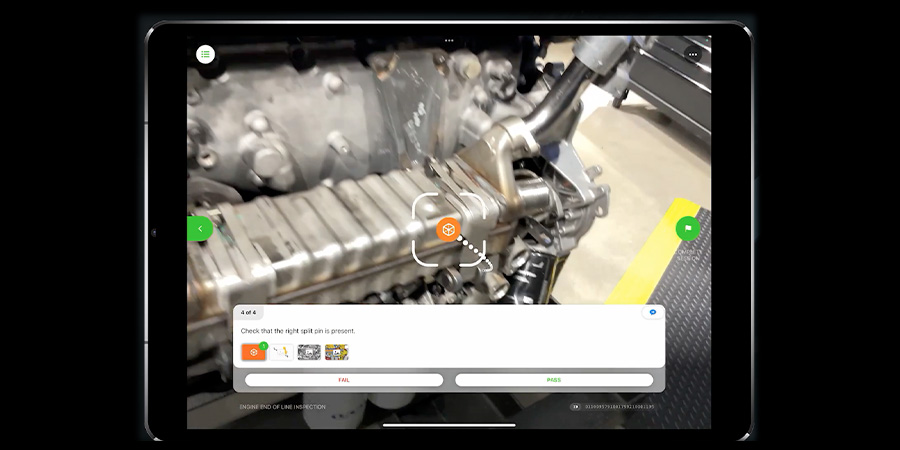
If an inspection point isn’t visible from the inspection worker’s viewpoint, Step Check guides them to the right place.
Step Check understands the location of inspection points on a piece and helps to direct the inspection engineer to inspection points that aren’t currently in the field of view through an integrated way-finding system.
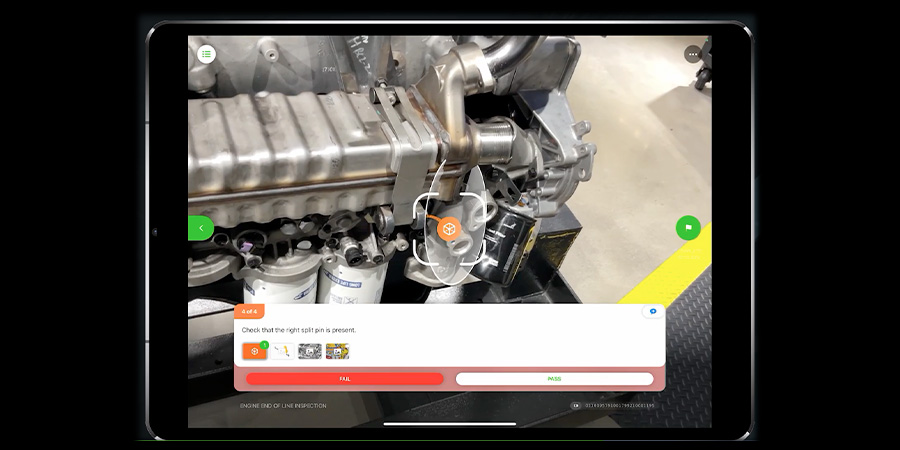
The orange icon in the image means that the inspection point, although in view, isn’t being viewed from the proper angle – the proper angle being shown by the grey funnel.
The wayfinding system helps the inspector get to the right side of the product and also assists him or her in understanding the angle from which to view the inspection point to best understand whether it meets the required conditions.
Improving Step Check Through Engineer Knowledge
Not all of the issues that an inspection engineer encounters can be solved on the spot, as in the first example. In that example, two pieces of the product needed to be connected, but both pieces were present.
In the second example, a part is missing and the inspection engineer doesn’t happen to have a spare piece sitting in a pocket. So, the issue needs to be reported.
Fortunately, nothing is wrong with the product itself – it’s just missing a small piece that should have been attached earlier. While sending the product back to have the additional piece incorporated isn’t a huge hurdle in terms of production, the end customer will be glad that the issue was identified at the assembly line instead of after the product had shipped.
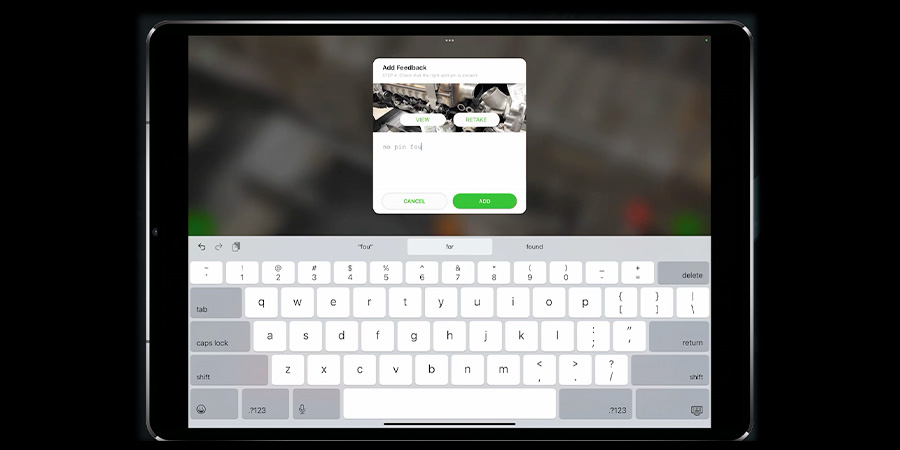
Adding feedback on a failed inspection point adds value to the documentation and helps Step Check learn.
More than just marking pass or fail, Step Check allows the inspection engineer to personally annotate steps in the process to let supervisors – and the Step Check system itself – know that something went wrong on each unit. Step Check even zooms in on the point of failure, making the issue immediately clear without time-intensive video editing.
Hopefully, this was a one-off issue. However, if the supervisor notices the issue recurring in multiple reports, it can be easier than ever to identify which stages of assembly could be improved for fewer failed inspections.
Automated Documentation
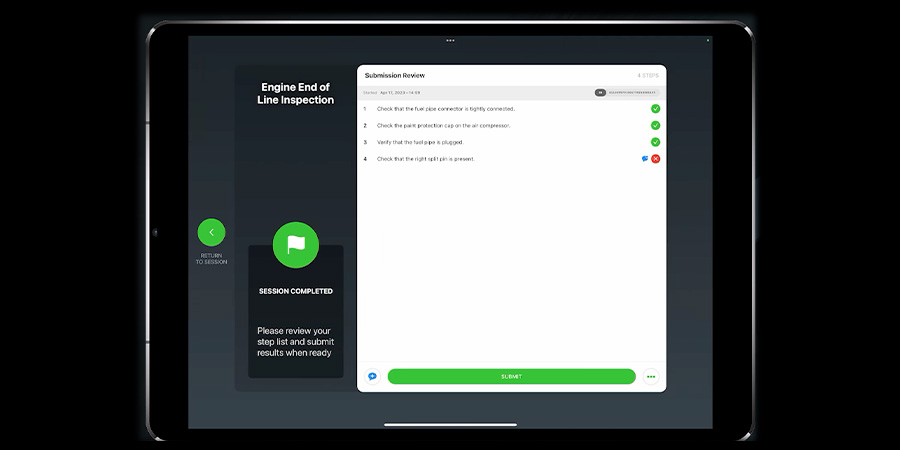
An automatically submitted inspection report confirmation generated when every inspection point has been passed or failed by the inspection engineer.
As the inspection engineer uses Step Check, it is already compiling a report. When all the inspection points for a procedure have been filled in, the program automatically submits the report.
This saves the inspection engineer time and hassle. They’re no longer taking time away from inspection to juggle reports – a chore that most would rather not have to do anyway.
Reviewing Reports and Data in Vuforia Insights
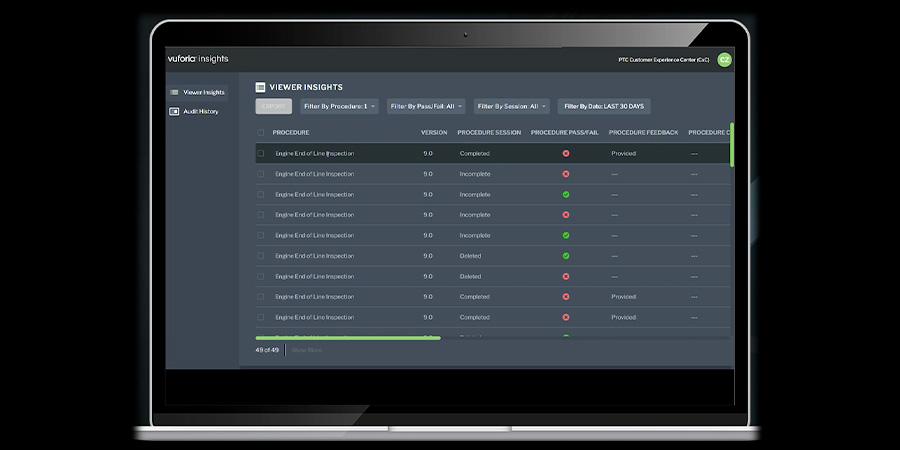
An inspection report collection viewed on a desktop application by a supervisor.
All reports submitted by Step Check can be viewed in Vuforia Insights. Users can review the results at a glance, or drill down into each submission to see which items passed and failed, and what notes were left by the inspector.
Outcomes of Implementing Vuforia’s Step Check
- Accelerated inspection cycle times
- Decreased ramp-up times
- Reduced test failures and tests omitted
- Higher customer satisfaction
- Increased throughput
Incorporating Vuforia’s Step Check into existing quality control processes results in accelerated cycle times with decreased omitted tests and test failures. Companies using Step Check have leveraged these benefits to increase throughput on existing products and reduce ramp-up times on new products. By providing a more engaging and efficient way to conduct inspections, Step Check revolutionizes quality control processes.
Setup Step Check Step-by-Step
Setting up is a guided and interactive experience using materials already on hand. The entire process takes place in the editor and the app – data collection and training. Initial data processing and training can be done entirely in-house with PTC’s Expert Capture.
The return is an AR-enabled guided workflow that helps both new and experienced inspection engineers work with new and existing product lines. From uploading CAD models to submitting documentation, this is what it looks like to use PTC Step Check to rethink your visual inspection documentation processes.
Setting Up Step Check in Vuforia Editor
Starting with Vuforia’s Step Check begins in the Vuforia Editor. Using nothing but CAD models, you could use Step Check to visually inspect the very first in a new line of products and begin training the software in lockstep with your inspection engineers.
If you already have a physical product, the software guides you through using an actual product to put a complete augmented reality solution into the hands of your team members. The guided process is comprehensive and intuitive.
Starting With the CAD Model
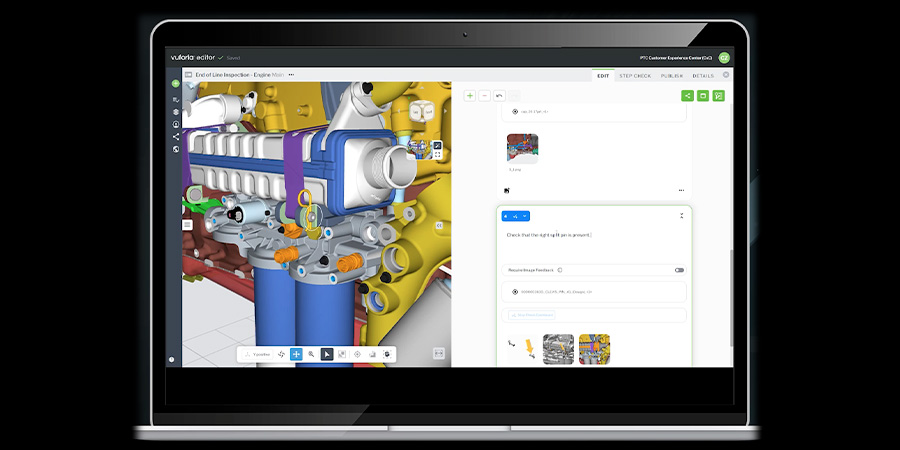
Creating a Step Check project from a CAD model
Getting started with a new Step Check procedure can be as easy as uploading a CAD model that was already on-hand from the design stage. The Vuforia Editor includes a guided workflow for setting up inspection points, prompts, and adding additional resources to help the inspection engineer that will ultimately use the procedure in the Vuforia Vantage app.
Assisted Image Capture
A guided training process helps ensure that an inspection point is captured from every angle. This helps Step Check accurately assess inspection points on the floor.
When training Step Check on a physical product, the program recognizes inspection points and helps the trainer to get a robust image sampling from every available angle and from a range of different focal lengths. A dome of translucent hexagons appears. When a device’s camera matches one of these hexagons, Step Check captures the image and the hexagon disappears. Moving the camera around an inspection point until all of the hexagons disappear creates the highly-detailed model that allows such a comprehensive visual inspection once Step Check is in the hands of inspection engineers on the assembly line.
This is an optional step that optimizes Step Check early. However, Step Check can work straight from the CAD model and learn entirely from inspection engineers using the software in the field.
Whether a company goes straight from the CAD model or takes the extra step of training on a physical product, Step Check still learns from every inspection.
