Get Started with Vuforia Expert Capture
Everything you need to capture and share expert knowledge
Destination or Printer: select Save as PDF
More Settings: In the Options, be sure the boxes Headers and footers and Background graphics are selected.
$name
- Get Familiar with Vuforia Expert Capture
- Create Procedure Workflow
- Set Up Your Account
- Prepare to Capture Procedures
01. Learn how to use Vuforia Editor
Vuforia Editor is an easy-to-use, web-based environment where you transform captures into finished procedures with or without 3D content. A capture is a recording created using the Vuforia Capture app. After you capture a task, process, or procedure, you are ready to edit it. If you did not record the capture yourself, refer to the procedure script or ask the person who captured it to help you edit it.
What you need:
- A Vuforia Expert Capture account: If you do not have a username and password, contact your organization’s Vuforia Expert Capture administrator. Learn more about setting up your account.
- Capture files: A subject matter expert uses an eyewear device and the Vuforia Capture app to record a procedure. The output of the recording is a capture file. You will need the capture file to edit and publish the procedure.
- Optional 3D files: Acquire the 3D data for the procedure's object. These are generally received from engineering. Learn more about preparing to view procedures.
- A compatible internet browser: Vuforia Editor is only supported on Google Chrome or Microsoft Edge web browsers. We recommend Google Chrome. If you do not have the required web browser, install it now.
- Learning Connector: Vuforia Editor PTC University
02. Create a procedure
Upload a capture
To create a new procedure, first upload your capture files to Vuforia Editor. Capture files cannot be uploaded directly from your eyewear device to Vuforia Editor.
Once you sign in to Vuforia Editor, you can upload your capture files.
Visit the Help Center for more information on content management best practices and how to access and upload your capture files.
Upload 3D files
To add 3D content to your procedure, first, you will need to locate and upload your 3D file to the editor. Then, you will be able to connect the 3D file to a procedure. Locating 3D files may require speaking with your engineering department, original equipment manufacturers, or technical publication writers.
Visit the Help Center for more information on 3D models and the supported file types and how to connect a 3D file to a procedure.
Edit a procedure
After you have uploaded the capture files, begin editing your procedure. You can:
- Add descriptive text, images, and videos to each step
- This could include media imported from Creo Illustrate
- Edit the audio
- Edit or rearrange steps
- Add other images and videos to Vuforia Editor by uploading them directly into the desired step
- Add 3D point markers and 3D part markers on desired steps and add a serial ID requirement
- Add required step feedback on desired steps, including confirmation feedback, pass or fail feedback, and step check feedback
Visit the Help Center for more information about how to edit a procedure, add a serial ID, or add step feedback prompts.
- How to Edit a Procedure Help Center
- Working with Captures Help Center
- Import a Creo Illustrate Procedure Package Help Center
- Serial ID Logging Help Center
- Step Feedback Help Center
03. Learn more about 3D
Once you have uploaded your cad file and connected it to the procedure, you will be able to customize the model for the procedure and add 3D content for each step.
Setting up your 3D Model:
- Select the model’s orientation with visual coordinate system selections. This makes editing easier as your model will be face up.
- Create product states to match the physical object. Sometimes the 3D Model will have additional parts that are not needed for the procedure. In the editor, you can hide or show parts depending on what the physical object will look like for the procedure.
- Use the navigation controls for easy manipulation of the 3D model. Authors can navigate using the built-in cube and arrows to rotate and zoom the model at the top right of the 3D screen, or they can use the rotate, pan, and zoom mouse functionality located at the bottom of the screen.
Use the following steps as needed to edit each step:
- Create point markers to guide users to an exact location on the object with wayfinding. With the point marker tool, the author simply selects the 3D model where they want the end user to be guided to.
- See 3D marker types for more information.
- Create part markers that highlight a part to draw the end user's attention to critical parts to complete the step. The end user will see this part in Augmented Reality highlighted with a bright color.
- See 3D marker types for more information.
- Create part sets when you frequently need to highlight a group of parts. This makes it easy to highlight the same group of parts for different steps with less clicks.
- Create custom view points to change the model target’s white chalk outline for that step. This helps users focus on the critical area for that step and provides more information to the model target tracking.
- Add Step Check to validate if a step has been done correctly by end users. Authors select the area to validate on the 3D model and then the AI model is trained with real life photos of the pass and fail state. End users will receive real-time feedback if the step is correct.
- See here for more Step Check editor information.
- See here for more Step Check training information.
Once you have edited and added the 3D content to the procedure, you are ready to publish. Next it is time to test your procedure on the physical object. To optimize model tracking, it is recommended to make custom viewpoints and to choose objects with distinct features that are not symmetrical. Making a custom viewpoint on a distinct feature will result in the best target acquisition.
- 3D Models Help Center
- Physical Object Recommendations Help Center
- Create a Product State Help Center
- Add Markers to a Model in a Step Help Center
- Create Part Sets Help Center
- Refine a Custom Viewing Position for a Large Object Help Center
- Step Check Components in Vuforia Editor Help Center
- Enable and Train Step Check Help Center
04. Track the history of your procedure
As you create and edit procedures, Vuforia Editor permanently records each change. It also records who made the change to the procedure, when it happened, and what was modified. The Versions and History table tracks these changes. Version control prevents data from being lost or overwritten. Your work is permanently saved and retrievable.
With version control, you can:
- View and restore any entry into he Versions and History table
- Restore a previous version without starting over
- Add a description to provide a record of the change, state, or requirements
- See who created and edited procedures and track how changes were incorporated
- Preserve your work and see all changes in the Versions and History table
Create a new version to document a significant moment in the lifecycle of the procedure. For example, a new part was added to a machine and you need to update the procedure. Click “Create Version” and a window opens with a description box. Enter a description that gives information about why you created this version (for example, “New lever added”). Machinery can change frequently. If a part is removed or changed again in the future, you can restore a previous version.
Your changes stay private until you’re ready to share or publish. If you change a procedure in Vuforia Editor, end users won't see your updates until you publish it.
Visit the Help Center for more information on creating versions.
- Version Control Overview Help Center
- Versions and History Table Help Center
- Vuforia Expert Capture: Version Control (Ar.gallery.video)
- What is Version Control and 3 Ways It Improves Digital Work Instructions
05. Publish procedures and share with end users
Once the procedure is complete, publish it. When a procedure is published, Vuforia Expert Capture automatically creates a “release” in the “Version and History” table. The major version number will change (for example, from 1.1 to 2.0). Add a meaningful description before publishing. Once published, the procedure is available to view. If there was a previous release available to end users, the new release will automatically replace the previous version. Only one release of a procedure can appear in Vuforia View or Vuforia Vantage.
When you publish, Vuforia Editor generates a QR code and links to share the procedure with others. When scanned, the QR code shows the most recent release. With these links, you can view the procedure in an internet browser or within the Vuforia Vantage or Vuforia View apps. The QR code and the links will not change, regardless of updates or edits to the procedure. The procedure can also be exported as a Microsoft Word document. Visit the Help Center to learn more about how to share procedures.
Remember: you need to edit permissions to make published procedures available for other users.
06. Training your step check model
Step Check assists users in visually verifying if a step in a procedure has been performed correctly or not. Authors will first enable Step Check in a step and set the area to validate. Once the procedure has been published, it is ready for photo collection in Vuforia Vantage. Vuforia Vantage walks the user through collecting photos from all available angles for the pass state and the failure state. The end user does not need to worry about taking the photos as Vuforia Vantage does it automatically. Instead, the user should move the device to where the app guides them. In the Vuforia Editor, the author can review the collected photos and press a button to start training the AI model. Once the AI model is trained, Vuforia Vantage will show end users a green or red icon depending on if the step is in the pass or fail state. Authors can also take a feedback photo required for additional analytics on how the step was completed by end users. With Step Check, end users are guided to the exact spot with the 3D Model information, shown how to complete the step with helpful videos and pictures, and get real time feedback if the step is in the pass or fail state. All of these parts help ensure end users feel confident they are completing the procedure correctly.
- Step Check Help Center
- When to Use Step Check Help Center
- Step Check Components in Vuforia Editor Help Center
- Enable and Train Step Check Help Center
- Step Check Dashboard Help Center
07. Tips and tricks for editing procedures
Here are some tips and tricks to help you use Vuforia Editor.
- The subject matter expert who captured the procedure should edit it first. If this isn’t an option, ask them to review the procedure before you publish it.
- You can edit images and record new audio in Vuforia Editor, if needed.
- When you upload a capture, delete any content you do not want in the final version. For example, any mistakes that were recorded when capturing the procedure will still be saved and uploaded into the editor; delete these mistake recordings. This will help you keep your work organized.
- Edit the procedure in chronological order. This will also help keep your work organized.
- Ensure someone is responsible for reviewing and approving procedures before you publish them. You may have chosen someone for this role when you planned your procedure workflow.
- If a team edits any procedures, we recommend choosing one editor to become your organization’s Vuforia Editor main subject matter expert. Then, they can train others and serve as a resource for Vuforia Editor needs.
- Vuforia Expert Capture Help Center Help Center
- Vuforia Expert Capture Community PTC Communities
Did you find this helpful?
$name
Prepare to View Procedures
Table of Contents
Overview: Get Started with Vuforia Expert Capture
Use this guide as you plan, implement, and learn to use Vuforia Expert Capture. Follow step-by-step instructions and get resources to help you capture and share expert knowledge and meet your business goals.
This information is useful for:
- Project and Program Managers
- Project Stakeholders
- System Administrators
- Technical Staff
- Anyone using Vuforia Expert Capture to capture their expertise
What is a Success Path?
A Success Path is an online guide to help you implement a specific PTC product at your organization. Each path provides step-by-step instructions and includes training and resources along the way. Use a Success Path to help your organization get the most out of a product and achieve your business goals.
Did you find this helpful?
Get Familiar with Vuforia Expert Capture
Learn the basics about Vuforia Expert Capture, and the software and hardware you need to implement this technology.
Before you begin, complete these steps:
01. Learn the basics
Vuforia Expert Capture is an end-to-end solution built to empower rapid and intuitive creation of high-fidelity augmented work instructions. These instructions provide step-by-step guidance to operators and technicians, where and when they need it— in the real-world context of their daily work environment. Subject matter experts and authors create work instructions hands-free, using an eyewear device. With Vuforia Editor, end users can edit the procedure they captured. Then they can view Expert Capture procedures on eyewear devices, smartphones, tablets, and desktop or laptop computers.
Expert Capture empowers industrial enterprises to rapidly document expert knowledge and easily scale that knowledge to new, redeployed, or remote workers as hands-on training or task guidance.
Recommended Resources
02. Explore features and functionality
Experts and operators use the Vuforia Capture app on an eyewear device to create augmented work instructions. They can capture hands-free, first-person, step-by-step video and images of procedures as they perform them. Using pre-configured templates that automatically create step-by-step procedures, anyone can author a procedure: no CAD data or coding required. The entire capture process is controlled by voice commands, gestures, and includes location-based steps on AR-enabled headsets.
The content created using Vuforia Capture, along with any existing images or videos, are uploaded and reconfigured into detailed procedures using the Vuforia Editor, a SaaS-based cloud platform. This allows subject matter experts, no matter where they are located, to create polished work instructions and training content. Once the editing process is complete, procedures are published and made available for consumption across a wide range of devices. Vuforia Expert Capture procedures are automatically reformatted and optimized for every device making the viewing experience consistent and easy to follow.
Recommended Resources
03. Review compatible devices
- Capture: Use the Vuforia Capture app on a HoloLens or RealWear eyewear device to record procedures. Your hands remain free, allowing you to perform procedures as you record.
- Author: Use Vuforia Editor through a Google Chrome or Microsoft Edge web browser to edit and enhance the procedures.
- Execute: Use the procedures for guidance as you complete a real-world task. Access finalized procedures via:
- iOS and Android mobile devices, tablets, Magic Leap, HoloLens, and RealWear eyewear devices using the Vuforia Vantage app
- Desktop or laptop computers using Vantage Web on Google Chrome or Microsoft Edge browsers
Export procedures as Microsoft® Word documents to help with the need for consistent and complete compliance documentation.
Recommended Resources
04. Get familiar with 3D data
Experts and operators can unlock additional key features to Vuforia Expert Capture by adding 3D data. 3D data can highlight key parts of a product, guide end users to the exact step location, and help validate that the steps have been done correctly. Depending on the size and complexity of the model, the processing of 3D model files and generating model targets may take anywhere from a few minutes to a few hours. Certain file types are better suited for the overall performance within the Editor itself.
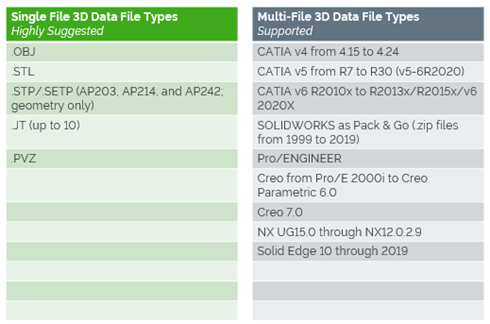
Multi-file formats must be imported as a .zip file where the .zip file name must match the name of the top-level assembly. For physical objects, it is recommended that you have the same exact shape and size as the 3D CAD model.
Recommended Resources
- 3D Models Help Center
$name
Before you begin, complete these steps:
01. Identify business drivers
To get the support your program needs, you must prove how Vuforia Expert Capture aligns with the strategic goals of your company. Identify which business drivers, when improved, will create the most value for the organization. How does your organization plan to remain profitable in the coming years? Consult executives to gather high-level business goals.
Common business goals that Vuforia Expert Capture helps you achieve include:
- Increasing worker productivity
- Reducing waste and scrap
- Improving safety and compliance
- Capture domain expertise and leverage 3D CAD data to scale a library of digital knowledge experiences embedded into the physical world
- Scale digital mentors to enable workers to relive the experts' experience to get trained more effectively
- Enable a workforce with work instructions that can improve productivity, reduce errors, and enable continuous improvement
Once you identify the most important business goals, document the activities or capabilities that will create value. How will Vuforia Expert Capture help your organization meet its business goals? There will usually be multiple drivers for each goal.
02. Identify your business challenges
Ensure your program is focused on the right use case by identifying and outlining the challenges your business is facing. Not all of the challenges you list will be applicable to Vuforia Expert Capture. Consider existing issues that prevent your organization from achieving its goals. For example, when workers do not have the right information to fix equipment in a timely manner, does it cause downtime? What resources are required to fix the issue in your current state?
Prioritize your list of business challenges, keeping business value top of mind.
03. Learn how other organizations use Vuforia Expert Capture
To better understand how Vuforia Expert Capture can address your business challenges, learn about other companies’ use cases—and what impact Vuforia Expert Capture had on their business.
Example use cases include:
- Increase creation of high-quality work instructions by 50%
- Decrease time to proficiency for trainees by 30%
- Reduce scrap and rework by 25%
Recommended Resources
- PTC Augmented Reality Use Cases
- GlobalFoundries Transforms Training and New Technician Skill Adoption
- PTC Case Studies
04. Map business challenges to Vuforia Expert Capture
Now that you have a prioritized list of business challenges, explore the top possibilities. Answer these questions:
- Pain point: What is the business challenge you want to solve? How can you improve operational issues, gaps in knowledge transfer, or other areas related to work productivity, quality, and safety?
- Feasibility: What do you want to do? Can it be executed now or do you need to build support and knowledge first? Do you have the support from experts who understand your use case and can help to achieve it?
- Solution: How will Vuforia Expert Capture solve your business challenge?
- Value: If the program is successful, what will this do for the business? How will it achieve business value?
- How does the program increase revenue or reduce costs?
- How does it affect the day-to-day activities of the employees who use it? How many hours work can be saved or allocated to other tasks?
Answering these questions should determine which business challenges align to Vuforia Expert Capture.
05. Map business challenges to Step Check
Now that you have a prioritized list of business challenges, explore the top possibilities. Answer these questions:
- Pain point: What is the business challenge you want to solve? How can you improve operational issues, gaps in knowledge transfer, or other areas related to work productivity, quality, and safety?
- Feasibility: What do you want to do? Can it be executed now or do you need to build support and knowledge first? Do you have the support from experts who understand your use case and can help to achieve it?
- Solution: How will Vuforia Expert Capture solve your business challenge?
- Value: If the program is successful, what will this do for the business? How will it achieve business value?
- How does the program increase revenue or reduce costs?
- How does it affect the day-to-day activities of the employees who use it? How many hours work can be saved or allocated to other tasks?
Answering these questions should determine which business challenges align to Vuforia Expert Capture.
06. Prioritize use cases
The list of possibilities may seem endless. Rank your use cases to focus your efforts and generate the most value.
For each of your possible use cases, create a matrix to identify:
- Impact: What is the use case value impact? Is it high or low?
- Frequency: How much viewership will the procedures receive? Does it have a high volume or low volume?
Use cases with tasks that are high-frequency and low-impact, or low-frequency and high-impact are high-value opportunities to apply Vuforia Expert Capture.
Work with stakeholders and subject matter experts to make realistic projections. The matrix will reveal which use cases are viable and of high value.
Use Case Prioritization Matrix Part 1: Procedure Description and Pain Points

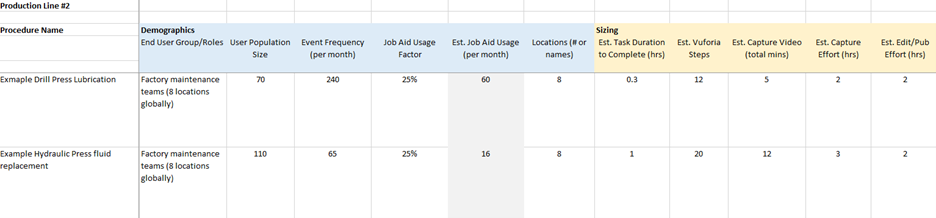
Use Case Prioritization Matrix Part 2: Demographics and Sizing
Use Case Prioritization Matrix Part 3: Procedure Ownership and Tracking
![]()
07. Finalize your use cases
With all the information collected, select the most achievable use cases that will provide the most value to your organization. The best way to gain momentum is to start the project in an area where you can prove value quickly. As you decide how to implement your use cases, begin with something achievable that provides return on your organization’s investment and acts as a baseline for broader adoption. If your use case supports your organization’s key business drivers, you’re more likely to get leadership support.
Once your use cases are chosen, clearly define the desired outcome and start thinking about key metrics you’ll need to measure and prove value. Document your chosen use cases and confirm them with project leaders. Include success criteria—the specific and measurable factors your project must meet to achieve the high-level goals—for each use case and what steps you will take if that criteria is not met.
Revisit your use cases and continue to improve upon them. Early success will help with your long-term strategy.
Verify Security and Compliance
If you have not done so already, make sure Vuforia Expert Capture meets your organization’s security policies and compliance requirements.
Before you begin, complete these steps:
01. Address security requirements
Check your organization’s policies and identify your security requirements. Your IT department will likely have specific rules governing software, mobile/eyewear devices, and data security. Early in the project, contact the people at your organization who are responsible for vetting new technology—addressing security concerns early will prevent delays later.
Vuforia Expert Capture is a SaaS (software as a service) solution built to safeguard users’ data and intellectual property. If your IT team has concerns about storing data in the cloud, PTC is available to address them. If you need specific security information or reports, contact your PTC sales representative or customer success manager.
Vuforia Expert Capture security features:
- SSAE 16 SOC2 compliance
- Content encryption for data in transit and at rest
- Secure authentication (active directory, OpenID Connect) and single sign-on support
- Multi-layered application security management including service isolation, network and web application firewalls, user access controls and auditing
- Environment vulnerability scanning and penetration testing
- DDoS protection for real-time monitoring and remediation for network-level attacks
- Backups and disaster recovery
02. Confirm industry compliance
Determine whether the procedures you’re documenting with Vuforia Expert Capture are subject to any compliance standards. For many industries, job-based work instructions must comply with standards from various regulatory bodies. For example, Good Manufacturing Practice requires companies to maintain detailed records of updates to their standard operating procedures.
Compliance questions to consider:
- Is your organization required to maintain paper-based work instructions? Vuforia Editor makes it easy to export procedures to Microsoft Word documents.
- Does your organization need copies of SOC 2 Type 1 reports? If you need reports, contact your PTC sales representative or customer success manager.
- Do rules or regulations prevent workers from using eyewear or mobile devices while performing procedures?
- Are workers required to document if, when, or how they perform a given procedure?
- Are workers required to document what, who, and when changes are made to procedures?
-
Vuforia Editor saves a history of every change you make to a procedure. This rich history of the procedure shows you:
- Which version is published
- When previous versions were published or replaced
- Who made changes or published a version
- The steps and details of a procedure at any point in time
-
Organizations can use Vuforia Expert Capture to stay in compliance with regulations. You have full transparency into your organization’s procedures. Your work is always saved.
Plan how Vuforia Expert Capture will affect your organization’s compliance processes.
03. Determine device requirements
You will need some combination of eyewear devices, computers, and mobile devices to use Vuforia Expert Capture. Before you select which devices to use, identify any safety and security standards that devices must meet.
Safety and compliance
Imagine the employees who will use Vuforia Expert Capture and consider the environments where they work. Are there any restrictions on the devices they can use while performing their jobs? For example:
- Are employees required to wear helmets or safety glasses?
- Do devices need to be intrinsically safe for use in explosive environments?
- Are workers using the devices in a clean room?
Document any relevant safety and compliance rules.
Security
The devices you use to record and view procedures will temporarily store data. These devices have built-in security features, but your organization may require stricter protection. Are there data security policies that govern devices at your organization? For example, you may need to install Mobile Device Management software on the devices to allow your IT department to monitor and secure them. Document any relevant security rules.
Recommended Resources
- Microsoft Hololens Health and Safety Information (Support.microsoft.com)
- RealWear HMT-1 Safety Information (Realwear.com)
- RealWear HMT-1Z1 Safety Usage Warnings (Support.realwear.com)
- Magic Leap Safety Guide & Regulatory Information (Assets.ctfassets.net)
Assemble Your Team
Engage the employees who will contribute to the Vuforia Expert Capture program. Consider hiring outside resources to fill in gaps and get expert guidance.
Before you begin, complete these steps:
01. Roles and responsibilities
Your team is one of the most important components of your Vuforia Expert Capture program. You will need help from a variety of people to achieve your use cases. In your organization, identify who will fill these roles on your team:
- Executive Sponsor: Responsible for getting organizational buy-in and realizing the value of Vuforia Expert Capture. Typically, a senior-level manager.
- Champion: Accountable for the success of program deployment. Creates the strategy to generate value from Vuforia Expert Capture. Forms the team responsible for leading the deployment throughout the organization. Also responsible for leading execution teams across sites.
- Program Manager: Ensures alignment across teams and is responsible for meeting deadlines, following the strategy, and achieving goals. If you’re involving multiple execution teams, a program manager would coordinate their efforts. This role may or may not be necessary, depending on the complexity of your Vuforia Expert Capture program.
- Execution Lead: Manages the project and is responsible for driving implementation, and executing the plan created by the champion. Organizes subject matter experts and obtains devices required to capture, author, and execute procedures. Also organizes related workshops. There may be multiple execution leads with a lead at each site and a lead who coordinates among sites.
- Technical Lead: Is responsible for ensuring the technology is successful across the program. Makes sure devices and products work on all networks. Works with IT, coordinates training, works with compliance, and more.
- Subject Matter Expert: Shares their expertise, creates procedures using Vuforia Expert Capture, and trains others to use the procedures. Typically, the subject matter expert is someone in your organization who knows how to do certain tasks that others don’t. Their ongoing commitment is important to move projects forward.
- Technical Writer, Training Specialist, or Team Manager: Consider who could help subject matter experts create procedures. Is there someone at your organization who creates, edits, or maintains work instructions today? They may use Vuforia Editor to refine, publish, and maintain Vuforia Expert Capture procedures. The subject matter expert could also fulfill these responsibilities.
- End Users: These end users, or viewers, will view and execute the procedures you create with Vuforia Expert Capture. They will need training to learn how to use one or both viewing apps: Vantage and View. The app they need depends on which device they'll use to view procedures. Viewers using mobile devices or tablets will use the Vantage app. Viewers using HoloLens or RealWear eyewear devices will use the View app.
- Additional support: Members of the IT and compliance teams at your organization can also help implement and maintain the technology needed for Vuforia Expert Capture. They also ensure it meets your organization’s security, compliance, and license policies.
One person may fill more than one of these roles, or you may have several contributors assigned to each role. Depending on the size of your organization and your use case, you may include people from various locations across the business or around the world on your team. For example, you may have a global team that leads oversight and strategy, with local teams at each factory or site led by a local execution lead.
Regardless of how you structure your team, make sure there’s a leader in place to coordinate across teams and ensure you’re achieving your goals.
As you build your Vuforia Expert Capture team, engage any employees who are interested in and will use the new technology in their jobs. This will create early buy-in and excitement, which will help maintain your momentum. Consider including end users when testing procedures before making them widely available. Their feedback can be useful to ensure that the procedures are understandable.
02. Cultivate leadership support
Your Vuforia Expert Capture program will benefit tremendously from leadership support: ensure leaders communicate the importance of your program to their teams in regular forums and feedback sessions. Identify and engage various people across your organization to support your program. The right leaders may vary business to business, but in general, choose both an executive sponsor and a champion.
Leadership support also helps cultivate collaboration among the teams using Vuforia Expert Capture across your organization. The more your teams interact, share best practices, and work together, the more buy-in you'll generate.
03. Identify internal partners
Engage the people who will make decisions and take action on your Vuforia Expert Capture program. Their support and know-how will be a key asset throughout the deployment process. In your organization, identify who is responsible for:
- Security: Who will confirm the software meets security standards?
- Infrastructure: Who will ensure your organization’s infrastructure (including network connectivity, security, etc.) is equipped to handle the software?
- Hardware management: Who will purchase and maintain the devices needed to use the software?
- Compliance: Who will verify your AR project meets safety, regulatory and compliance standards?
- Seats: Your organization will need to buy software licenses, or seats, to use Vuforia Expert Capture. A seat gives you the right to use the software tools and will be related to the user’s role type. Who will know how many seats and which types of seats your organization needs? Who will track how many seats are available or are in use? Who will buy them? Who will decide when to buy more?
Contact the appropriate partners and decide their involvement in the program. You’ll need their help on important tasks.
04. Determine outside resources needed
PTC offers services to help organizations achieve success with Vuforia Expert Capture. Customer Success Services can help you plan, implement, and measure the value of your Vuforia Expert Capture program. Consider using an outside resource to cover skill gaps or speed up your program. Contact your PTC Customer Success Manager to learn more.
Develop Long-Term Strategy
Document your strategy for Vuforia Expert Capture by creating a program plan. Determine who should oversee the program, when key milestones will occur, and how you’ll coordinate your efforts across teams. Most importantly, focus on supporting your organization’s strategic business goals.
Before you begin, complete these steps:
01. Create a program plan
Now that you have chosen the use cases your organization will pursue, plan how you will achieve and measure them. Create a program plan that outlines the value you expect to create for the business and reflects your vision for Vuforia Expert Capture. The program plan will be high level, long term, and affect multiple areas of your organization.
A program plan should specify:
- Use cases
- Roles and responsibilities
- Program governance
- Program scope
- Roadmap
- Program risks
- Escalation plan
- Program operating model
Focus on quantifiable goals you expect Vuforia Expert Capture to help your organization achieve. Later, you will create a project plan that details how you will complete specific deliverables to support those goals. Document your program plan, share it with your team, and make sure everyone is working toward a shared goal. Revisit the plan as your implementation progresses, changing it as needed. Designate someone to maintain the document: a project manager, program manager, or champion.
02. Navigate changes in process and people
As you develop your program plan, consider how you will facilitate changes that Vuforia Expert Capture will bring. Your workforce will adopt a new mindset, develop new skills, and learn new technology and processes. And while necessary, change can be difficult.
To help employees embrace change, plan to:
- Communicate consistently
- Listen openly to concerns and questions
- Encourage participation
- Share the benefits that Vuforia Expert Capture will bring to employees and to the organization as a whole
- Obtain active and visible executive sponsorship
- Dedicate resources to planning and enacting change management
Later, you will plan how to build excitement and address concerns with others at your organization.
PTC can help your organization navigate change and achieve your goals, faster. Contact your PTC sales representative to learn more about organizational change support.
03. Assign roles and responsibilities
Earlier, you outlined the roles you need to successfully implement Vuforia Expert Capture. If you have not already, document who at your organization will fill those roles. Some members of the team will be responsible for achieving the program goals, and some will be responsible for executing specific deliverables to support those goals.
04. Establish program governance
Organize the people on your team to facilitate success. First, decide who will be invested in and accountable for achieving key goals—typically, the champion is responsible for governing the program. If you are rolling out Vuforia Expert Capture to multiple business units or locations across the organization, you may need multiple leaders to govern the program. A program manager may also be involved to coordinate the various teams. This role ensures alignment across teams and is responsible for meeting deadlines, following the strategy, and achieving goals.
The champion will also identify how Vuforia Expert Capture will affect various business units across the organization. They collaborate with leaders whose teams will use Vuforia Expert Capture, and who may have conflicting needs. This role considers how this new technology will affect people, processes, and tools across the organization and makes decisions accordingly.
Meanwhile, the execution lead, technical lead, and other team members will focus on the day-to-day work of implementing the technology: setting up Vuforia Expert Capture and empowering others to use it. They report progress to the program manager and champion, who ensure they’re achieving the strategic vision. Decide how to organize the project contributors and who they report to. Also decide who has the authority to make important decisions and take action.
05. Document program scope
After you have decided which use cases you will pursue, document those use cases and the program scope. Which aspects of your organization will benefit most? Determine which people, processes, and tools will be affected by Vuforia Expert Capture. For example, your scope may include employees working at particular locations, and exclude other locations.
Later, you will create a project plan that specifies more details about the people who will use Vuforia Expert Capture and the procedures you will document.
06. Create your value roadmap
A value roadmap defines the timeline and scope for each use case and the expected value attainment for each. Estimate how much time your organization will require to fully implement your use cases. Depending on the scale of your program, your timeline could be 4 months, 1 year, or more.
Given your timeline, decide when to pursue each use case (which use case comes first, second, third). We recommend dividing your project into phases and working toward 1-2 use cases in each phase. Consider aligning phases to business quarters. Document how many phases you need, and which use cases are included in each. Build milestones into the plan and measure progress as you go.
07. Anticipate risks to the program
Identify possible risks to achieving your program goals and imagine how to mitigate them.
Possible risks include:
- Subject matter experts are too busy with their day-to-day jobs to learn how to use Vuforia Expert Capture and document important procedures.
- Employees have difficulty embracing new technology and choose not to use Vuforia Expert Capture.
- Rigid corporate policies slow down the project.
- The organization changes priorities and reduces support or funding for new technology.
- It takes longer than expected to acquire the eyewear devices you need to use Vuforia Expert Capture.
Oftentimes, proactive communication, strong executive leadership, and thorough planning minimize risk.
08. Manage and escalate issues
Establish a process for communicating, escalating, and resolving problems that may arise. By designating key decision makers early in the project, you’ll be better prepared to address issues quickly. Make sure the team understands the chain of command.
Questions to consider:
- Who has the authority to do and decide what?
- If a contributor lacks the authority to make a decision, how should they escalate the issue to someone who holds more power?
- Who should individual contributors contact to resolve day-to-day issues?
- How can contributors get attention from leaders in a timely manner, if needed?
- Who/how does work get approved?
- If two teams disagree, who makes the final decision?
Establishing a clear structure for managing issues will prevent delays to the project later.
09. Operate the program
Decide how everyone contributing to the project will collaborate and communicate (program operating model). In some cases, the decisions made by one contributor will affect other contributors later—and you will need to share updates accordingly. Consider whether different workstreams need to be standardized across the program.
Questions to consider:
- Which teams are working on what, and when?
- How will contributors keep one another informed?
- How often should various groups meet?
- Which groups need to meet more or less frequently?
- How will everyone report their progress?
- Are there preferred communication methods or project management tools you can share?
- What information do executive stakeholders need?
Planning how the project will operate is crucial for achieving your program goals—especially if the contributors do not often work together.
$name
Before you begin, complete these steps:
01. Define initial project scope
Defining the scope of your Vuforia Expert Capture project gives stakeholders a shared understanding of their role, and the project objectives and goals. Ensure the scope is manageable for your timeline and budget and fulfills the success criteria for your use case. Plan your project in a phased approach: work toward short-term goals within your long-term plan. This phased approach will generate quick wins and keep momentum moving forward.
Choose procedures to document
Decide which procedures you’ll document first using Vuforia Expert Capture. Start with 1-10 procedures in the initial phase of the project. Your first procedures should be realistic and provide value quickly. Consult managers, subject matter experts, and frontline workers across the organization—they may recommend which procedures are a good fit for your first effort.
Focus on procedures that pertain to your use case. In your project plan, document information around the “as is” state of the work procedure. For example: today, frontline workers use paper-based documentation that is out of date, resulting in wasted time and the possibility of errors.
We recommend choosing procedures shorter than 10 minutes so you can get comfortable using eyewear devices, navigating the Capture app interface, and narrating your actions. Try to capture your procedures in the correct order, but it's ok if you cannot—you will edit them later. You can also re-record audio without redoing the entire procedure, if needed. Test with a small number of users, then make changes based on their feedback, as necessary.
02. Identify affected teams
Now that you have assembled your team—led by an execution lead—consider who else will be immediately affected by your Vuforia Expert Capture project. Consider who will use these procedures to do their jobs and who creates or manages work instructions today. These team members will need training to use Vuforia Expert Capture.
Verify that your subject matter experts have time to commit to helping with your project: if they cannot find time to capture procedures, your project will lose momentum. Before you begin, they should be fully trained and confident using eyewear devices to capture procedures.
Before you deploy Vuforia Expert Capture to workers who will use it in their jobs, select a few participants to test the solution. These initial users do not need Vuforia Expert Capture experience, but they should be enthusiastic about embracing new technology and willing to dedicate time to the project. Contact your testers early in the project and provide first access to Vuforia Expert Capture training.
If you have not yet done so, document any stakeholders, executive sponsors, business leads, subject matter experts, or other contributors so everyone on the project is clearly identified and accountable.
Recommended Resources
03. Establish dates and deadlines
Establish a timeline that includes short-term and long-term goals to stay on track with your project. It should also include completion dates, milestones, key deliverables, and a rollout date. You’ll create a rollout plan later.
04. Determine your training needs
The frontline workers, subject matter experts, and managers using Vuforia Expert Capture will need training to get started. We recommend you also include members of your IT team in training, so they can provide technical support to other users. Depending on the scale and timeline of your project, your training needs may evolve. PTC offers independent training to train your team members.
Independent training: Access documentation that explains how to use Vuforia Expert Capture.
- The Help Center covers key topics about how to capture, edit, publish, and view procedures using Vuforia Expert Capture.
- The Learning Connector contains video tutorials for key topics.
- For advice and tips from fellow users, join the PTC Community. Anyone can explore and view posts in the PTC Community, but you will need to create a PTC account if you would like to post a topic or respond to others. This account is separate from your Vuforia Expert Capture account.
Recommended Resources
- Vuforia Expert Capture Help Center Help Center
- Learning Connector: Vuforia Editor PTC University
- Learning Connector: Vuforia View PTC University
- Learning Connector: Vuforia Vantage PTC University
- Vuforia Expert Capture Community PTC Communities
Create a Measurement Plan
One of the most important steps in your Vuforia Expert Capture project is to plan how you will measure success. In order to report your return on investment, you must measure key performance indicators: Determine your goals, define your plan, and establish your operational metrics and a clear baseline.
Before you begin, complete these steps:
01. Determine goals and metrics
What is the goal of your Vuforia Expert Capture use case and how will you deem it successful? Establishing a measurable goal and quantifiable metrics will keep your project on track and enable you to gain momentum.
Establishing clear goals also helps:
- Get support from leadership
- Persuade other teams to buy in and adopt the software
- Get budget and resources
- Expand your project in the future
Depending on your industry, there are a variety of metrics to consider for your use case. Some examples include:
-
Reduce assembly time by 10%
How? By providing clear and easy-to-understand work instructions that entry-level operators can now complete - Reduce training costs by 15% and increase time to proficiency
How? By creating dynamic work instructions that trainees can easily comprehend, reuse, and update - Lower rework and scrap costs by 15%
How? Better training and more accurate work instructions reduce errors - Increase first-time fix rate by 10%
How? Providing up-to-date instructions where workers need them to reduce the number of return visits
Do not forget to also document "soft" metrics such as customer satisfaction and employee confidence.
02. Define your measurement plan
After you identify the goal and metrics your organization will track, it’s important to document and share your measurement plan. In your measurement plan, include:
- Short-term and long-term project goals
- This should align with the scope you defined in your project plan.
- Key metrics
- The specific and quantifiable measures you will track to prove you're achieving your goals.
- How you will measure key metrics
- For example, if "training time" is a key metric, how will you consistently measure training time?
- The timeline for your measurement plan
- We recommend working in a 30-day timeline. Gather metrics weekly or daily (based on your use case) and do a final comparison at the end of the 30 days.
- Who will gather and record the metrics
- There's likely someone at your organization who measures performance of day-to-day operations. For example, a line manager who records the cost of rework.
- When to share progress and outcomes with stakeholders
- For example, depending on your use case, you may meet weekly to check in on progress, with a final comparison at the end of a 30-day timeline.
- Also, consider how you may need to adjust your strategy based on your results. For example, will you need to make changes to your procedures or who your end users are?
- Baseline metrics
- You need to know the current state of your key metrics to accurately measure the impact of Vuforia Expert Capture.
03. Establish baseline metrics
Before you start using Vuforia Expert Capture, you must document your organization's "as-is" state. If you fail to establish baseline metrics, it will be difficult to measure whether your Vuforia Expert Capture project had a meaningful effect on your organization.
For example, if you are trying to reduce training time on a particular task, quantify how long it takes to train individuals on that task today, using your current method. In this example, consider not only the time it takes to train the individual, but also the time required from the subject matter expert performing the training.
Establishing your baseline metrics will help prove the value of your project. Create a spreadsheet, or similar document, to record your baseline metrics and track any updated metrics throughout the project timeline.
Choose Devices
Vuforia Expert Capture runs on eyewear devices, smartphones, tablets, and computers. To use it hands-free, you must invest in eyewear technology. Decide which devices are right for your organization.
Before you begin, complete these steps:
01. Compare device options
You will need some combination of eyewear devices, mobile devices, tablets, and computers to use Vuforia Expert Capture.
Create procedures in 3 steps:
- Capture: You need an eyewear device to record a procedure using the Vuforia Capture app.
- Author: You need an internet-connected desktop or laptop computer to edit, annotate, and publish the procedure using Vuforia Editor.
- Execute: You need an eyewear device, mobile device, tablet, or desktop or laptop computer to view completed procedures. You’ll use this device to access procedures, which will guide you through executing a real-world task.
- Use the Vuforia Vantage app on mobile devices, tablets, and Magic Leap eyewear devices.
- Use the Vuforia View app on HoloLens or RealWear devices.
- Use Vantage Web for desktop and laptop computers.
The best device for your situation depends on your use case and the circumstances where you will use Vuforia Expert Capture. Consider the environment where you will capture video or photos for your procedures and the types of procedures you’re creating. Then decide whether 2D eyewear devices (such as RealWear) or 3D eyewear devices (such as HoloLens) will work better.
For example, if you need to move from one location to another as you perform the procedure, then 3D eyewear devices can be beneficial—the spatial tracking functionality guides you to the places in the factory or building where each step needs to be completed.
Similarly, think about where and how employees will execute procedures. Are 2D eyewear, 3D eyewear, mobile devices, or computers the best option?
Learn the requirements and constraints of each option to determine which devices are best suited for your use case.
Recommended Resources
- How to Choose the Right Devices
- 5 AR Devices to Pair with PTC Vuforia Resource Center
- Supported Devices, Operating Systems, and Browsers Help Center
02. Confirm device compliance
Earlier in the project, you checked whether your organization has security, safety, or compliance policies that restrict which devices employees can use while performing their jobs. Determine whether your devices must meet glass, combustion, or other safety standards. Keep these factors in mind as you explore device options.
Recommended Resources
- How to Choose the Right Devices
- Microsoft Hololens Health and Safety Information (Support.microsoft.com)
- RealWear HMT-1 Safety Information (Realwear.com)
- RealWear HMT-1Z1 Safety Usage Warnings (Support.realwear.com)
03. Purchase devices
If you need new devices for your Vuforia Expert Capture project (eyewear devices, mobile devices, tablets, or computers), purchase them now. Reach out to the appropriate approvers to get budget for the devices. The IT department can often help get a cost quote and place the order.
Recommended Resources
Ensure Proper Infrastructure
Make sure your IT infrastructure is equipped to support Vuforia Expert Capture. You’ll need internet connectivity and a Google Chrome or Microsoft Edge web browser to capture, author, and execute procedures.
Before you begin, complete these steps:
01. Verify internet connectivity
You will need internet connectivity to use some features of Vuforia Expert Capture.
Internet connectivity is required to:
- View procedures on a desktop or laptop computer.
- Edit and publish procedures.
- Install the Capture, Vantage, and View apps on devices.
- Update the Capture, Vantage, and View apps on devices.
- Use spatial anchors. Available only for Microsoft HoloLens, spatial anchors allow you to attach procedure steps to real places in physical space.
Internet connectivity is not required to:
- View downloaded procedures: Typically, viewing procedures using an eyewear or mobile device requires internet connectivity. However, you can download procedures to your device, then view these offline procedures without internet connectivity. Spatial anchors are not available in these offline procedures.
- Capture procedures: However, spatial anchors will not be available.
Consider where and how employees will capture, author, and execute procedures. Then verify they can connect to the internet in those environments, if needed.
02. Download compatible web browser
Vuforia Editor—the application used to author procedures—requires a Google Chrome or Microsoft Edge web browser. Ensure everyone who will author Vuforia Expert Capture procedures has access to Google Chrome or Microsoft Edge.
Because the software is SaaS (software-as-a-service) and the user accesses it online, there’s no need to host the software on your organization’s servers.
Recommended Resources
$name
Before you begin, complete these steps:
01. Define your rollout plan
Plan how to support employees as they learn to use this new technology. You may roll out Vuforia Expert Capture to a large audience all at once or release it to smaller groups gradually. The specifics of your rollout plan will vary, depending on your organization’s use case.
A rollout plan outlines:
- Who, specifically, will be using Vuforia Expert Capture?
- What will they be using Vuforia Expert Capture for? For example, will they be documenting their expertise by capturing procedures? Will they be editing the recordings into step-by-step procedures? Or will they be viewing completed procedures to do their jobs?
- What type of seat or assigned role will the user need?
- How will you communicate with them as they get started and beyond?
- When and how should they receive training? Who will conduct the training?
- When should they start using Vuforia Expert Capture?
- How will they access the devices they need?
- Who will manage user seats and/or role assignments? This could be someone in your IT department or the execution lead on your team.
- How will they get assistance, if needed?
- How will new employees get started, on an ongoing basis? Conversely, how will you revoke access for users who change jobs or leave the organization?
In addition to your first set of procedures, plan how you’ll roll out new procedures on an ongoing basis. As you create and release new Vuforia Expert Capture procedures, consider these questions:
- Who needs access to the procedures to do their jobs?
- When will they get access to new procedures?
- How will they find and view procedures? For example, will you use QR codes or links?
- How they will be notified when new procedures become available?
Your rollout plan will communicate many of the decisions you made through project planning. Document your rollout plan and share it accordingly.
02. Establish internal technical support
Users at your organization will sometimes need technical support to successfully use Vuforia Expert Capture. To support these users, PTC recommends establishing a “help desk” within your IT department. IT personnel should complete Vuforia Expert Capture training so they’re prepared to answer basic questions and troubleshoot issues.
In cases when the help desk is unable to resolve the user’s issue, PTC offers technical support: your organization’s help desk personnel or Vuforia Expert Capture administrator can log a case with PTC eSupport. Once received, a member of the technical support team will assist you.
Recommended Resources
- Create your eSupport Account eSupport
Determine Device Management Strategy
Plan how your organization will maintain the hardware and devices needed for Vuforia Expert Capture. Regular maintenance will ensure uninterrupted productivity, stronger data security, and easier use.
Before you begin, complete these steps:
01. Document your device management plan
You will need some combination of eyewear devices, mobile phones, tablets, and computers to use Vuforia Expert Capture. These devices must be inventoried, maintained, secured, and updated—similar to other technology employees use in their jobs. This responsibility typically falls on IT.
There are many questions you must answer to determine the best device management plan for your needs:
- Device inventory: Who will maintain a list of available devices? If you plan for employees to share devices, how will they track what’s available, what’s broken, and who checked out the device most recently?
- Quantity: How many employees at your organization will need to use the devices? If more employees need devices in the future, how will you meet the growing demand?
- Initial setup: When a new device arrives, how will you prepare it for use?
- Ongoing software support: Who will install software updates on the devices? If the IT department is unable to oversee monthly software updates, consider allowing employees to perform these updates themselves.
- Charging batteries: Where should devices be plugged in? How often will they need to be charged?
- Storage and cleaning: Where should the devices be stored when not in use? Who will be responsible for sanitizing them after each use?
- Security: Are there data security policies that govern devices at your organization? You may install Mobile Device Management software on the devices, if necessary. We recommend applying the latest software and firmware upgrades on a timely basis. Follow guidance from your IT team to secure the devices.
- App store account management: Devices must connect to their corresponding app stores to download the apps necessary to use Vuforia Expert Capture. To access the app store, Google Play and Apple require a user ID. Who will manage this account? Will it be managed per device or share the same account and credentials across the organization? We recommend practicing good password hygiene.
Document your device management plan and share it accordingly. Most importantly, make sure the workers who use the devices understand their role in maintaining them.
Recommended Resources
- Microsoft Hololens IT Pro Center (Docs.microsoft.com)
- RealWear HMT Support (Realwear.com)
02. Manage software updates
Vuforia Expert Capture releases software updates every month. We recommend installing the latest updates to the apps you use to capture and execute procedures. These may include Vuforia Capture and Vuforia Vantage. Vuforia Editor updates automatically—there is no need to download or install anything.
You can configure the apps to automatically update through the device’s app store. If your organization prefers to limit the ability to update the software, determine who will be responsible and how updates will take place. You may use mobile device management software to distribute updates. Remember: devices must be connected to the internet to receive updates.
Recommended Resources
- Download Vuforia Capture Help Center
- Download Vuforia Vantage Help Center
Build Excitement and Address Concerns
Using technology like Vuforia Expert Capture can greatly improve productivity, decrease wasted time, and much more. However, for those users who will create and use procedures, the changes may feel daunting and adversely affect their jobs. Take proactive steps to engage contributors and ease the transition.
Before you begin, complete these steps:
01. Establish mechanism for listening to concerns
While it is important to communicate, it’s also imperative to listen. If stakeholder communication is only coming from one direction, you risk overlooking valuable feedback, inventive ideas, or important concerns from people in your organization.
To help facilitate and elicit feedback, try one or more of the following methods:
- An open forum or team website: Provide a forum where stakeholders and employees can ask questions and make comments. Project leaders can help answer common questions across the organization.
- Group email: Some employees may be hesitant to post on a public forum. To engage them, consider creating a dedicated project email inbox.
- Anonymous survey: Send anonymous surveys throughout the process to gather honest feedback without the fear of repercussions.
Whichever method you choose, be sure frontline workers, managers, new trainees, project participants, and other stakeholders know how to express concerns, share ideas, and ask questions.
02. Generate support across the organization
Advocate for Vuforia Expert Capture across your organization. If possible, get support from leadership and ask them to help you spread the news. Consider sharing updates with executive leaders, managers, trainees, and other employees as appropriate.
Whenever you communicate about Vuforia Expert Capture, clearly articulate why you are implementing it. Know how to explain:
- Why you are making the change
- How it will effect both the business and the users of the new technology
- Your end goal and timeline
Prevent inaccurate assumptions by clearly communicating the value this new technology will bring to your organization.
03. Create a communication plan
Document how, when, and to whom you will communicate throughout your project. Keeping employees informed can help ease concerns about big changes.
Guidelines for creating a communication plan:
- Explain what’s happening, and when and how the overall project is going. It's especially important to be transparent about new technology. Without proper communication, end users may fear the new change may eliminate their jobs or create more work for them. Be sensitive to possible fears.
- Include a timeline for what to communicate, when, and to which audiences. Establish key milestones or successes in these communications to help maintain momentum and excitement.
- Communicate with key stakeholders to ensure the message is consistent.
- Involve employees’ direct managers, if possible. If end users know their managers are excited about the change, they will be too.
04. Introduce Vuforia Expert Capture to employees
Change can be uncomfortable—but it is inevitable for businesses to stay competitive. Implementing new technology like augmented reality is no different, but there are ways to smooth the transition and build excitement about the new initiative.
One way to introduce Vuforia Expert Capture to employees is to show them its amazing possibilities. Help audiences understand the technology by demonstrating how others use it. Read examples of use cases here. Explain how this will connect to what employees are doing today and why it should matter to them.
Giving employees an opportunity to interact with Vuforia Expert Capture firsthand is another way to create excitement. For example, you will test your Vuforia Expert Capture procedures throughout the project to make sure they’re functional and usable. Early in the project, recruit employees to help test it. By involving end users early and listening to their ideas, you encourage them to advocate for the project on your behalf.
Set Up Your Account
Invite users to access Vuforia Expert Capture. Then, set up the account you’ll need to get help from PTC.
Before you begin, complete these steps:
01. Activate administrator account
The first step to set up user accounts is to activate the administrator account. The Vuforia Expert Capture administrator will be responsible for adding and removing users across their organization. An organization selects an administrator when they finalize their purchase contract with PTC.
The administrator will receive an email from “[email protected]” inviting them to activate their account. They will enter their name and create a password. Once active, the administrator will get access to the admin center, where they’ll invite and manage users.
Recommended Resources
- Vuforia Expert Capture Admin Center PTC login required
- Vuforia Admin Center Help Center Help Center
02. Create your support account
PTC offers two ways to get help.
For Administrators: Vuforia Expert Capture Administrators may open a support case with PTC eSupport. To open a case, you must have a PTC customer account. To create your PTC customer account, you'll need your PTC Customer Number and your PTC Service Contract Number. After you file a case, a member of the technical support team will assist you.
For Users: If you do not have or do not know your Service Contract Number, the PTC Community is your best resource for support. Browse information about using the product, follow others’ topics, or post a new topic. A knowledgeable community member will respond and help.
Anyone can explore the PTC Community. If you’d like to post a topic or respond to others, you must create a PTC basic account. Select the "Basic" tab on the "Create New PTC eSupport Account" page. This account is separate from your Vuforia Expert Capture account.
Recommended Resources
- Create your eSupport Account eSupport
- Access the Community PTC Communities
- Create your PTC Basic Account eSupport
- Get Help Logging In eSupport
03. Set up single sign-on
Single sign-on is available for Vuforia Expert Capture, though not required. Single sign-on allows employees to use their existing company email address and password to sign in to Vuforia Expert Capture. If you prefer not to set up single sign-on, skip this step. You can also set it up later, though the transition time may take longer.
To set up single sign-on, you must have an identity provider that supports SAML 2.0. See the “How to integrate SAML 2.0” article below for details.
If your organization's identity provider supports SAML 2.0, open a support case with PTC eSupport to set up single sign-on. You will need a support account to contact eSupport, explained in the previous step. Notify any affected users once single sign-on is functional.
If you do not set up single sign-on now, you can set it up later. Setting it up later may take longer depending on the number of users you have. You also risk interrupting someone’s work. Communicate with all users before setting it up.
Recommended Resources
- How to integrate SAML 2.0 to Vuforia Expert Capture Editor Help Center PTC login required
- Open a support case eSupport PTC login required
04. Set up user accounts
You need a Vuforia Expert Capture account to capture, author, and execute procedures. Vuforia Expert Capture includes several applications: Vuforia Capture, Vuforia Editor, and Vuforia Vantage or Vuforia View, depending on the device type you are using to execute procedures.
You need a Vuforia Expert Capture account if:
- You are using Vuforia Vantage or Vuforia View to execute procedures
- You are using Vuforia Editor to author procedures
- You are using Vuforia Capture on a HoloLens eyewear device and want to include location-specific steps in your procedures
You do not need a Vuforia Expert Capture account to capture procedures using HoloLens or RealWear eyewear devices.
To create your account, follow these steps:
- Invite: Your organization’s administrator adds you as a new user.
- Activate: You will receive an email from “[email protected]” inviting you to activate your account. You will use this email address to log in to Vuforia Expert Capture.
- Sign in or create a password:
- If your organization has single sign-on, enter your company email address and password to sign in. If you are not sure whether you have single sign-on, try signing in with your company credentials first.
- If you cannot sign in with your company credentials, you must create your own username and password. Enter your name and email address, then create a password.
Once you have activated your account, you will have access to Vuforia Expert Capture. You administrator will assign you to a user role. You can be assigned the role of Administrator, Manager, Author, or Viewer. Each role has varying levels of access to functionality in Vuforia Expert Capture. If you are having trouble logging in or do not have the correct role assigned, contact your administrator for help.
Visit the Help Center for more information about user roles.
Recommended Resources
- User Roles Help Center
- What is Vuforia Expert Capture? Help Center
05. Understand user roles
Each role has varying levels of access to functionality in Vuforia Expert Capture.
Viewer
- Anyone who will use Vuforia Expert Capture to document their expertise or view procedures
- Will use the Vuforia Capture, View, or Vantage apps
- May be your frontline workers
- Needs a Standard User seat to document and view procedures
Author
- Anyone who will use Vuforia Expert Capture to create or edit new procedures
- Uses Vuforia Editor to access or change procedures they created or that others shared with them, but cannot delete procedures
- May be your training content creators or technical publication team
- Needs a Premium User seat to create and edit procedures
Manager
- Anyone who will manage user permissions for procedures in Vuforia Expert Capture
- Uses Vuforia Editor to access or change procedures they created or that were shared with them
- Can publish procedures while authors cannot
- Will be essential in your rollout process
- Users who publish procedures get automatic access to view them once published
- Needs a Premium User seat to publish procedures
Administrator
- Anyone who needs to use all features and procedures in Vuforia Expert Capture
- Monitors metrics in Vuforia Insights
- Needs a Premium User seat to use all features
We recommend assigning a limited number of administrator roles. If you are having trouble logging in or do not have the correct role assigned, contact your administrator for help.
Recommended Resources
- User Roles Help Center
Get Started with Devices
Obtain and set up the devices you will use for your Vuforia Expert Capture project. Make sure the employees who will use eyewear devices have the opportunity to experience what it is like to wear them in their day-to-day jobs.
Before you begin, complete these steps:
01. Set up devices
The devices you chose to run Vuforia Expert Capture may require some initial setup or configuration. Verify your devices are connected to Wi-Fi and ready for use before proceeding. No need to install Vuforia Expert Capture software: for now, workers are learning the basics of the device, not the software.
02. Learn how to use eyewear devices
Eyewear devices like Microsoft HoloLens and RealWear HMT empower users to view work instructions, hands free. Getting accustomed to eyewear devices takes practice. It will take time to get used to how it fits and how to consume work instructions in a new way. The gestures and voice commands you will use to interact with the device will feel strange, at first.
Start acclimating workers to wearing and using the devices on the job as soon as possible. Some first-time users say wearing an eyewear device for as little as 15 minutes helped them get acclimated.
Recommended Resources
- Realwear Quick Start Guide (Realwear.com)
- RealWear: Wearing the HMT (Support.realwear.com)
- Microsoft Hololens: Gesture Input (Youtube.com)
- Microsoft Hololens: Gaze Input (Youtube.com)
- Microsoft Hololens: Best Way to Wear It (Youtube.com)
- Magic Leap Quick Start Guides (Magicleap.care)
- Properly Fitting Your Magic Leap Device (Magicleap.care)
03. Learn about model targeting
Model targets are important to understand, as they allow digital Augmented Reality content to be overlayed on top of the real world. Upon publishing your procedure with your 3D data, Vuforia will automatically create a Standard Model Target and will start the process to generate an Advanced Model Target. The 3D component of the experiences can now be accessed for end users in Vuforia Vantage for desktops, mobile devices, and HoloLens. If the end user is on desktop, they will see a 3D rendering of the object on the screen with 3D content critical to the procedure. If the end user is on a phone, tablet, or HoloLens device, they will be presented with a white chalk outline of your 3D rendering. The end user can then line up the digital chalk outline with the physical object and see Augmented Reality Content on top of the physical object.
When you initially publish an experience with a 3D model, Vuforia Expert Capture quickly creates a Standard Model Target while it generates an Advanced Model Target for easier alignment of the digital and physical object. The Standard Model Target allows end users to quickly access the procedure after publishing and creates a white chalk outline of the digital content. The end user needs to match the white chalk outline to the physical object on phones, tablets, and HoloLens to acquire the target and see the Augmented Reality 3D content. It is necessary to align the shape of the white chalk outline to the physical object when the procedure is using the Standard Model Target. After the target has been acquired, then the user can walk around the object, and progress through the procedure. Once the Advanced Model Target is done generating, the end user can look at the object from any angle, and the white chalk outline is just a suggestion. This means the white chalk outline does not need to exactly match with the physical object to acquire the target when using an Advanced Model Target. The change from Standard to Advanced Model Target happens automatically and will not need action from the author.
Recommended Resources
- 3D Models Help Center
Install Vuforia Expert Capture Software
You need several applications to use Vuforia Expert Capture: Vuforia Capture, Vuforia Editor, and either Vuforia Vantage or Vuforia View. In some situations, you'll need both Vuforia Vantage and Vuforia View.
Before you begin, complete these steps:
01. Install Vuforia Capture on eyewear devices
You must install the Vuforia Capture app on each eyewear device you will use to capture procedures.
If you are using:
- RealWear eyewear devices: Download the Vuforia Capture APK onto a computer, then install the app onto your devices.
- Microsoft HoloLens eyewear devices: Download Vuforia Capture from the Microsoft store directly onto your devices, similar to installing an app on your mobile device.
- Magic Leap eyewear devices: Download the Vuforia Capture app from the Magic Leap World store, then install the app onto your devices.
Recommended Resources
- How to Download Vuforia Capture Help Center
02. Sign in to Vuforia Editor
You will use Vuforia Editor to author and publish procedures. Vuforia Editor is a web-based SaaS (software as a service) application, so there is no need to install any software. Vuforia Editor is only supported on Google Chrome or Microsoft Edge web browsers. If you do not have the required web browser, install it now.
Then, open Vuforia Editor and sign in with your email address and password. If you have not yet set up your account, follow these steps.
Recommended Resources
- Get to Know Vuforia Editor Help Center
03. Install Vuforia Vantage or Vuforia View on devices
You must install Vuforia Vantage or Vuforia View on your devices to view and execute procedures.
To view procedures on a desktop or laptop computer, you do not need to install anything. You will receive a link to a procedure and use your web browser to view it. You must be signed into Vuforia Expert Capture when you view procedures on a desktop or laptop computer.
Download and install Vuforia Vantage if you are using:
- Magic Leap eyewear devices: Download the Vuforia Capture app from the Magic Leap World store, then install the app onto your devices.
Download and install Vuforia View if you are using:
- RealWear eyewear devices: Download and install Vuforia Vantage from your device's app store.
- Microsoft HoloLens eyewear devices: Download Vuforia Capture from the Microsoft store directly onto your devices, similar to installing an app on your mobile device.
Recommended Resources
- Download Vuforia Vantage Help Center
- How to Download Vuforia View Help Center
- View a Procedure with Vuforia Vantage Web Help Center
Create Procedure Workflow
Plan and document the process you’ll follow to create procedures. Determine who will be responsible for planning, capturing, editing, and approving each procedure.
Before you begin, complete these steps:
01. Determine your first procedure
If you have not done so already decide which procedures you will document first using Vuforia Expert Capture. We recommend starting with procedures that fit your use case and provide value quickly.
Once you determine your first procedure, connect with your subject matter experts—those with the knowledge and expertise to complete the procedure—to start planning.
02. Document your procedure process
Plan how you will create and manage procedures using Vuforia Expert Capture. Think about the requirements your organization has for managing procedures today (paper-based work instructions, training materials, etc.). Then, account for those requirements as you create a new process. Documenting this process establishes standards for everyone creating and maintaining your procedures at your organization.
Your process should include:
- Order of operations
- What steps are necessary to plan, create, approve, and publish procedures? What is the order of these steps?
- Roles and responsibilities
- Who should be involved as you create and manage procedures? Typically, you’ll need someone in these roles:
- Subject Matter Expert: This person is extremely knowledgeable about how to do the task/process/procedure you’re documenting. This person will capture and sometimes edit the procedure.
- Approver: This person is responsible for ensuring procedures are accurate and comply with any requirements your company has for the procedure. This person will review and publish the procedure. They may also be involved in editing the procedure.
- End User: This person will test your procedures. Before you finalize new procedures, we recommend that employees try to use the procedures in their jobs. They can point out anything that does not work or that seems confusing.
- Depending on how your team is structured, one person may be responsible for multiple roles.
- If a procedure has a small audience (5-10 people, for example), consider whether the subject matter expert may capture, edit, approve, and publish the procedure on their own.
- If the procedure has a much larger audience (across your entire organization or external customers, for example), different teams may capture, edit, approve, and publish the procedure.
- Who should be involved as you create and manage procedures? Typically, you’ll need someone in these roles:
- Project timeline
- When you established dates and deadlines for your Vuforia Expert Capture project, how much time did you allot to creating your initial set of procedures? Given that deadline, what do you need to complete the work on time?
- The audience size will likely affect how long it takes to create a procedure. If a large audience will use the finished procedure, there will likely be more people involved in capturing, editing, and approving it. The more people involved, the longer it will likely take. If it is a small audience, the process may be faster as the subject matter expert could plan, edit, test, and publish on their own—and the finished procedure may not need to meet the same quality requirements as one for a larger audience.
- Company requirements
- Will the procedures you’re documenting with Vuforia Expert Capture be subject to any compliance standards? If your organization has requirements for creating, documenting, altering, or using procedures, make sure your process covers them.
- If paper-based instructions are required, you can export a Microsoft Word document of a finished procedure.
- Communications
- Who needs to be notified when you begin planning? When?
- Who needs to be notified when you publish a new procedure? When?
- Who is responsible for sending out communications?
- Updates process
- When changes to a published procedure are necessary, consider how to make them. If it’s a small change, the subject matter expert may be able to edit the procedure themselves. If it is a big change or update, such as new tools or protocols, consider who is affected and who needs to be involved in the decision to implement the change. How does that change affect other teams or parts of your organization? Who needs to be included in communications about the change? When does the change go into effect?
- Content management
- When you’ve uploaded capture files to Vuforia Editor, how should your files be organized? How will you decide how to organize your folders? Who will have access into each folder? How should files be named?
- Visit the Help Center to learn more about recommended content management best practices and review examples of content management.
- Version control
- A change in Vuforia Editor is the record of any edit made to a procedure. Vuforia Editor automatically tracks and permanently documents the changes you make to procedure.
- A version can be created to mark a key moment in a procedure. Because versions are manually created, you decide when to create new versions. We recommend that you create a version when you complete a phase of your procedure. This could be:
- Before sending a procedure for review
- After major changes were completed
- After you updated procedures to comply with new regulations
- Anytime you want a "snapshot" of the state of a procedure that could be helpful to refer to later
- Set a standard for creating versions for the team to ensure consistency, so other authors know what to expect when they see a new version in Vuforia Editor.
- When you create a new version, you must write a description for it. Other authors or collaborators will see this description when they open the procedure. Who needs to be notified of the new version?
Establishing this process will ensure the procedures you create are up to date, compliant, and useful as your procedure library and user base grow.
$name
Before you begin, complete these steps:
01. Learn how Vuforia Expert Capture works
Vuforia Expert Capture empowers you to document and share your expertise. Follow these four steps to create procedures.
- Plan: Decide which task, process, or procedure to capture. Then document your plan for capturing it. We recommend creating an outline or script before you start capturing.
- Capture: Use an eyewear device and the Vuforia Capture app to record yourself performing the process or task. You will use a RealWear, HoloLens, or Magic Leap eyewear device. As you record, explain what you’re doing and why. Be concise and refer to your outline or script if needed. The resulting output is called a "capture."
- Author: Use Vuforia Editor to build your procedure. Upload the capture to Vuforia Editor. Use content from your captures along with any uploaded images or videos to create steps in the procedure. Publish the finished procedure.
- Execute: Now others at your organization can find and view the procedure. View procedures using one of two apps, depending on the type of device you are using.
- If you are using a mobile device, tablet, or Magic Leap device to view the procedure, use the Vuforia Vantage app.
- If you are using a RealWear or HoloLens eyewear device to view the procedure, use the Vuforia View app.
You can also export the procedure to a Microsoft Word document, if necessary.
You will learn specifics about how to capture, author, and execute procedures in later steps.
Recommended Resources
- What is Vuforia Expert Capture? Help Center
02. Plan your procedure
To successfully capture a procedure, we recommend preparing beforehand. Start by planning your procedure and preparing your work environment. You may have already covered some of these details when you planned your workflow.
Create a plan:
Decide which process or task you are documenting.
Identify who is going to demonstrate and record the process or task. Look for someone who is knowledgeable about the process—their expertise is extremely valuable. Ideally, this subject matter expert is also comfortable learning new technology. Depending on your process, one person may be responsible for both planning and demonstrating/recording the procedure.
Jot down an outline or script. List all the steps you will perform. Then for each step, include a brief description and document any tools or equipment you will need. Write a script for what the expert will say as they record.
For each step, include:
- Step description
- Video Capture? For some steps, a photo can be used for the step.
- Photo Capture? Consider whether to take a photo while recording this step.
- What materials do I need? Possible materials include assets, props, machines, or tools.
- Additional notes
Rehearse the process. We recommend practicing the procedure before you attempt to record it. Wear an eyewear device and perform the procedure. Adjust your script if necessary.
Prepare your workspace. Perform the procedure in a real setting, using the actual machine or object. Gather any materials, tools, or props you will need.
Get a template and an example plan at the “How to Plan your Vuforia Expert Capture Procedure” resource below.
Remember: Mistakes are inevitable. Do not worry if you stumble on a step—your capture does not have to be perfect. You will remove mistakes during the editing process later.
Recommended Resources
- How to Plan your Vuforia Expert Capture Procedure
- Get Started with Vuforia Work Instructions Help Center
03. Learn how to use Vuforia Capture
After you plan your procedure and prepare your work environment, you’re ready to use Vuforia Capture. You’ll need an eyewear device and the Vuforia Capture application. Keep your outline/script nearby in case you need a reference.
How to capture a procedure
- Power on your device. If you’re prompted to adjust your camera, do so now. Use voice commands to control the device—instead of clicking or tapping, you’ll tell it what to do. If you’re using a HoloLens device, use voice commands or gestures. A list of key voice commands is included in the “Capture a Procedure” articles below.
- Open the Vuforia Capture app.
- To begin recording, say “new capture.” Record the first step of the procedure.
- When you’re ready to start the next step, say “next step.” Repeat until you finish recording all your steps. Pause the recording by saying “pause.” Resume the capture by saying “resume.” Once the capture is resumed, you’ll automatically be taken to the next step. No need to start over if you make a mistake—just say “next step” and keep going.
- Once you’ve completed the procedure, say, “finish capture.” Then, say “edit title.” Give the capture a descriptive title that’s short and concise. The device may not register the entire title if you say something long or complicated. To finish, say “save capture.”
- To avoid losing your work, plug your eyewear device into a computer and save the file in a secure location right away.
The steps to follow to capture a procedure will vary slightly depending on whether you’re using a RealWear, HoloLens, or Magic Leap eyewear device. See the articles below for detailed, device-specific instructions.
In the beginning, it may feel strange to wear an eyewear device and record yourself doing a task. But you may be surprised how quickly you get used to it. Most users feel capable using Vuforia Expert Capture after capturing 3-5 procedures.
If you need more training, PTC offers a variety of resources to help you learn how to use Vuforia Capture:
- The Help Center covers key topics about how to capture, edit, publish, and view procedures.
- The Learning Connector contains video tutorials for key topics.
- The Community offers advice and tips from other users. Anyone can explore and view posts in the Community, but you'll need to create a PTC account if you would like to post a topic or respond to others. This account is separate from your Vuforia Expert Capture account.
Everyone learns at their own pace. Give yourself plenty of time to get accustomed to the software. If you’re new to eyewear devices, we recommend you practice wearing and using those devices prior to completing Vuforia Capture training.
Recommended Resources
- Capture a Procedure with a HoloLens Device Help Center
- Capture a Procedure with a RealWear Device Help Center
- Vuforia Expert Capture video
- Learning Connector: Vuforia Capture PTC University
04. Tips and tricks for capturing procedures
Here are a few tips and tricks to help you use Vuforia Capture.
- Plan and rehearse the procedure before you record it.
- When you’re demonstrating the procedure, tell the user what they should and should not do. For example, “make sure this bolt is tight,” or “watch out, this knob may be hot.”
- Don’t worry about mistakes. If you misspeak, forget a step, or have any other trouble while capturing the procedure; just say “next step” and keep going. You can remove steps and re-record audio later if needed.
- Be concise. As you’re talking through the procedure, use as few words as possible to make your point. Be action oriented. For example, say “open drawer,” or “insert cartridge.” Consider writing a script for the procedure.
- Speak slowly.
- Share your expertise. Imagine the employee who will use this procedure to do their job, and coach them through it. If you know how to do something better, safer, or more efficiently, offer that guidance in the procedure.
- Keep the steps in chronological order the best you can. This will make editing the procedure easier.
- Don't combine too many details into one step. Divide lengthy portions into multiple steps.
- Record procedures in a well-lit environment.
- Gather all the props you need (tools, parts, documents) prior to capturing the procedure.
- Ask someone to assist you, if needed.
- Consider when images would be helpful. Use the Capture app to take photos during the procedure and use them later.
- Avoid moving your head too much while capturing. If you must move your head, do it slowly to prevent the camera from jerking abruptly.
- If the device doesn’t pick up on a voice command, don’t say it any louder or slower. Just pause and say the command again.
See below for more best practices.
Recommended Resources
- Best Practices: Capturing a Procedure Help Center
$name
Before you begin, complete these steps:
01. Learn how to use Vuforia Editor
Vuforia Editor is an easy-to-use, web-based environment where you transform captures into finished procedures with or without 3D content. A capture is a recording created using the Vuforia Capture app. After you capture a task, process, or procedure, you are ready to edit it. If you did not record the capture yourself, refer to the procedure script or ask the person who captured it to help you edit it.
What you need:
- A Vuforia Expert Capture account: If you do not have a username and password, contact your organization’s Vuforia Expert Capture administrator. Learn more about setting up your account.
- Capture files: A subject matter expert uses an eyewear device and the Vuforia Capture app to record a procedure. The output of the recording is a capture file. You will need the capture file to edit and publish the procedure.
- Optional 3D files: Acquire the 3D data for the procedure's object. These are generally received from engineering. Learn more about preparing to view procedures.
- A compatible internet browser: Vuforia Editor is only supported on Google Chrome or Microsoft Edge web browsers. We recommend Google Chrome. If you do not have the required web browser, install it now.
Recommended Resources
- Learning Connector: Vuforia Editor PTC University
02. Create a procedure
Upload a capture
To create a new procedure, first upload your capture files to Vuforia Editor. Capture files cannot be uploaded directly from your eyewear device to Vuforia Editor.
Once you sign in to Vuforia Editor, you can upload your capture files.
Visit the Help Center for more information on content management best practices and how to access and upload your capture files.
Upload 3D files
To add 3D content to your procedure, first, you will need to locate and upload your 3D file to the editor. Then, you will be able to connect the 3D file to a procedure. Locating 3D files may require speaking with your engineering department, original equipment manufacturers, or technical publication writers.
Visit the Help Center for more information on 3D models and the supported file types and how to connect a 3D file to a procedure.
Edit a procedure
After you have uploaded the capture files, begin editing your procedure. You can:
- Add descriptive text, images, and videos to each step
- This could include media imported from Creo Illustrate
- Edit the audio
- Edit or rearrange steps
- Add other images and videos to Vuforia Editor by uploading them directly into the desired step
- Add 3D point markers and 3D part markers on desired steps and add a serial ID requirement
- Add required step feedback on desired steps, including confirmation feedback, pass or fail feedback, and step check feedback
Visit the Help Center for more information about how to edit a procedure, add a serial ID, or add step feedback prompts.
Recommended Resources
- How to Edit a Procedure Help Center
- Working with Captures Help Center
- Import a Creo Illustrate Procedure Package Help Center
- Serial ID Logging Help Center
- Step Feedback Help Center
03. Learn more about 3D
Once you have uploaded your cad file and connected it to the procedure, you will be able to customize the model for the procedure and add 3D content for each step.
Setting up your 3D Model:
- Select the model’s orientation with visual coordinate system selections. This makes editing easier as your model will be face up.
- Create product states to match the physical object. Sometimes the 3D Model will have additional parts that are not needed for the procedure. In the editor, you can hide or show parts depending on what the physical object will look like for the procedure.
- Use the navigation controls for easy manipulation of the 3D model. Authors can navigate using the built-in cube and arrows to rotate and zoom the model at the top right of the 3D screen, or they can use the rotate, pan, and zoom mouse functionality located at the bottom of the screen.
Use the following steps as needed to edit each step:
- Create point markers to guide users to an exact location on the object with wayfinding. With the point marker tool, the author simply selects the 3D model where they want the end user to be guided to.
- See 3D marker types for more information.
- Create part markers that highlight a part to draw the end user's attention to critical parts to complete the step. The end user will see this part in Augmented Reality highlighted with a bright color.
- See 3D marker types for more information.
- Create part sets when you frequently need to highlight a group of parts. This makes it easy to highlight the same group of parts for different steps with less clicks.
- Create custom view points to change the model target’s white chalk outline for that step. This helps users focus on the critical area for that step and provides more information to the model target tracking.
- Add Step Check to validate if a step has been done correctly by end users. Authors select the area to validate on the 3D model and then the AI model is trained with real life photos of the pass and fail state. End users will receive real-time feedback if the step is correct.
- See here for more Step Check editor information.
- See here for more Step Check training information.
Once you have edited and added the 3D content to the procedure, you are ready to publish. Next it is time to test your procedure on the physical object. To optimize model tracking, it is recommended to make custom viewpoints and to choose objects with distinct features that are not symmetrical. Making a custom viewpoint on a distinct feature will result in the best target acquisition.
Recommended Resources
- 3D Models Help Center
- Physical Object Recommendations Help Center
- Create a Product State Help Center
- Add Markers to a Model in a Step Help Center
- Create Part Sets Help Center
- Refine a Custom Viewing Position for a Large Object Help Center
- Step Check Components in Vuforia Editor Help Center
- Enable and Train Step Check Help Center
04. Track the history of your procedure
As you create and edit procedures, Vuforia Editor permanently records each change. It also records who made the change to the procedure, when it happened, and what was modified. The Versions and History table tracks these changes. Version control prevents data from being lost or overwritten. Your work is permanently saved and retrievable.
With version control, you can:
- View and restore any entry into he Versions and History table
- Restore a previous version without starting over
- Add a description to provide a record of the change, state, or requirements
- See who created and edited procedures and track how changes were incorporated
- Preserve your work and see all changes in the Versions and History table
Create a new version to document a significant moment in the lifecycle of the procedure. For example, a new part was added to a machine and you need to update the procedure. Click “Create Version” and a window opens with a description box. Enter a description that gives information about why you created this version (for example, “New lever added”). Machinery can change frequently. If a part is removed or changed again in the future, you can restore a previous version.
Your changes stay private until you’re ready to share or publish. If you change a procedure in Vuforia Editor, end users won't see your updates until you publish it.
Visit the Help Center for more information on creating versions.
Recommended Resources
- Version Control Overview Help Center
- Versions and History Table Help Center
- Vuforia Expert Capture: Version Control (Ar.gallery.video)
- What is Version Control and 3 Ways It Improves Digital Work Instructions
05. Publish procedures and share with end users
Once the procedure is complete, publish it. When a procedure is published, Vuforia Expert Capture automatically creates a “release” in the “Version and History” table. The major version number will change (for example, from 1.1 to 2.0). Add a meaningful description before publishing. Once published, the procedure is available to view. If there was a previous release available to end users, the new release will automatically replace the previous version. Only one release of a procedure can appear in Vuforia View or Vuforia Vantage.
When you publish, Vuforia Editor generates a QR code and links to share the procedure with others. When scanned, the QR code shows the most recent release. With these links, you can view the procedure in an internet browser or within the Vuforia Vantage or Vuforia View apps. The QR code and the links will not change, regardless of updates or edits to the procedure. The procedure can also be exported as a Microsoft Word document. Visit the Help Center to learn more about how to share procedures.
Remember: you need to edit permissions to make published procedures available for other users.
06. Training your step check model
Step Check assists users in visually verifying if a step in a procedure has been performed correctly or not. Authors will first enable Step Check in a step and set the area to validate. Once the procedure has been published, it is ready for photo collection in Vuforia Vantage. Vuforia Vantage walks the user through collecting photos from all available angles for the pass state and the failure state. The end user does not need to worry about taking the photos as Vuforia Vantage does it automatically. Instead, the user should move the device to where the app guides them. In the Vuforia Editor, the author can review the collected photos and press a button to start training the AI model. Once the AI model is trained, Vuforia Vantage will show end users a green or red icon depending on if the step is in the pass or fail state. Authors can also take a feedback photo required for additional analytics on how the step was completed by end users. With Step Check, end users are guided to the exact spot with the 3D Model information, shown how to complete the step with helpful videos and pictures, and get real time feedback if the step is in the pass or fail state. All of these parts help ensure end users feel confident they are completing the procedure correctly.
Recommended Resources
- Step Check Help Center
- When to Use Step Check Help Center
- Step Check Components in Vuforia Editor Help Center
- Enable and Train Step Check Help Center
- Step Check Dashboard Help Center
07. Tips and tricks for editing procedures
Here are some tips and tricks to help you use Vuforia Editor.
- The subject matter expert who captured the procedure should edit it first. If this isn’t an option, ask them to review the procedure before you publish it.
- You can edit images and record new audio in Vuforia Editor, if needed.
- When you upload a capture, delete any content you do not want in the final version. For example, any mistakes that were recorded when capturing the procedure will still be saved and uploaded into the editor; delete these mistake recordings. This will help you keep your work organized.
- Edit the procedure in chronological order. This will also help keep your work organized.
- Ensure someone is responsible for reviewing and approving procedures before you publish them. You may have chosen someone for this role when you planned your procedure workflow.
- If a team edits any procedures, we recommend choosing one editor to become your organization’s Vuforia Editor main subject matter expert. Then, they can train others and serve as a resource for Vuforia Editor needs.
Recommended Resources
- Vuforia Expert Capture Help Center Help Center
- Vuforia Expert Capture Community PTC Communities
Prepare to View Procedures
Use Vuforia Vantage to easily find and execute work instructions created using Vuforia Expert Capture.
Before you begin, complete these steps:
01. Learn how to execute procedures
The Vuforia Vantage app may be used to find and execute Vuforia Expert Capture procedures.
Use the Vuforia Vantage app for:
- Mobile devices
- Tablets
- HoloLens and RealWear eyewear devices
Each app allows viewers to follow work instructions created by experts. These work instructions are called procedures. Procedures guide the viewer through manufacturing, repair, training, or service scenarios, for example.
Using a mobile device, tablet, or eyewear device, the viewer sees the procedure from their own point of view in their real environment. They can also view procedures on a desktop or laptop computer. Viewers navigate through the steps in the procedures at their own pace, pausing as needed.
If you have not yet done so, download Vuforia Vantage for your mobile device, tablet, or for your other eyewear devices. Learn more about installing Vuforia Vantage on your device. You must log in to access your organization’s procedures. Easily access a specific procedure by scanning its QR code or inputting the URL.
If you don’t have a Vuforia Expert Capture account, contact your organization’s Vuforia Expert Capture administrator. They will add you as a new user and invite you to create a username and password.
Recommended Resources
- How to View or Share a Procedure Help Center
- Download Vuforia Vantage Help Center
02. Tips and tricks for viewing procedures
Here are some tips and tricks to help you use Vuforia Vantage or Vuforia View.
- When you access a procedure through Vuforia Vantage or Vuforia View, you can save it to your eyewear or mobile device. When you want to view the procedure again, you do not have to scan the QR code or access the URL. You can also view saved procedures without an internet connection.
- View specific steps within the procedure by selecting the step list in the menu. Select where you want to start the procedure or skip to a specific step.
- Procedures play in a continuous loop. If the procedure is short and you want to view a step again, it may be easier to let the procedure restart.
- If you are using an eyewear device to view procedures, you will need practice to get used to interacting with it. Learn how to use eyewear devices.
Recommended Resources
Check on Progress
Regularly meet with your project team to review your progress with Vuforia Expert Capture. Discuss project status, action items, and any issues or obstacles.
Before you begin, complete these steps:
01. Connect with project team to review progress
Conduct regular check-in meetings with your project team to assess progress, according to your communication plan.
Review topics such as:
- Overall status of the project, including timeline, budget, scope, and resources
- Recently completed tasks and action items
- Current action items
- Open action items
- New developments and insights
- Issues, risks, or obstacles
Gather updates from the execution lead(s), technical lead, and other team members as they become involved in the project. Consider creating some sort of documentation (Word document, one-slide presentation, etc.) to regularly address the same topics mentioned above.
Consider meeting more frequently when your Vuforia Expert Capture project begins. As the project progresses, you could meet weekly or every other week depending on what works best for your project.
Share progress updates with other stakeholders who should be included as the project progresses. Your Customer Success Manager can help you track your progress.
$name
Before you begin, complete these steps:
01. Test procedures
Before you introduce Vuforia Expert Capture across your organization, test your initial procedures to ensure that they are effective, clear, and meet your goals. The purpose of testing your procedures is to find and fix anything that’s difficult or confusing for end users. You are also confirming the procedures are safe to use and comply with your organization’s rules and standards.
Once a procedure is published, test it in the environment and under the circumstances where employees will use it. Work with your end user: someone who’s expected to execute the procedure. This may be a trainee or frontline worker, depending on your use case. The subject matter expert who helped create the procedure should also be present during testing to receive feedback—such as confusing or unclear instructions—and gain more perspective on their work.
Test and verify:
- Functionality: Does the procedure function properly? Does the link or QR code load the right procedure? Does the procedure load appropriately?
- Connectivity: Is the Wi-Fi signal strong enough? If not, consider downloading procedures for offline use.
- Usability: Can the end user figure out how to find, open, and use the procedure, with minimal guidance from you?
- Devices: Are you using the latest version of Vuforia Vantage and Vuforia View? Are the devices you’re using to view the procedure working as expected? Are they suitable for your environment?
- Usefulness: Does the Vuforia Expert Capture procedure make the task or process easier for the person using it?
- Content: Are there any steps that are unclear? Is it easy to follow? Can the viewer follow the procedure without getting stuck?
Based on the feedback you receive, decide whether to make any changes to the procedure before you deploy it to all your end users. Repeat this testing process for each of your initial procedures.
Recommended Resources
- Download a Procedure for Offline Viewing Help Center
02. Train end users
Ensure everyone who will use Vuforia Expert Capture has the knowledge they need to get started. Follow the training plan you created in your project plan.
- End users will need access to your organization’s chosen devices (mobile devices, tablets, eyewear devices, and/or computers).
- They will also need either Vuforia Vantage or Vuforia View to participate in training.
- They will need a username and password to log in to Vantage or View—your admin must invite them from the Admin Center, if they have not done so already.
This training should be straightforward and focus on getting your end users comfortable using Vantage and View. Communicate what procedures are available. Help them get comfortable using the devices to access and view those procedures. As you conduct training, monitor whether your approach is effective. You may discover end users need more time to get used to wearing eyewear devices or guidance on using them.
PTCU has short tutorials available for all users, no need to sign in. Feel free to reuse appropriate tutorials as part of your training plan for your users. Consider what they need to know and only pick which tutorials are appropriate.
Ideally, employees have been notified in advance that the organization is adopting Vuforia Expert Capture. They will be more likely to embrace the change if they know it is coming. Training is another opportunity to build excitement for Vuforia Expert Capture, providing your employees with an opportunity to try your devices and interact with a procedure firsthand.
Ensure end users know how to contact your organization’s system administrator and technical support (or help desk) if they have an issue with Vuforia Expert Capture or a device.
Recommended Resources
- Learning Connector: Vuforia PTC University
- Learning Connector: Vuforia Editor PTC University
- Learning Connector: Vuforia View PTC University
- Learning Connector: Vuforia Vantage PTC University
03. Train your organization's help desk
To reduce downtime and achieve your project goals, it’s important to provide technical support to everyone using Vuforia Expert Capture within your organization. PTC recommends establishing a “help desk” within your IT department. Help desk personnel should complete Vuforia Expert Capture training so they’re prepared to answer basic questions, troubleshoot problems, and manage device issues.
PTC offers a hands-on training workshop to prepare the key members of your team to maintain procedures using Vuforia Expert Capture. Contact your customer success manager to learn more. This workshop can be held on-site or remotely.
In cases when the help desk is unable to resolve the employee’s issue, PTC offers technical support: your organization’s Vuforia Expert Capture administrator may log a case with PTC eSupport. Once PTC is notified of the issue, a member of the technical support team will assist them.
Recommended Resources
- Create your eSupport account eSupport
- Log a support case eSupport PTC login required
- Learning Connector: Vuforia PTC University
- Learning Connector: Vuforia Editor PTC University
- Learning Connector: Vuforia View PTC University
- Learning Connector: Vuforia Vantage PTC University
Manage Devices
Keep your devices up to date with the latest versions of Vuforia Expert Capture applications.
Before you begin, complete these steps:
01. Update Vuforia Capture on devices
Update your eyewear devices regularly to ensure they remain secure and stable. You will update the eyewear device operating system and the Vuforia Capture app. PTC releases a new version of Vuforia Capture every 28 days. You need to take extra steps to install updates depending on which eyewear devices you use.
If you are not permitted to install software updates, contact your company's IT department or administrator. They may have a process for updating devices on employees' behalf.
Microsoft HoloLens and Magic Leap eyewear devices
If your HoloLens or Magic Leap device is connected to the internet, they will update the Vuforia Capture app automatically when a new version is released. You may need to sign in to the app after the device updates.
RealWear eyewear devices
To update Vuforia Capture on RealWear eyewear devices, follow these steps:
- Log in to PTC eSupport. You'll need a PTC support account.
- Download the latest Vuforia Capture APK.
- Add the downloaded software to the RealWear Explorer.
Devices must be connected to the internet to update.
You will need to update each device individually. Unless you are using RealWear Foresight, which allows you to update multiple devices at one time.
You may need to sign in to the app after the update is installed.
Recommended Resources
- Download Vuforia Capture Help Center
- Open a support case eSupport PTC login required
- Microsoft Hololens IT Pro Center (Docs.microsoft.com)
- RealWear HMT Support (Realwear.com)
- RealWear Foresight (Realwear.com)
- Magic Leap Support (Magicleap.care)
02. Vuforia Editor updates automatically
Vuforia Editor will update automatically—there’s no need to update, download, or install anything.
03. Update Vuforia Vantage and Vuforia View on devices
PTC releases new versions of the Vuforia Vantage and Vuforia View apps every 28 days. Keep your viewing apps updated on all devices to ensure users can execute procedures without software issues. You may need to take extra steps to install updates depending on your devices.
If you're not permitted to install software updates, contact your organization's IT department or administrator. They may have a process for updating devices on employees' behalf.
Vuforia View no longer available for mobile devices and tablets
On May 27, 2021, you must switch from Vuforia View to Vuforia Vantage if you’re using mobile and tablet devices. Vuforia View will no longer be available for accessing Vuforia Expert Capture procedures.
If you’re using eyewear devices (not including Magic Leap devices) to view procedures, you’ll continue using Vuforia View.
Mobile devices and tablets
The latest version of Vuforia Vantage is available for your supported mobile devices and tablets in the iOS and Android app stores.
Microsoft HoloLens and Magic Leap eyewear devices
If your HoloLens or Magic Leap eyewear device is connected to the internet, it will update Vuforia View automatically when a new version is released. You may need to sign in to the app after it updates.
RealWear eyewear devices
To update Vuforia View on RealWear eyewear devices, follow these steps:
- Log in to PTC eSupport. You need a PTC support account.
- Download the latest Vuforia Capture APK.
- Add the downloaded software to the RealWear Explorer.
- Devices must be connected to the internet to update.
You’ll need to update each device individually. Unless you’re using RealWear Foresight, which allows you to update multiple devices at one time.
You may need to sign in to the app after the update is installed.
Recommended Resources
- Download Vuforia Vantage Help Center
- Download Vuforia View Help Center
- Open a support case eSupport PTC login required
- Microsoft Hololens IT Pro Center (Docs.microsoft.com)
- RealWear HMT Support (Realwear.com)
- RealWear Foresight (Realwear.com)
- Magic Leap Support (Magicleap.care)
Evaluate the Project
Once your end users have been using Vuforia Expert Capture for a few weeks, evaluate how the project went. Gather your team for a meeting or workshop to discuss their experiences and gather their feedback. Look for opportunities to improve on your next project.
Before you begin, complete these steps:
01. Complete project retrospective
After you deploy Vuforia Expert Capture, evaluate how the project went: a project retrospective is your opportunity to reflect on the project. Gather feedback from the project team, employees who helped create the procedures, employees who are using those procedures, and anyone else involved with Vuforia Expert Capture.
Explore questions like:
- Did you achieve the outcome you identified for your use case? For example, if your use case is to decrease training time for new hires, has Vuforia Expert Capture helped your organization do training more quickly?
- What went well throughout the project?
- What was challenging?
- What did you learn?
- How could you have done things differently?
- What are the benefits of using Expert Capture compared to using printed work instructions or previous methods?
- How can you improve for the next project?
- Were there any skillsets missing from the project team?
- Was the timeline appropriate?
- Did you have enough user seats?
The project retrospective helps you identify opportunities to improve processes, reallocate resources, and change your approach. It also helps you communicate positive outcomes as you encourage others to adopt Vuforia Expert Capture.
02. Evaluate devices
Now that employees are using Vuforia Expert Capture to perform their jobs, determine whether the devices they’re using to capture and view procedures are ideal (mobile devices, tablets, eyewear devices, or computers). Get feedback from those who captured procedures and a diverse range of viewers. If possible, observe them using Vuforia Expert Capture in their real-world environment.
Explore questions like:
- Are there any challenges that arise when someone is using the device?
- If using multiple devices, do users prefer one versus another?
- Does the person using the device experience any physical discomfort?
- Are the devices performing as expected?
- If using a mobile device, tablet, or computer; would a hands-free eyewear device work better?
The feedback you receive will help you make decisions about devices for future Vuforia Expert Capture projects. As you grow your program, you may consider adopting additional devices or retiring existing ones.
Measure Business Impact
Revisit the goals and metrics you established for your Vuforia Expert Capture use case. Then, gather the data you need to measure success.
Before you begin, complete these steps:
01. Evaluate metrics
After your Vuforia Expert Capture use case is implemented, revisit the goals and metrics your organization set in your measurement plan. Review your baseline metrics—for example, rework and scrap costs from improved training—then gather current data. If you do not have access to the information you need, contact someone who does, like the line manager who records the cost of rework.
Evaluate your metrics on an ongoing basis, according to your measurement plan.
If your organization uses Vuforia Vantage, you can use Vuforia Insights to analyze data about how end users executed procedures. Any procedures viewed with Vuforia View will not be included in your Vuforia Insights data. This tool is only available to managers and administrators.
Vuforia Insights tracks:
- Who executed a procedure (including username and user role)
- Which version of the procedure the end user executed
- When the end user executed a procedure
- How much time it took the end user to execute the entire procedure
- If the end user entered feedback
- What the end user entered as feedback
Visit the Help Center for more information about how to use Vuforia Insights.
Assess value
Compare the baseline metrics to your current data to determine how much value Vuforia Expert Capture has provided so far. If you are not achieving value, the set of metrics you chose may not be accurate for the use case or there may be another factor affecting the current outcome. Reassess and make any necessary adjustments.
At this point, confirm your goals have not changed from your initial measurement plan. Consider if they are still relevant and adjust accordingly. If you do adjust your goals, give your stakeholders a clear reason why.
02. Share results with stakeholders
Share the results and any adjustments to your goals with the project champion, organizational leaders, execution leads, end users, and other stakeholders. It is important to share these results so all stakeholders are informed about the value of your project. Reviewing these results can also help you reassess and strategize next steps.
Revisit Roadmap and Next Steps
Return to the value roadmap for your Vuforia Expert Capture program. Prioritize your next steps based on the value that your Vuforia Expert Capture procedures contribute to your long-term goal.
Before you begin, complete these steps:
01. Revisit roadmap
As you measure the success of your Vuforia Expert Capture project, revisit your roadmap. Determine your next steps based on the value your project delivered. Plan any adjustments you need to achieve or sustain value for the organization. Consider how you will grow the use of Vuforia Expert Capture in your organization to achieve the most value.
Your roadmap should reflect what’s feasible and needed to grow your Vuforia Expert Capture program. For example, if you plan to start using Vuforia Expert Capture at additional sites or among new users, make sure everyone has the devices and training they need to author and execute procedures.
Review how many user seats you have. Are more teams across your organization going to start using Vuforia Expert Capture? If yes, will you need more Viewers, Authors, Managers, or Administrators? Do you have enough seats?
Revisit your long-term strategy and program goals. Consider if you need to adjust your priorities to meet your goals, and discuss any problems and new insights. Ensure your next steps are clear to all stakeholders to keep the project moving forward.
We also recommend encouraging employees to adopt Vuforia Expert Capture. Are they using Vuforia Vantage or Vuforia View to execute procedures? Can they teach others how to use the technology? Empowering users to teach one another will help integrate the technology in your organization.